If you display a Mimic that contains an embedded Mimic, the embedded Mimic is loaded into memory on the client PC (into an area called the embedded Mimic cache). The file for the embedded Mimic can then be accessed locally by any Mimic that contains the embedded Mimic.
Example:
A Mimic named ‘Pipeline’ contains an embedded Mimic called ‘Tank 1’. A user logs on to a client named ‘VC1’ and displays the ‘Pipeline’ Mimic. The ‘Pipeline’ Mimic is loaded and the embedded ‘Tank 1’ Mimic is stored in the embedded Mimic cache.

The user then displays a Mimic named ‘Section A’. The ‘Section A’ Mimic also contains an embedded version of the ‘Tank 1’ Mimic. To maximize performance and efficiency, the ‘Section A’ Mimic loads the ‘Tank 1’ Mimic from the embedded Mimic cache rather than loading the ‘Tank 1’ Mimic from the server. This means that both the ‘Pipeline’ and ‘Section A’ Mimics use the same local file for the embedded ‘Tank 1’ Mimic instead of loading separate versions of the file from the server.
When you display a Mimic that contains embedded Mimics, the embedded Mimics are stored in the embedded Mimic cache. To help minimize potential loss of performance, ClearSCADA will attempt to remove unused embedded Mimics from the cache if the amount of memory being used reaches the defined cache limit. When the limit is reached, ClearSCADA will remove the embedded Mimic files for any embedded Mimics that are not currently on display, starting with the oldest files first. However, ClearSCADA can only remove the files for embedded Mimics that are not currently being displayed on Mimics.
Mimic performance issues can occur when the embedded Mimic cache is full and ClearSCADA cannot remove any embedded Mimic files as they are in use. In this situation, the Mimics on display may take a long time to load and respond. For example, imagine that a Mimic named ‘Pipeline’ has ten embedded Mimics and these embedded Mimic files are so large that they fill the embedded Mimic cache. The user displays the ‘Pipeline’ Mimic and then navigates to a Mimic named ‘Region 1’. The ‘Region 1’ Mimic contains six embedded Mimics, but as the embedded Mimic cache is full, ClearSCADA has to remove the embedded Mimic files that were used by the ‘Pipeline’ Mimic before it can display the ‘Region 1’ Mimic. The embedded Mimic files used by the ‘Region 1’ Mimic are then stored in the embedded Mimic cache. When the user navigates back to the ‘Pipeline’ Mimic, the embedded Mimics used by that Mimic are no longer in the embedded Mimic cache and so they have to be reloaded and the embedded Mimics used by the ‘Region 1’ Mimic have to be removed. This additional processing means that the Mimics are slower to load, meaning the embedded Mimic cache offers no benefit. To resolve this situation, you need to adjust the defined embedded Mimic cache limit.
We recommend that you only change the embedded cache size if specifically advised to do so by a Schneider Electric engineer. The engineer will usually recommend that you begin by increasing the embedded Mimic cache size from 1000 to around 2000. If this does not resolve the performance issues, the next step would be to increase the embedded Mimic cache size from 2000 to 5000. If this still does not improve performance, the final step would be to increase the embedded Mimic cache size from 5000 to around 10000. The embedded Mimic cache size should not increase beyond 10000 as this could result in around 200MB of actual memory being used (the embedded Mimic files can use up to 20 times more physical memory when loaded and so exceeding 10000 can cause other performance issues, especially if DBServer is running on the same PC).
When making changes to the size of the embedded Mimic cache, you can examine the effects by using the View feature for the embedded Mimic (available on the Options window). This allows you to see whether embedded Mimic files are being loaded in and out of the cache.
If you have been advised to change the embedded Mimic cache size, you will need to use the Options window to make the alterations:
- Display the Options Window.
- Select the General tab.
- In the Miscellaneous section, use the Embedded Mimic Cache Size (KB) spin-box to increase the cache size as advised. Unless there are specific memory limitations, you would not be advised to reduce the cache size below the default setting of 1000 KB.
- Select the OK button to apply the changes.
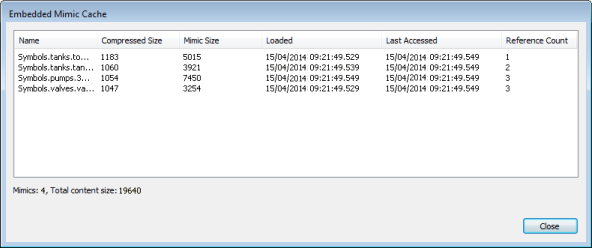
You can view information about the embedded Mimic cache by selecting the View button that is next to the spin-box. This displays the Embedded Mimic Cache window which provides the following information:

- Name—The name of the embedded Mimic. The name includes the parent Group.
- Compressed Size—The size of the embedded Mimic file as stored in the ClearSCADA database. When stored in the database, files are compressed so that they are smaller and the database can store greater numbers of files.
- Mimic Size—The size of the embedded Mimic file before it is compressed. The size of the embedded Mimic file will be larger than both the Compressed Size and the Mimic Size when it is loaded into memory as there is additional processing involved.
- Loaded—The date and time that the embedded Mimic file was last added to the cache.
- Last Accessed—The data and time that the embedded Mimic file was last used on a Mimic on display.
- Reference Count—The number of times the embedded Mimic file is displayed on the Mimics that are currently open on the client PC.