This section explains the procedure that a system administrator should perform to check that any driver-specific settings are correctly configured on each server when a ClearSCADA system is first installed. Such settings are configured using the ClearSCADA Server Configuration Tool. (For information on the driver installation process, see Set up the Drivers on a New ClearSCADA System in the ClearSCADA Guide to Drivers, or see Add a New Driver to an Existing ClearSCADA System in the ClearSCADA Guide to Drivers.)
Several advanced drivers have driver-specific settings. These settings are in addition to the ‘Drivers’ and other global parameters that are common to the drivers on your system (see Use the ClearSCADA Server Configuration Tool to Specify the Common Driver Settings in the ClearSCADA Guide to Drivers). Any driver-specific settings are defined in the corresponding driver-specific section of the ClearSCADA Server Configuration Tool and are explained in the relevant driver guide.
For drivers that have driver-specific settings, use this section in conjunction with the driver-specific documentation. For fields that are common to many advanced drivers, see the rest of this section. For fields that are not described here, see the driver-specific documentation. For File Upload server settings, see Upload Files over the Network.
NOTE: Repeat any changes that you make on each of the servers on your system (except for any Permanent Standby servers, which do not run the drivers).
To access the settings for a particular driver:
- Access the ClearSCADA Server Configuration Tool (see Working with the ClearSCADA Server Configuration Tool in the ClearSCADA Guide to Server Administration).
- Expand the Global Parameters branch of the tree-structure.
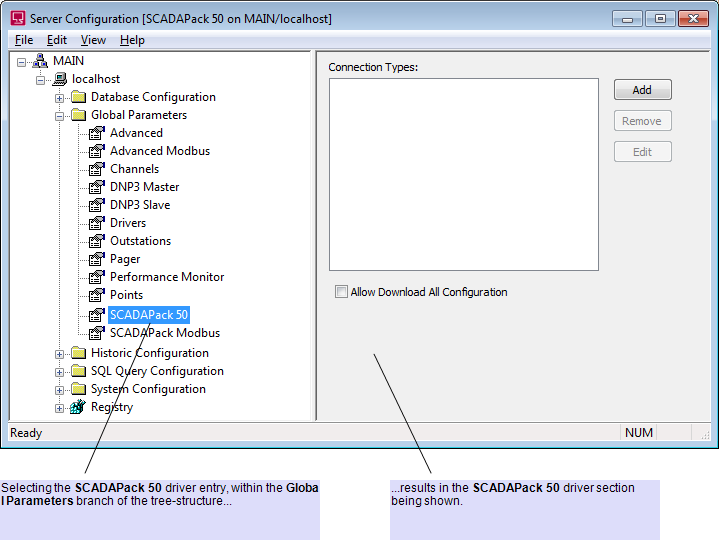
- Within the Global Parameters branch, select the name of the driver for which you want to display the server settings.
The entries that are included in the Global Parameters branch vary, depending on the drivers that are installed on your system. (A separate driver entry is only included if that driver is installed and its server settings differ to those of other drivers.)
The appropriate driver section is displayed.
Example:

- Refer to the appropriate ClearSCADA Driver Guide for information on configuring the settings for that driver. (Depending on the driver, these settings may include those for Defining Communication Delays, and for specifying additional PSTN Connection Types.)
(For features displayed within the ‘Drivers’ section of the tool, see Driver Settings in the ClearSCADA Guide to Server Administration.)
As you configure the settings, the driver entry in the hierarchical list changes color to indicate that changes are being made to the driver configuration.
Example:

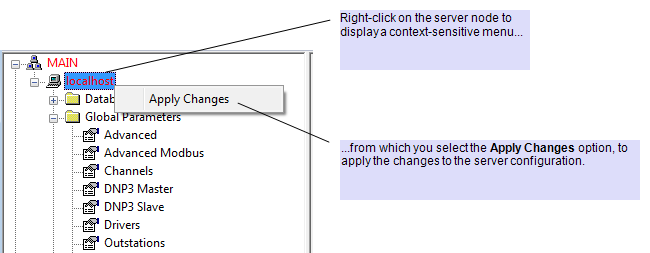
- Right-click on the server (‘node’) entry in the hierarchical list in the ClearSCADA Server Configuration Tool.
A context-sensitive menu is displayed. - Select the Apply Changes option.
The changes are applied to the server configuration.Example:

- If the server is currently running as the main server, restart the driver for the changes to take effect (see Start and Stop a Driver in the ClearSCADA Guide to Server Administration).
NOTE: With some drivers, you need to restart the driver if it is currently running on the server, regardless of whether the server is currently running as the main server. The driver-specific documentation indicates when such a driver restart is required.
With some configuration changes, you may also need to restart the server, in order for those changes to take effect—the driver-specific documentation indicates whether a server restart is required.
- Repeat the above steps for the other drivers on your system.
- Repeat the above steps on each of the servers that are not Permanent Standby servers on your system.