An Advance EWS Group is a logical grouping of points that the Advanced EWS Driver scans at the same interval.
You can attach multiple Advanced EWS Groups to one or more Advanced EWS Server on your system. By specifying different scan rates and offsets within groups, you can enable the Advanced EWS Driver to scan certain data at different intervals and times to other data on the same Advanced EWS Server.
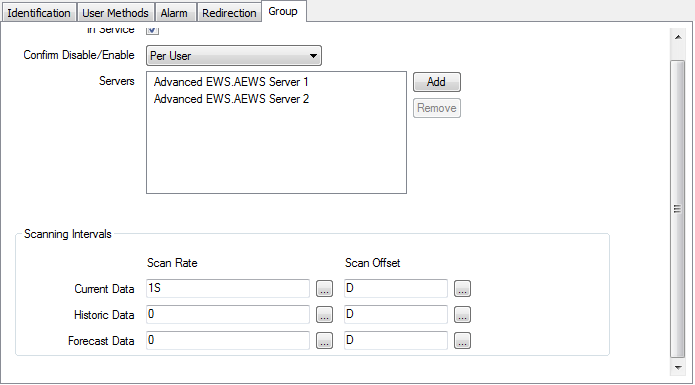
Configure the scanner’s properties using the Advanced EWS Group Form. Use the fields on the Group tab to define the driver-specific properties of a group

- In Service—Use to specify whether the Advanced EWS server is active or inactive, (see Placing an Item In Service in the ClearSCADA Guide to Core Configuration).
- Confirm Disable/Enable—Users with the required permissions can disable a group that is In Service, or enable a group that is not In Service.
Use the Confirm Disable/Enable combo box to specify whether a confirmation dialog box is displayed whenever an operator requests that this group is disabled or enabled (see Requesting Confirmation of Action Requests in the ClearSCADA Guide to Core Configuration).
- Servers—Use the Add button to select the Advanced EWS servers that you want to associate with this group. This allows you to configure groups in multi-server configurations.
Use the Remove button to disassociate any selected Advanced EWS server from the group.
- Scanning Intervals—Use this section to define the scanning rates for the following data types:
- Current Data—Determines the frequency with which the driver updates the server with the current values for the points associated with the group.
- Historic Data—Determines the frequency with which the driver updates the server with the historic values for the points associated with the group.
- Forecast Data—Determines the frequency with which the driver updates the server with the forecast values for the points associated with the group.
For each item you can define the following two properties:

- Scan Rate—Specify the frequency with which the group scans its points for data that has changed. Enter the rate in the OPC Time Format, for example 30S for a 30 second scan rate. You can enter the value directly in the field, or use the Interval Window (accessed via the field’s browse button) to specify the required rate.
- Scan Offset—Use this field to specify the actual time at which a scan takes place. Scan times are synchronized with the server’s system clock whenever the driver is restarted. The offset is used in conjunction with the scan rate to determine when each scan occurs.
Enter the offset in the OPC Relative Time Format. You can enter the value directly in the field, or use the Offset Window (accessed via the field’s browse button) to specify the required value.
It is advisable that the scan rate and offset are fully divisible, so that scan times occur at readily recognizable times.
Example:
An Advanced EWS Group has this configuration:
Scan Rate: 15S
Scan Offset: M (‘the beginning of the current minute’)The driver is started as the system clock shows a time of 14:19:25.
Using the group configuration, ClearSCADA determines that the group should start its first scan at 14:19:30 (30 seconds past the beginning of the current minute (as the first 15-second interval after the beginning of the current minute is already in the past)).
The next scan occurs at 14:19:45 (15 seconds after the first scan, as specified by the Scan Rate property). Thereafter, scans occur at 15-second intervals (on the minute, and at 15, 30, and 45 seconds after each minute).
Properties on other tabs are common to many database items, see Tabs That are Common to Many Configuration Forms in the ClearSCADAGuide to Simple Drivers.
For information on the minimal amount of configuration that you can undertake to produce a functional EWS Group in ClearSCADA, see Minimum Configuration.