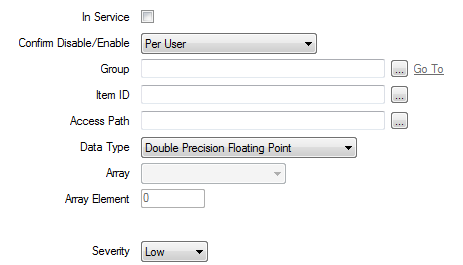
This section describes how to use the fields at the top of the <Point> tab to configure the general point properties of an Advanced OPC point.

- In Service—Use to specify whether the point is active or inactive (see Placing an Item In Service in the ClearSCADA Guide to Core Configuration).
- Confirm Disable/Enable—Users with the required permissions can disable a point that is In Service, or enable a point that is not In Service. Such actions are carried out using the Disable Point and Enable Point pick actions.
Use the Confirm Disable/Enable combo box to specify whether a confirmation dialog box is displayed whenever an operator requests that this point is disabled or enabled (see Requesting Confirmation of Action Requests in the ClearSCADA Guide to Core Configuration).
- Group—Use to specify the Advanced OPC group that defines the update rate for points associated with the group. Select the browse button to display a Reference browse window, and select the required group from the window, (see Configure an Advanced OPC Group).
- Item Id—Use to specify the unique identifier for the item in the OPC DA server. Select the browse button to display a Reference browse window, and select the required item within the OPC DA Server, from the window.
- Access Path—Use this to enter a preferred data path for the OPC DA server to use to retrieve the data for the point item. Select the browse button to display a browse window, and navigate to the OPC DA server to select the preferred path.
- Data Type—Use to specify the type of data that is requested from the OPC DA server for the point item, see List of OPC Data Types.
- Array—Use this to define how the data is retrieved from the OPC DA item, with an array data type.
The following four array types are available for all types of points with an array data type:
- None (Single Value)— this array type is only available when the Data Type is Canonical.
- Absolute Element—this allows you specify an absolute element position within the array.
- Relative to First Element—this allows you to specify an element relative to the first element (0 = first element, 1 = second element, and so on).
- Relative to Last Element—this allows you to specify an element relative to the last element (0 = last element, 1 = penultimate element, and so on).
The following array types are only available for Analog points with an array data type:
- Total—this adds the value of all the elements within the array to return a total.
- Minimum—this returns the smallest element value (also available for Time points with an array data type).
- Maximum—this returns the largest element value (also available for Time points with an array data type).
- Average—this returns the arithmetic mean of all the elements.
NOTE:ClearSCADA does not support the control of points with an array data type.
- Array Element—Use this to define which element of the array the value is retrieved from, when using the Absolute or Relative array types.
- Severity—Use this combo box to define the severity of any non-state events or alarms for the point.
- For more information on severities, see Defining Severities in the ClearSCADA Guide to Core Configuration.
- Area of Interest—This field is only displayed if the Area of Interest feature is enabled on your system. Use the field to specify the Area of Interest with which any non-state related point alarms or events are to be associated (see Assign a Different Area of Interest to an Item's Alarms and Events in the ClearSCADA Guide to Core Configuration).