For E-mail/Voicemail Redirection use an E-Mail Action.
To successfully redirect an alarm by forwarding the details in an e-mail:
- The servers on your system have to be configured to send e-mail messages (see E-Mail Settings in the ClearSCADA Guide to Server Administration).
- The users to which you want to send e-mails must have:
- Valid e-mail accounts (see Define the E-Mail, Pager, and Voicemail Contact Settings for a User in the ClearSCADA Guide to Security)
- Web access if they are to acknowledge alarms via e-mail and/or access the item’s Alarm View from a hyperlink embedded in the e-mail (see Define whether a User can Access the System via ViewX, WebX or Phone in the ClearSCADA Guide to Security).
- The security permissions needed to acknowledge the alarms (see Allocating Security Permissions in the ClearSCADA Guide to Security).
- If e-mails are to be sent to multiple users:
- Suitable User Groups and/or User Rosters have to exist in the database (see User Groups in the ClearSCADA Guide to Security, and see Configure a User Roster in this guide)
- Each user has to be a member of the relevant User Group (see Associate a User with a User Group in the ClearSCADA Guide to Security).
- Each user in a User Group and/or User Roster has to be configured to receive the e-mails via the same E-Mail Contact number (either 1, 2, 3, or 4) (see Define the E-Mail, Pager, and Voicemail Contact Settings for a User in the ClearSCADA Guide to Security).
- If users are to acknowledge alarms by entering an Acknowledgment Keyword in the subject line of the reply to the e-mail, that Acknowledgment Keyword has to be specified on your system’s servers (see E-Mail Settings in the ClearSCADA Guide to Server Administration).
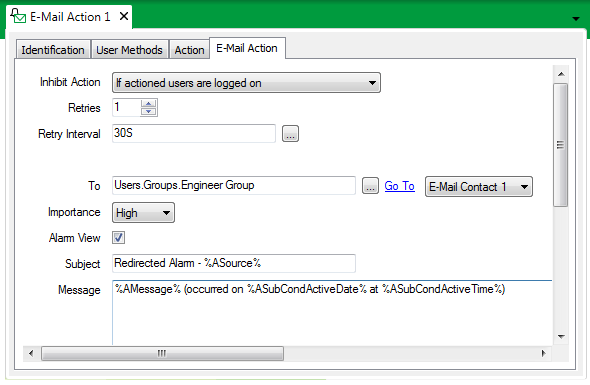
Use the E-Mail Action Form’s E-Mail Action tab to define:
- Whether the e-mail should only be sent to recipients that are logged on to the ClearSCADA system
- The recipient(s) of the e-mail
- The contact account to which to send the e-mail
- The importance of the e-mail
- The e-mail’s subject
- The e-mail’s content.
Configure each E-mail Action so that the correct engineer receives the e-mail, and the e-mail contains the relevant information. Each e-mail is customized for the individual recipient. This includes the overall format of the e-mail, which can be sent in either:
- Plain text format (see Plain Text Format E-Mails)
- HyperText Markup Language (HTML) format (see HTML Format E-Mails).
You specify the required e-mail format on each user’s User Account Form (see Define the E-Mail, Pager, and Voicemail Contact Settings for a User in the ClearSCADA Guide to Security). Other properties—such as a User Account’s Locale and Date Format—further determine how an e-mail is customized for an individual recipient.
To define an E-mail Action’s message:
- Display the Action Form for the E-mail Action that you want to configure.
- Select the E-Mail Action tab.

- Use the Inhibit Action combo box to define under what circumstances ClearSCADA should be inhibited from sending the e-mail:
- Never—Send the e-mail to each of the users listed in the To field, regardless of whether those users are logged on to the system.
- If actioned users are logged on—Send the e-mail to those users listed in the To field, who are not logged on to the system.
- If actioned users are logged on from a WebX client—Send the e-mail to those users listed in the To field, who are not logged on to the system from a WebX client.
- If actioned users are logged on from a ViewX client—Send the e-mail to those users listed in the To field, who are not logged on to the system from ViewX.
- Use the Retries field to specify the maximum number of times that ClearSCADA will attempt to re-send an e-mail if the initial attempt is unsuccessful. Use this field in conjunction with the Retry Interval field (see below).
- Use the Retry Interval field to specify the duration between attempts to re-send an e-mail. Specify the required interval in the OPC Time Format, for example 30S for a 30-second interval.
You can enter the value directly in the field, or use the Interval Window (accessed via the field’s browse button) to specify the required interval.
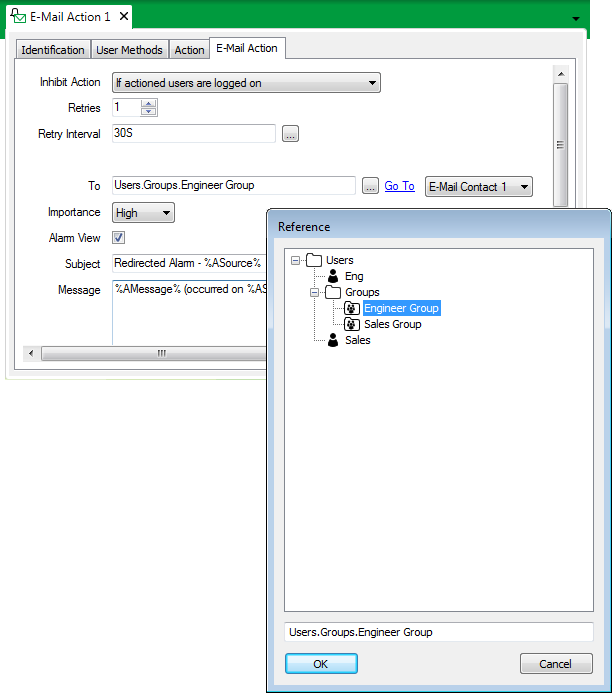
- Select the browse button adjacent to the To field.
A Reference browse window is displayed.
- Use the Reference browse window to locate the user name of the required recipient user.
- Select the required User name, User Group, or User Roster. (For further information, see User Accounts in the ClearSCADA Guide to Security; see User Groups in the ClearSCADA Guide to Security; or see Configure a User Roster.)
NOTE: Only users with an e-mail address are valid (see Define the E-Mail, Pager, and Voicemail Contact Settings for a User in the ClearSCADA Guide to Security).
- Select the OK button.
The Reference browse window is closed and the selected user name is shown in the To field. - Use the E-Mail Contact combo box to specify to which e-mail contact account the message is to be sent. (Each user can be allocated up to four e-mail addresses through which they can be contacted. Each address is allocated to a separate E-Mail Contact Account—see Define the E-Mail, Pager, and Voicemail Contact Settings for a User in the ClearSCADA Guide to Security.)
 WARNING
MISDIRECTED ALARM NOTIFICATIONS
When configuring ClearSCADA to redirect alarms to a User Group or User Roster, ensure that each user account in that User Group or User Roster is configured to receive messages via the specified E-Mail Contact number (1, 2, 3, or 4).Failure to follow these instructions can result in death, serious injury, or equipment damage. - Use the Importance combo box to define the priority of the e-mail. When the recipient receives the e-mail, it will display its importance—the recipient can use the importance to determine which e-mails take priority.
Choose from High, Normal, and Low.
- Use the Alarm View check box to specify whether the e-mail is to include a hyperlink to the relevant Alarm View (if such a view exists for the item that is in alarm).
Select the Alarm View check box to include a hyperlink. The format of the hyperlink varies, depending whether the e-mail is in Plain Text or HTML format (see Plain Text Format E-Mails, and see HTML Format E-Mails). For an example of each type of hyperlink, see Send an E-Mail in Different Formats to Different Users. In order to access the Alarm View using the hyperlink and display that view in a Web browser, the intended recipient(s) need to have Web access (see Define whether a User can Access the System via ViewX, WebX or Phone in the ClearSCADA Guide to Security).
Clear the check box if no hyperlink is required. This option might be preferable, for example, for security purposes, or if the language used on your system includes characters that are not supported by hyperlinks in Plain Text e-mails (see Plain Text Format E-Mails).
- Enter the title of the e-mail in the Subject field. The title can contain both plain text and trip sequences (see Trip Sequences Supported by Redirection Actions).
Regardless of the E-Mail’s format, the Subject is sent as 7-bit US-ASCII, a character set to which limitations apply (see Plain Text Format E-Mails).
- Select the Message field.
- Enter the e-mail message. This can include trip sequences (see Trip Sequences Supported by Redirection Actions).
If the e-mail is being sent to telephony software, also see E-mail/Voicemail Redirection.
If any of the recipients can receive HTML format e-mails, you can include HTML tags and character entities (such as <) in the e-mail message. Any tags and character entities have to conform to the HTML 4.0 Transitional standard (see HTML Format E-Mails).
NOTE: If the Send Using Plain Text Only feature is activated on the recipient’s user account, the recipient will only be sent e-mails in plain text format (see Define the E-Mail, Pager, and Voicemail Contact Settings for a User in the ClearSCADA Guide to Security).
- Save the configuration (see Saving Configuration Changes in the ClearSCADA Guide to Core Configuration).
When you have configured the required E-Mail Actions, you can proceed to Configure Alarm Redirections for an Item or Group.