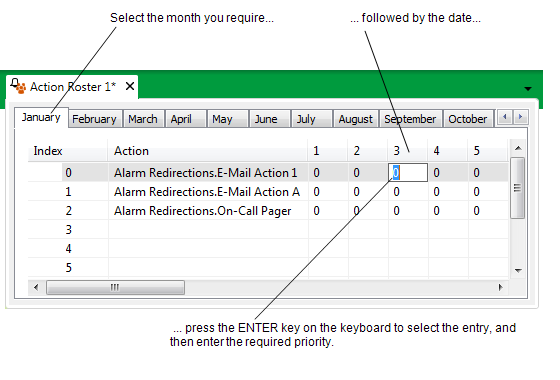
After you Add Redirection Actions to the Action Roster, you need to define the priority of those action(s).
By default, when you add a redirection action to a roster, the date fields on the roster calendar for that action are populated with the default priority of zero. Priority 0 informs ClearSCADA not to trigger the redirection action.
For any action that ClearSCADA is to trigger, you need to define a priority other than zero.
Actions are triggered on the roster in priority order, with the highest priority (for example, Priority 1) triggering immediately. Once those action(s) have triggered, ClearSCADA takes into account the Action Delay time specified on the Action Roster Form (see Display and Configure Properties on the Action Roster Form), and only triggers the actions with the next priority once the delay time has elapsed.
To change the priority of an alarm redirection on a roster:
- Select the tab that corresponds to the month for which you want to change the alarm redirection priority.
- In the row corresponding to the alarm redirection for which you want to change the priority, select the required date so that it is highlighted. (Use the horizontal scroll bar if necessary.)
- Press the ENTER key on the keyboard.
The priority entry for that date is selected ready for changing. - Enter the priority that you require (1 being the highest, 0 for any redirection action that ClearSCADA is not to trigger).
- Repeat the procedure for any other redirection actions on the roster.
- Save the configuration (see Saving Configuration Changes in the ClearSCADA Guide to Core Configuration).

For an example of how priorities can be used to trigger actions in a particular order, see Example of Action Roster Configuration.
When you have defined the priority of each action on the roster, you can proceed to Configure Alarm Redirections for an Item or Group.