Alarm displays only include those alarms to which a user and ViewX or WebX client have access. Additionally, a Default Alarm Filter can optionally be specified on a per user basis. Such a Default Alarm Filter can be used to further restrict the entries that are included in Alarms Lists and the Alarm Banner, to just those alarms that are of interest to that particular user. A system administrator or high-level engineer typically configures any such Default Alarm Filter whenever a new User Account is added to ClearSCADA, by specifying an Alarm Filter String for that user (see Specify a Default Alarm Filter).
If required, you can use the Filter window to temporarily filter the entries further, so that only a subset of alarm entries is included in the Alarms List or Alarm Banner. For example, you might want to temporarily filter an Alarms List so that it only provides information on alarms that have High severity. If your User Account allows you to filter entries in the Alarm Banner, ClearSCADA might be configured to automatically disregard any such filtering as soon as your User Account’s Banner Filter Timeout period is exceeded.
If your User Account is assigned a Default Alarm Filter, you can also use the Filter window to temporarily adjust the default filters, so that the alarm displays include further alarms to which your User Account and ViewX or WebX client have access.
The instructions below tell you how to use the Filter window to temporarily filter the entries in an Alarms List or the Alarm Banner.
To display the Filter window for the Alarm Banner on a ViewX client:
- Right-click on the Alarm Banner.
A context-sensitive menu is displayed. - Select the Filter option.
(This option is only available if the ability to filter Alarm Banner entries is enabled on your User Account.)
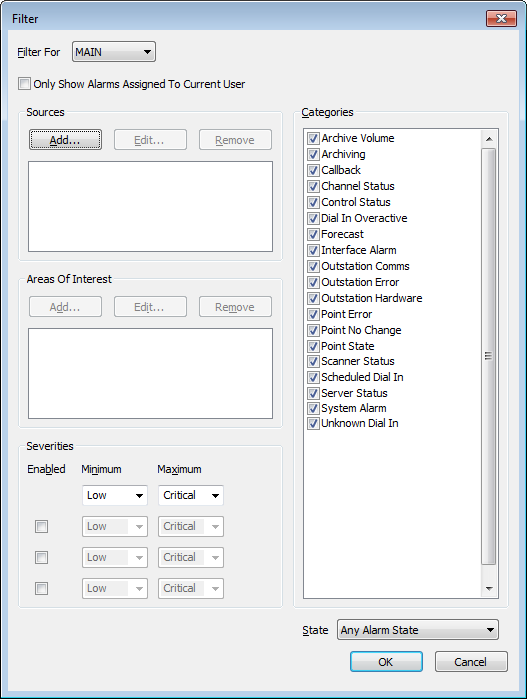
The Filter window is displayed.
To display the Filter window for a currently open Alarms List on a ViewX client:
Either:
- Right-click on the Alarms List.
A context-sensitive menu is displayed. - Select the Filter option.
The Filter window is displayed.
Or:
- Press the F7 function key.
The Filter window is displayed.
To display the Filter window for a currently open Alarms List on a WebX client:
- Right-click on the Alarms List.
A context-sensitive menu is displayed. - Select the Filter option.
The Filter window is displayed.
The Filter Window

Use the Filter window to perform any combination of the following:
- Use the Filter for combo box to specify the ClearSCADA database on which you want to filter the alarms see Specify the ClearSCADA Database for which you want to Filter Alarms . This applies only to the Alarm Banner or the client-wide Alarms List on ViewX clients that can access multiple ClearSCADA databases.
- Use the Only Show Alarms Assigned to Current User check box to display the alarms to which the current user or ViewX workstation is assigned responsibility see Filter Alarms to Show Only Those that are Assigned to the Current User or ViewX Workstation. This applies only if the Set Responsibility Action is used.
- Use the Sources section to filter the alarms to those that are associated with specific Groups, or database items (see Filter Alarms by Alarm Source).
- Use the Areas of Interest section to filter the alarms by Area of Interest (see Filter Alarms by Area of Interest).
- Use the Severities section to filter the alarms by severity range (see Filter Alarms by Alarm Severity).
- Use the Categories section to define which categories of alarm are shown see Filter Alarms by Alarm Category. The categories vary, depending on the drivers that are installed on your system.
- Use the State combo box to filter the alarms by alarm state (see Filter Alarms by Alarm State).
Further Information
Reset the Filters on an Alarms List or the Alarm Banner.
Specify a Default Alarm Filter for an Alarms List embedded on a Mimic: see Filter an Embedded Alarms List in the ClearSCADA Guide to Mimics.