The Example Projects database is installed automatically as part of a Full installation or Typical Server and Clients installation.
NOTE: The Example Projects database is automatically imported into your installation if there is no existing database present.
If an existing database is present, then the Example Project database files are copied to your system, but are not imported. You can import the Example Project database at a later date if required.
UNEXPECTED BEHAVIOR OF APPLICATION
The Example Projects database can only be installed at Root Group level within a database. It contains security settings, which might affect the configuration of an existing database.
We recommend that the Examples Project database be installed as a standalone server and used only for training and in conjunction with the Tutorial material.
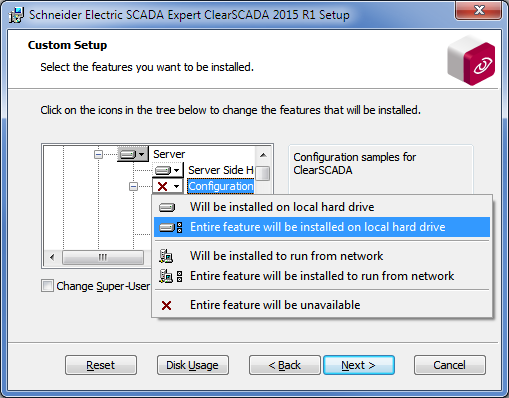
If your installation choice for ClearSCADA does NOT include the Examples Projects database as part of the installation you need to select a Custom installation (see Choose Setup Type) or import the Example Project database when your installation is complete. When you choose Custom on the Choose Setup Type ‘page’, the Custom Setup ‘page’ is displayed.
Use the ‘tree’ on the left-hand side of the ‘page’ to choose and expand the Server branch and locate the Configuration Samples component.

Right-click on the branch and select the Entire feature will be installed on local hard drive option. The selected component and all of its sub-components will be installed.
NOTE: The Example Projects database is automatically imported into your installation if there is no existing database present.
If an existing database is present, then the Example Project database files are copied to your system, but are not imported. You can import the Example Project database at a later date if required.
When you have completed the installation of ClearSCADA, (see Create a Super User Account), use the following procedure to complete the setup of the Example Projects:
- Check that the ClearSCADA server is running. To do this, look for the ClearSCADA icon in the Windows task bar. The ClearSCADA icon should be blue, like this:

If the ClearSCADA icon is a different color, this indicates a different server state (for more information, see The Server Icon in ‘Working with the ClearSCADA Server Configuration Tool’ in the ClearSCADA Guide to Server Administration).
If the ClearSCADA icon is not shown, the Server Icon application may not be running. You can run it manually by selecting Start>All Programs>Schneider Electric>StruxureWare SCADA Expert>ClearSCADA>Server Icon in Windows.
- Once the Server is running, start ViewX:
- Double-click on the ViewX desktop icon.
Or:
- In Windows, select Start>All Programs>Schneider Electric>StruxureWare SCADA Expert>ClearSCADA>ViewX.
- Double-click on the ViewX desktop icon.
- Once ViewX has started, log on to ViewX using the Super User account.
For a new installation this is the only user available, see Super User Account.
You can now Enable Example User Accounts.