The quickest way to uninstall ClearSCADA is to uninstall the program from the Windows Control Panel. However, this leaves various ClearSCADA files and settings in place. While these files and settings have very little effect on system resources, you may wish to completely remove ClearSCADA from a PC. To do this, you need to remove connections, DSNs, and registry key settings.
To completely remove ClearSCADA from a computer:
- Log on as a Windows user that has Administrator level permissions.
- Remove all ClearSCADA client connection settings.
- Run the ClearSCADA Configure Connections application. (This can be found in Start>All Programs>Schneider Electric>StruxureWare SCADA Expert>ClearSCADA by default). If you are prompted to allow the ClearSCADA Client Configuration Tool to make changes to your computer, select Yes.
The ClearSCADA Client window is displayed.
- Select a ClearSCADA client from the list, and then use the Remove button to delete it.
- Repeat step ii until the ClearSCADA Client window has no clients listed.
- Select the Close button.
- Run the ClearSCADA Configure Connections application. (This can be found in Start>All Programs>Schneider Electric>StruxureWare SCADA Expert>ClearSCADA by default). If you are prompted to allow the ClearSCADA Client Configuration Tool to make changes to your computer, select Yes.
- Remove all ClearSCADA DSN settings.
- Access Control Panel>Administrative Tools in Microsoft Windows.
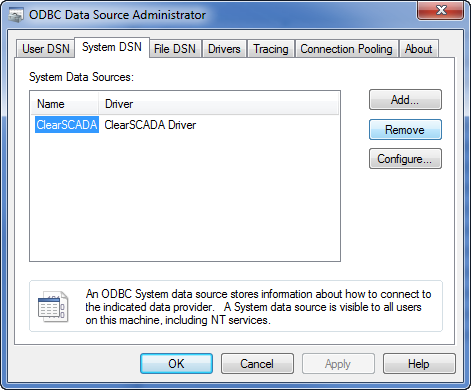
- When the Administrative Tools window is displayed, double-click on Data Sources (ODBC) to display the ODBC Data Source Administrator window.
- Select the System DSN tab.

- Select a ClearSCADA system from the list, and then select the Remove button. Confirm that you want to remove the system DSN by selecting Yes at the prompt.
- Repeat the previous step for each ClearSCADA system.
- Select the OK button when you have removed all of the ClearSCADA system DSNs from the list.
- Use Windows Control Panel to access the Uninstall or Change a Program window. For more information on how to uninstall a program in Windows, please refer to your Windows documentation.
- Choose to Uninstall ClearSCADA. If you are prompted to allow ClearSCADA to update software on your computer, select Yes.
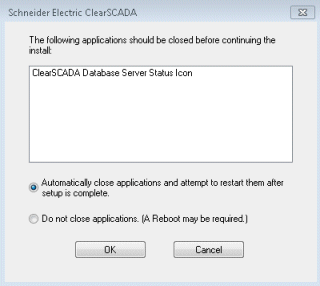
The ClearSCADA uninstallation process begins.If there are any programs running that need to be closed for the uninstallation process to continue, a prompt is displayed, like this:

Choose to close any applications that need to be closed during the uninstall process.
- When ClearSCADA has been uninstalled, use Windows Explorer to delete the contents of the following directories (default locations are shown here):
- C:\ Program Files\Schneider Electric\ClearSCADA
- C:\ Program Files (x86)\Schneider Electric\ClearSCADA
This applies to 64-bit Windows only
- C:\ProgramData\Schneider Electric\ClearSCADA
This removes the database, logs, caches, and so on.
- C:\Users\<UserName>\AppData\Local\Schneider Electric\ClearSCADA
You need to remove the ViewX settings files for each user that has run ViewX.
NOTE: NOTE: If your ClearSCADA system was installed into non-default locations, you will need to remove the files from the alternate locations instead.
- C:\ Program Files\Schneider Electric\ClearSCADA
- In Windows, run RegEdit. (For more details, please refer to your Windows documentation). If prompted to allow RegEdit to make changes on your computer, select Yes.
 CAUTION
PROBLEMS WITH THE OPERATING SYSTEM
Only experienced Windows administrators should use RegEdit to modify the registry keys. Incorrectly adjusting registry settings could cause serious problems to the operating system, which may require the operating system to be reinstalled. In some instances, registry errors cannot be solved.Failure to follow these instructions can result in injury or equipment damage. - In RegEdit, delete the following keys from the registry:
- HKEY_LOCAL_MACHINE\SOFTWARE\Schneider Electric\ClearSCADA
- HKEY_LOCAL_MACHINE\SOFTWARE\Schneider Electric\ClearSCADA-<nnnn>
Where <nnnn> represents an instance of ClearSCADA. This only applies if you have used Database Manager to create multiple registry instances of ClearSCADA. You need to remove each ClearSCADA registry instance.
- HKEY_LOCAL_MACHINE\SOFTWARE\Wow6432Node\Schneider Electric\ClearSCADA
This only applies if your computer runs a 64-bit version of Microsoft Windows.
- HKEY_CURRENT_USER\Software\Schneider Electric\ClearSCADA
You need to remove this key for each user that has run ClearSCADA.
If prompted to ‘Confirm Value Delete’, select Yes to remove the registry key.
NOTE: The ClearSCADA uninstaller may remove one or more of the registry keys automatically. You only need to delete the registry keys listed above if they are in place on your computer.