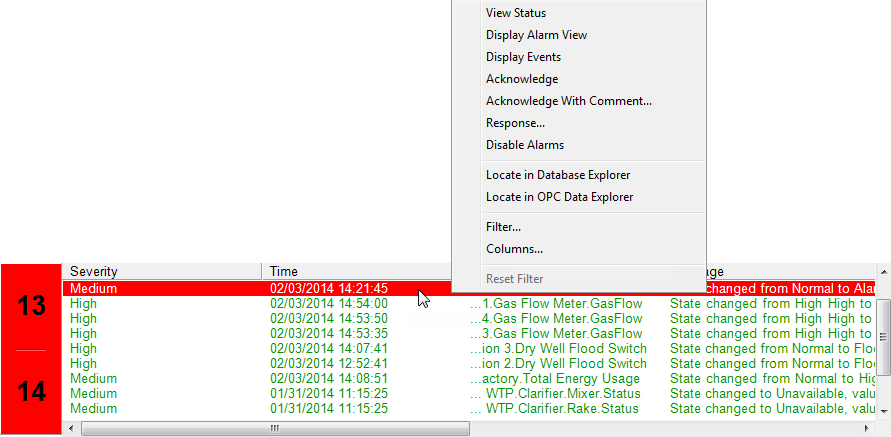
When ClearSCADA detects a problem on your system, it raises an alarm which is shown in the Alarm Banner (and is also included on Alarms Lists). The Alarm Banner provides information about currently active alarms on your system and also provides access to the various alarm response features. It is shown at the bottom of the ViewX display by default (but can be moved or hidden from view if required).

When you imported the Example Projects (see Import the Example Projects), some of the imported items caused a number of alarms to be raised. If you look at the Alarm Banner, you will see information about each of these alarms, including:
- Severity—The importance of the alarm.
- Time—The time at which the alarm was raised ('triggered')
- Source—The full address of the database item for which the alarm has been raised. The database item is the source of the alarm.
- Message—A brief description of the condition that caused the alarm to be raised.
- Category—Indicates the type of alarm, for example, the points that are in alarm on your system have a Category of Point State (as the points’ values have caused the points to change state, which has triggered alarms).
- Suppressed Alarm Count—ClearSCADA has an alarm suppression feature that allows the alarms of database items to be hidden temporarily. This is useful when you want to create a hierarchy of alarms, with the visibility of alarms on ‘child’ items being dependent on the alarms of ‘parent’ items.
The Suppressed Alarm Count information on the Alarm Banner shows the number of alarms that are suppressed on ‘children’ of the ‘parent’ item. (This should be 0 at this stage of the tutorial).
For further information on Alarm Suppression, see Alarm Suppression in the ClearSCADA Guide to Alarms.
- Area of Interest—ClearSCADA has an Area of Interest feature that allows you to limit the alarms and events that are shown to a user. Typically, the Area of Interest feature is implemented so that users can only see alarms that are relevant to their geographical location or responsibilities.
The Area of Interest information on the Alarm Banner indicates whether an alarm is associated with a defined Area of Interest - it either shows the name of the Area of Interest or World (World means the alarm is not associated with any Areas of Interest, and can be renamed if required).
For more information about Areas of Interest, see Restrict Alarm and Event Access to Specific Areas of Interest in the ClearSCADA Guide to Core Configuration.
Alarms in ClearSCADA are color coded, and so the alarms are displayed in different colors. The default color scheme is Red (flashing) for unacknowledged, uncleared alarms, Green (flashing) for unacknowledged cleared alarms, and Brown for acknowledged uncleared alarms.
If you right-click on an alarm in the Alarm Banner, a context sensitive menu for the alarm is displayed. The menu contains options that you can use to respond to alarms, including Acknowledge and Response

On a 'live' system, operators will use these alarm response options to inform other system users that they are aware of an alarm condition and are trying to resolve the situation.
To show you how easy responding to alarms is, we want you to Acknowledge the alarm for the Total Energy Usage point:
- In the Alarm Banner, use the Source column or the Message column to identify which alarm relates to the Total Energy Usage point.
- Right-click on the alarm, then select the Acknowledge option from the context sensitive menu. This informs ClearSCADA and other users that you have seen the alarm.
As the alarm is an Unacknowledged Cleared alarm, as soon as you select the Acknowledge option, the alarm will be removed from the Alarm Banner. This is because the cause of the alarm is no longer in effect and so the alarm has already been cleared. The alarm only remained on the system because no user had acknowledged the alarm. ClearSCADA only removes an alarm when the cause of the alarm has been resolved and a system user has confirmed that they have seen the alarm (this means alarms are not raised and cleared automatically, which could result in users being unaware of intermittent alarm conditions).
The Alarm Banner is just one of several displays that you can use to access alarm response features. It is also possible to access these features on Alarms Lists, specially configured Mimics, and even on the context sensitive menus for individual items.
Now that you have familiarized yourself with the general layout of the ViewX interface, you can choose to Test Your Knowledge on the ViewX Interface, or you can proceed to the next section of the tutorial: Configuration Basics.
Further Information
Alarm Banner and alarm response actions: see the ClearSCADA Guide to Alarms.