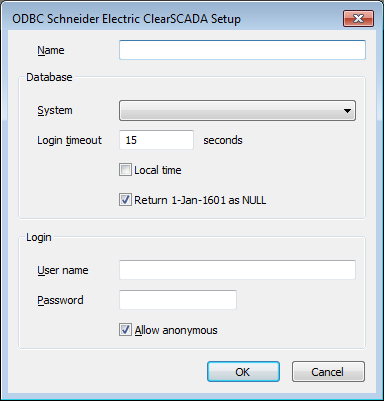
When you have run the ODBC Data Source Administrator Tool (64-bit or 32-bit as appropriate), you can use its settings to configure ODBC access:
- Select the System DSN tab.
- Select the Add button to display the Create New Data Source window.
- Select ClearSCADA Driver then select the Finish button.
The ODBC ClearSCADA Setup window is displayed.
- Use the ODBC Setup window to define these settings:
- Name—Define the name for the DSN. This can be any name of your choosing. For more information, Define the Name for the Data Source.
- System—Use to choose the ClearSCADA system to which your Third Party ODBC Client will connect via the connection Define the ClearSCADA System to which the Data Source will Connect.
- Login Timeout—Use the Login Timeout field to define the amount of time that the system will wait for a user to log on Define the Log On Timeout for the ODBC Connection
- Local Time—Use to define whether the ODBC driver converts the time values from ClearSCADA into Local Time or continues to use their UTC times Define whether ClearSCADA Converts Time Stamps to Local Time.
- Return 1-Jan-1601 as NULL—Use to define whether ClearSCADA reports time and date values that have not yet been set as 1-Jan-1601 00:00:00 or as null Define whether ClearSCADA reports 1-Jan-1601 00:00:00 as Null
- User Name—Use to define the name of the ODBC Client user account that provides full access to ClearSCADA. We recommend that you leave the User Name blank, so that ClearSCADA User accounts are required to access the ClearSCADA database. For more information, Define the Login Settings for a Data Source.
- Password—You can use the Password setting to define the password that is used in conjunction with the ODBC Client User Name (see above). We recommend that you leave the Password blank, so that ClearSCADA User accounts are required to access the ClearSCADA database. For more information, Define the Login Settings for a Data Source.
- Allow Anonymous—Use to define whether Guest users on the ODBC Client can access the ClearSCADA database. We recommend that you clear the check box so that Guest users do not have access to ClearSCADA via ODBC. For more information, Define the Login Settings for a Data Source.
- Select the OK button to confirm the settings and close the ODBC Schneider Electric ClearSCADA Setup window.
- Select the OK button to close the ODBC Data Source Administrator window.
NOTE: Alternatively, you can setup the ODBC access via the User DSN tab, but this will only allow one specific user to access the ClearSCADA database via ODBC. The System DSN settings can be used to provide users with access to the ClearSCADA database via ODBC.
If you create a user DSN on a computer running 64-Bit Windows, you need to be aware that there are differences between the ODBC Administrator Tools: The 32-bit version of the tool shows 32-bit system DSNs, 32-bit user DSNs, and 64-bit user DSNs, whereas the 64-bit version shows 64-bit system DSNs, 32-bit user DSNs, and 64-bit user DSNs.
NOTE: You can delete a System DSN by selecting it in the list on the System DSN tab and selecting the Remove button. You can also alter the System DSN configuration by selecting the System DSN in the list and selecting the Configure button.
To test that you have configured the data access connection correctly, we suggest that you set your Third Party ODBC application to issue an SQL query on the ClearSCADA server (refer to your Third Party ODBC application documentation for more details). An example query that would work from within MSQuery using SQL-92 standard language is:
'SELECT Name FROM CDBUser'
If the Third Party ODBC client connection has been installed and configured correctly, this will return a result set containing the names of every user in the ClearSCADA database.
Further Information
Time Zones: see Time Zone Support in ClearSCADA in the ClearSCADA Guide to Core Configuration.