By default, when the Area of Interest feature is enabled on a ClearSCADA system, every alarm or event that can be generated on the system is assigned to the World Area of Interest.
To limit alarm and event access for particular areas of the system, you can add further Area of Interest level(s) to your system, and assign particular alarms and events to those Areas of Interest. You can only add further Areas of Interest if your user account provides access to the Areas of Interest Bar and you have been allocated the Configure Database permission.
To add an Area of Interest to your system:
- Display the Areas of Interest Bar

- Right-click on the entry to which you want to add a new Area of Interest. (For example, the World Area of Interest.)
A context sensitive menu is displayed. - Select the New Area of Interest option.
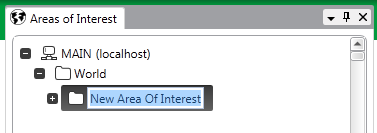
A new Area of Interest is added to the Bar. The entry is highlighted, ready for you to define its name.
- Give the Area of Interest a suitable name, taking into account the ClearSCADA Naming Restrictions.
- Repeat steps 2 to 4 for any other Areas of Interest that you want to add to your system.
Be aware that Areas of Interest are hierarchical—you can configure multiple Area of Interest levels on your system. Users that are assigned a particular Area of Interest are automatically given access to any Areas of Interest that exist within that area.
Further Information
Specify the Default Area of Interest for your System
Assign a Different Area of Interest to an Item’s Alarms and Events
Restrict Alarm Redirection to Alarms that are Assigned a Specific Area of Interest
Assign a Different Area of Interest to a User
Reorganize the Areas of Interest on your System