To create and configure an item in the database, you need to be logged on via a User Account that:
- Has the Configure Database feature enabled. This is enabled via the User Form (see User Accounts in the ClearSCADA Guide to Security).
- Is allocated the relevant permissions, such as the Configure permission for the Group to which you want to add a database item, or the item that you want to configure. Permissions are allocated via the Security window (see Allocating Security Permissions in the ClearSCADA Guide to Security).
You also need to be aware of the Database Structure and Database Security requirements of your system, and have undertaken any necessary Preparation.
You can access the database structure within ViewX by using the Database Bar. This is one of the Explorer Bars (see Explorer Bars in the ClearSCADA Guide to ViewX and WebX Clients).
To add an item to the database:
- Display the Database Bar (see Display an Explorer Bar in the ClearSCADA Guide to ViewX and WebX Clients).
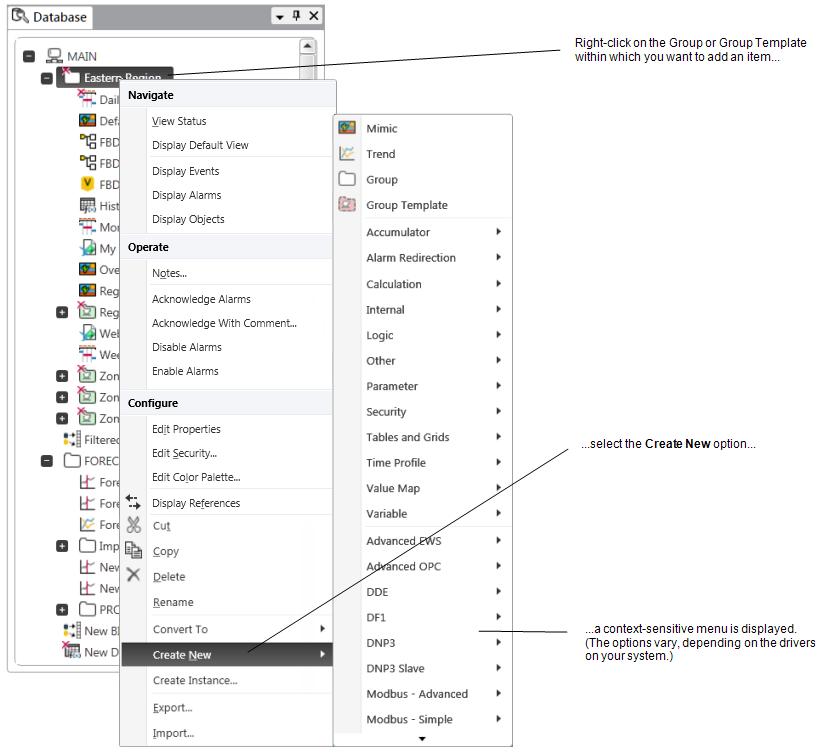
- In the Database Bar, right-click on the Group, or Group Template within which you want to add the item.
A context-sensitive menu is displayed.
- Select the Create New option.
A further menu is displayed.NOTE: To add a new Group Instance and associate that Instance with an existing Group Template, you select the Create Instance option, rather than the Create New option. For more information, see Add a Group Instance.
- Select the menu option that is appropriate to the item that you want to create:
To add an item for a particular driver:
- Select the appropriate <Driver Name> option (for example, DNP3).
A further context-sensitive menu is displayed. - Select the type of item that you want to create (for example, a DNP3 Direct Channel).
An item of the selected type is added to the ClearSCADA database. The entry is highlighted, ready for you to define its name. - Give the item a suitable name (taking into account the ClearSCADA Naming Restrictions).
For information on the items that are supported by a particular driver and the order in which those items should be configured, see the driver-specific documentation.
To add a ‘core’ item:
- Select the appropriate menu option (for example, select ‘Alarm Redirection’ if you want to add a new redirection action to enable ClearSCADA to redirect alarms).
- In some cases, a further menu is displayed—select the appropriate option (for example, ‘E-Mail Action’ to add an e-mail redirection action).
An item of the selected type is added to the ClearSCADA database. The entry is highlighted, ready for you to define its name. - Give the item a suitable name (taking into account the ClearSCADA Naming Restrictions).
- Select the appropriate <Driver Name> option (for example, DNP3).
You can then configure the item in the database.
Some ClearSCADA database configuration is carried out using configuration Forms (see Working with Forms). A Form exists for every item in the database. This guide covers those aspects of Form-based configuration that are not specific to a particular driver, along with Basic Configuration Procedures. The ClearSCADA Guide to Point Configuration covers aspects of point configuration that are common to internal points and to points on many drivers.
Many items that you add to a ClearSCADA system will be driver-specific (they are only available if a specific driver, such as the DNP3 Driver, is installed). Refer to the relevant driver-specific guide for information on configuring the driver-specific items in your database, including the order in which you should configure the items in your database.
This Guide to Core Configuration covers configuration of many ‘core’ items, such as Master Station Accumulators, Value Maps, Data Grids, and Schedules—for more information, see Introduction.
You can also configure other ‘core’ items such as:
- Trends—Plots of the values of, for example, points, over a specific time period. The data is displayed in the form of a time-based graph called a Trend. ClearSCADA supports various types of Trend (see Pre-Configured Trends and Ad Hoc Trends in the ClearSCADA Guide to Trends).
- Logic Programs—To define sequences, perform calculations, or determine the values of particular items in the database. ClearSCADA supports a variety of logic programs (see the ClearSCADA Guide to Logic).
- Alarm Redirections—You can configure ClearSCADA to redirect alarms under particular circumstances. For instance, to forward alarm details to an on-call engineer’s pager when a control center is unmanned. For more information, see the ClearSCADA Guide to Alarm Redirection.
- Mimics—Pictorial or textual representations of plant, regions, or other logical divisions (see the ClearSCADA Guide to Mimics).
As well as producing Mimics as a means of operator interaction with your system, you can also use Mimics as:
- Default Views—Views that usually contain representations of the items within a Group (see Defining a Default View).
- Help Views—Documents that provide Help about an item (see Defining Identification Details).
- Alarm Views—Views that represent the alarm state for an item or Group, and provide access to alarm response actions and controls (see Defining an Item or Group’s Alarm Properties).