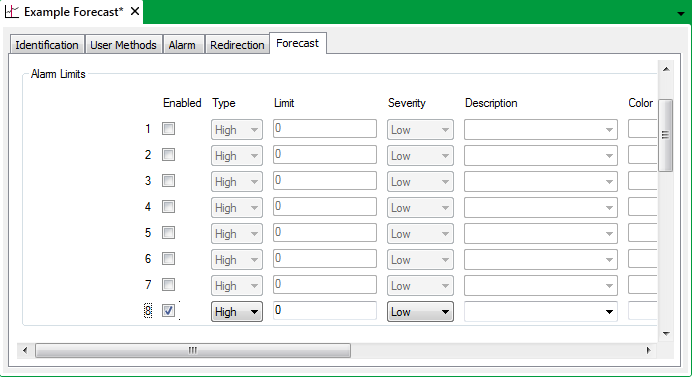
Use the fields within the Alarm Limits section of the Forecast tab to specify whether ClearSCADA is to raise any alarms as a result of Forecast values exceeding specified limits.
You can use these limits in conjunction with the fields in the Alarm Time Window to specify the period during which ClearSCADA is able to generate such alarms (see Define the Period of Forecast Data for which ClearSCADA can Generate Limit Alarms).

You can specify up to eight limits for which ClearSCADA is to raise alarms should any Forecast values exceed those limits.
Within the Alarm Limits section, each row represents a different limit (labelled 1 to 8). To use a limit, you select the Enabled check box for that limit. Once enabled, the rest of the fields in that row become available for use.
You do not need to set up the limits so that they form a particular order (for example, all High alarms together, followed by all Low alarms), as ClearSCADA organizes the limits internally, according to their configuration. However, we advise using ordering where possible, to allow the configuration to be readily assessed, should configuration changes be required in the future.
Use the fields to configure the limit settings:
- Type—Use this combo box to specify whether the limit is a high or low limit:

- High—The limit is a High limit. ClearSCADA raises an alarm if a Forecast value rises above this limit. Use the Limit field (below) to specify the actual value that have to be exceeded in order for ClearSCADA to raise the alarm.
- Low—The limit is a Low limit. ClearSCADA raises an alarm if a Forecast value drops below this limit. Use the Limit field (below) to specify the actual value that has to be exceeded in order for ClearSCADA to raise the alarm.
- Limit—Use to specify the Forecast value at which an alarm limit becomes active. ClearSCADA will raise an alarm if a Forecast value is greater than this limit (for a High-type limit) or less than this limit (for a Low-type limit).
- Severity—Use this combo box to specify the level of importance associated with an alarm. A set of severity levels is provided for each ClearSCADA system (see Defining Severities). Choose the appropriate severity level from the list available on your system (the diagram below shows a default set of severity levels).

- Description—Use this combo box to enter or select a suitable description for a limit. You can either highlight any existing description and replace it with a new one, or you can choose one of the available descriptions from the combo box list.
Each ClearSCADA system is supplied with a set of default descriptions for each limit, but these can be replaced by user-defined descriptions that are more specific to your system (see Define Descriptions for Numeric Point States in the ClearSCADA Guide to Server Administration).
If the Dictionary feature is used on your system, you can prefix strings in the Description field, in order for those strings to be replaced with another term, when displayed in a List or on a Mimic, in ViewX. For more information, see Dictionary Settings in the ClearSCADA Guide to Server Administration.
- Color—By default, Forecast values are shown in black on displays such as Trends unless the value is in an alarm state (in which case it is displayed in the corresponding severity color).
Use the Color field if you want to associate the limit with a color other than the default color to indicate a ‘Normal’ state (black by default).
You can only associate a limit with a custom color if you have pre-configured custom colors available (see Defining a Custom State Color).
Use the Color field’s browse button to display a Reference browse window. Use the window to locate the required custom color.