To create and configure an item in the database, you need to be logged on via a User Account that:
- Has the Configure Database feature enabled. This is enabled via the User Form (see User Accounts in the ClearSCADA Guide to Security).
- Is allocated the relevant permissions, such as the Configure permission for the Group to which you want to add a database item, or the item that you want to configure. Permissions are allocated via the Security window (see Allocating Security Permissions in the ClearSCADA Guide to Security).
You also need to ensure that any necessary Preparation has been undertaken.
You configure the properties of each point using the relevant Point Form. Each Form has several ‘tabs’ that you use to define different aspects of point configuration. As a minimum you have to define particular properties—such as the device with which the point is associated—in order to produce a functional point (see the relevant ‘Minimum Configuration’ section for details). In many cases, you only need to adjust some of the settings on the Form in order to achieve the required configuration.
If the Dictionary feature is used on your system, you can prefix the strings in some fields, in order for those strings to be replaced with other terms when displayed in a List or on a Mimic, in ViewX. For more information, see Dictionary Settings in the ClearSCADA Guide to Server Administration, and the field descriptions in the rest of this guide.
NOTE: If you are configuring an Abstract point, within the Template, you configure the base (none module-specific) properties for the point. Then within each Instance, you configure the module-specific properties for each point.
To configure a new or existing point:
- Display the Database Bar (see Display an Explorer Bar in the ClearSCADA Guide to ViewX and WebX Clients).
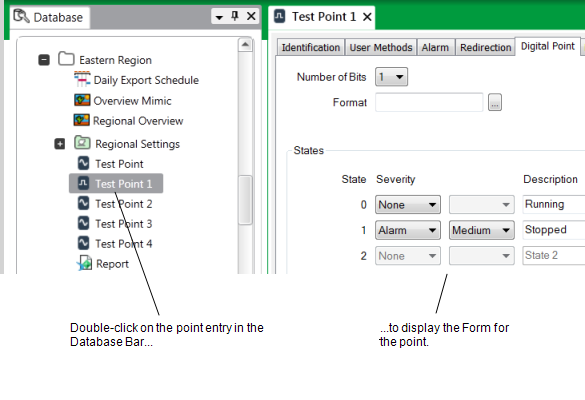
- Double-click on the point entry in the Database Bar (if you are logged on via a User Account that has the Double Click Edits Documents feature enabled).
The associated Form is displayed.
If your User Account does not have the Double Click Shows Properties feature enabled, double-clicking will display the Status display, rather than the Form for the item. In this case, you will need to use a context-sensitive menu to display the Form. For information on other ways to display a Form and on how to display the Database Bar, see Display a Form in the ClearSCADA Guide to Core Configuration.
- Define the Identification details (see Defining Identification Details in the ClearSCADA Guide to Core Configuration).
- Define any User Methods that are required (see Using the User Methods Tab to Define Custom Actions in the ClearSCADA Guide to Core Configuration).
- Define the Alarm details (see Defining an Item or Group’s Alarm Properties in the ClearSCADA Guide to Core Configuration).
- Define the Redirection details (see Configure Alarm Redirections for an Item or Group in the ClearSCADA Guide to Alarm Redirection).
- Either:
- Define the Analog Point details (see Defining Analog Point Details).
Or:
- Define the Digital Point details (see Defining Digital Point Details).
Or:
- Define the <Counter Type> Point details (see Defining Counter Point Details).
Or:
- Define the String Point details (see Defining String Point Details).
Or:
- Define the Time Point details (see Defining Time Point Details).
Or:
- Define the details for a different point type (different drivers support different points—see the documentation for the relevant driver).
- If applicable, define the Historic details (see Defining Historic Details for a Point).
- If applicable, define the Driver specific details (please refer to the documentation for the relevant driver).
- Define the Control details of any Output points. See the section that is appropriate to the type of point that you are configuring:
- Define the Manual details of any Internal points. See the section that is appropriate to the type of Internal point that you are configuring:
- Define the Calculation details of any Calculation points (see Configuring and Working with Calculation Points)
For further information on configuring a driver-specific point, see the driver-specific documentation and the relevant point configuration section in this guide.
For further information on configuring an abstract or internal point, see the relevant configuration section within this guide.