To create and configure an item in the database, you need to be logged on via a User Account that:
- Has the Configure Database feature enabled. This is enabled via the User Form (see User Accounts in the ClearSCADA Guide to Security).
- Is allocated the relevant permissions, such as the Configure permission for the Group to which you want to add a database item, or the item that you want to configure. Permissions are allocated via the Security window (see Allocating Security Permissions in the ClearSCADA Guide to Security).
The primary means of accessing the database structure within ViewX is by using the Database Bar. This is one of the Explorer Bars that can be displayed in a pane to the left of the main ViewX work area (see Explorer Bars in the ClearSCADA Guide to ViewX and WebX Clients).
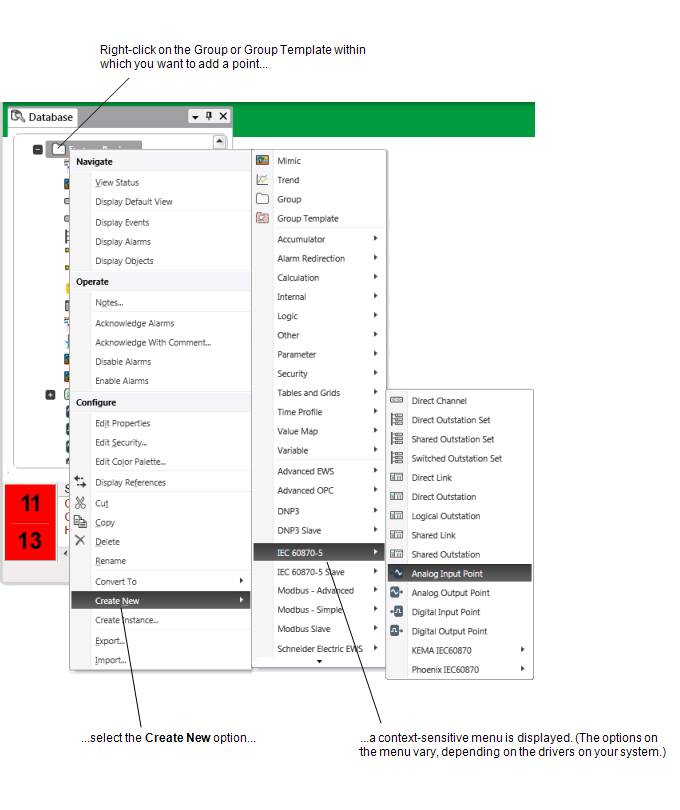
To create a point in the ClearSCADA database:
- Display the Database Bar (see Display an Explorer Bar in the ClearSCADA Guide to ViewX and WebX Clients).
- In the Database Bar, right-click on the Group, or Group Template within which you want to add a point.
A context-sensitive menu is displayed. - Select the Create New option.
A further menu is displayed.
- Select the menu option that is appropriate to the point you want to create:
To add a driver-specific point:
- Select the appropriate <Driver Name> option (for example, Modbus).
A further context-sensitive menu is displayed. - Select the type of point that you want to create (for example, Analog Point).
NOTE: With some drivers further sub-menu(s) are available. You might need to select the type of point you require from one of the sub-menus.
For information on the point types that are supported by particular drivers, see the driver-specific documentation.
A point of the selected type is added to the ClearSCADA database. The entry is highlighted, ready for you to define the point’s name. - Give the point a suitable name (see Naming Restrictions in the ClearSCADA Guide to Core Configuration).
- Configure the point (see Configure a New or Existing Point).
To add an internal point (for example, for use in Logic programs):
- Select the Internal option.
A further menu is displayed. - Select the type of point that you want to create (for example, Analog Point).
A point of the selected type is added to the ClearSCADA database. The entry is highlighted, ready for you to define the point’s name. - Give the point a suitable name (see Naming Restrictions in the ClearSCADA Guide to Core Configuration).
- Configure the point (see Configure a New or Existing Point).
To add a calculation point:
- Select the Calculation option.
A further menu is displayed. - Select the type of point that you want to create (for example, Analog Point).
A point of the selected type is added to the ClearSCADA database. The entry is highlighted, ready for you to define the point’s name. - Give the point a suitable name (see Naming Restrictions in the ClearSCADA Guide to Core Configuration).
- Configure the point (see Configuring and Working with Calculation Points).
To add an abstract point:
(You can only create Abstract points within Group Templates. You cannot create Abstract points within Group Instances or ordinary Groups.)
- Select the Abstract option.
A further menu is displayed. - Select the type of point that you want to create:
- For points on Simple drivers, select either ‘Point’ or one of the Simple point options (for example, Simple Analog Point).
- For points on Advanced drivers, select either ‘Point’ or one of the Advanced point options (for example, Advanced Point (Current and Logged Data)).
For further information, see Types of Abstract Item in the ClearSCADA Guide to Core Configuration.
A point of the selected type is added to the ClearSCADA database. The entry is highlighted, ready for you to define the point’s name.
- Give the point a name that is not module-specific (also see Naming Restrictions in the ClearSCADA Guide to Core Configuration).
- Within the Template, configure the base (none module-specific) properties for the point (see Configure a New or Existing Point). Also ensure that appropriate configuration properties are enabled on the Point Forms, to allow module-specific properties to be configured within each Instance (see Define which Property Values Derive from a Group Template in the ClearSCADA Guide to Core Configuration).
- Within each Instance, configure the module-specific properties for the point (see Configure a New or Existing Point).
- Select the appropriate <Driver Name> option (for example, Modbus).