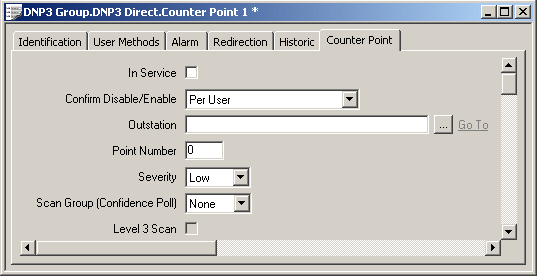
Use the fields at the top of the <Point Type> tab of the appropriate Point Form to define the general DNP3 settings for a point. Depending on the driver, some or all of these fields may be available. These fields are common to many DNP3 points:

- In Service—Use to specify whether the point is active or inactive (see Placing an Item In Service in the ClearSCADA Guide to Core Configuration).
- Confirm Disable/Enable—Users with the required permissions can disable a point that is In Service, or enable a point that is not In Service. Such actions are carried out using the Disable Point and Enable Point pick actions.
Use the Confirm Disable/Enable combo box to specify whether a confirmation dialog box is displayed whenever an operator requests that this point is disabled or enabled (see Requesting Confirmation of Action Requests in the ClearSCADA Guide to Core Configuration).
- Outstation—Not applicable to Frozen Counter points. Specify the outstation on which the point is located.
Use the browse button to display a Reference browse window, and select the required outstation entry from the window.
- Point Number—Enter the DNP3 point number that uniquely identifies this point in the outstation. You cannot have multiple points of the same point type and Point Number on the same outstation.
NOTE: For DNP3 Pulse (Trip-Close) points, you enter two Point Numbers in the Actions section of the Pulse Action tab (see Configure Trip and Close Pulse Actions).
- Severity—Use this combo box to define the severity of point status alarms. For more information on severities, see Defining Severities in the ClearSCADA Guide to Core Configuration.
- Area of Interest—ClearSCADA will only display this field if the Area of Interest feature is enabled on your system. Use this field to specify the Area of Interest that you want to associate with any non-state related point alarms or events (see Assign a Different Area of Interest to an Item's Alarms and Events in the ClearSCADA Guide to Core Configuration).
- Scan Group (Confidence Poll)—A Scan Group defines a group of points for which the current values are updated at a particular rate, or are read during a DNP3 Level 3 Scan. You can assign each point to one of eight Scan Groups.
When you use the Perform Level 3 Scan pick action to read point data from a DNP3 outstation, you will be prompted to select which Scan Groups to include. The points from the selected Scan Groups that have the Level 3 Scan property enabled (see below) will be read from the outstation using a DNP3 Level 3 Scan. (If the Perform Level 3 Scan action is triggered by Schedule, you specify which Scan Groups are to be included, when you set up the Schedule.)
For Direct DNP3 Outstations, you also define the rate at which the current values of points in each Scan Group are updated, by using the corresponding Scan n field on the DNP3 Direct Channel Form (see Defining Further Scan Parameter Settings for a Direct Channel in the ClearSCADA Guide to Advanced Drivers).
NOTE: When the Scan Group timer expires, the DNP3 driver does not schedule a poll of the Outstation. Instead, it updates the point’s value with the response to the next scheduled poll, unless Level 3 Scanning is enabled (see below).
Scan Groups do not apply to DNP3 Pulse Action (NULL) or DNP3 Pulse Action (Trip-Close) points.
- Level 3 Scan—Use this check box to specify whether the point’s value is read from the outstation using a DNP3 Level 3 Scan. Select the check box for the DNP3 driver to issue a DNP3 Level 3 Scan when the point’s Scan Group timer expires (DNP3 Direct Outstations), or the Perform Level 3 Scan pick action is executed.
Clear the check box if point data is to be retrieved through other means, such as an Integrity poll.
This field is not applicable to DNP3 Pulse Action (NULL) or DNP3 Pulse Action (Trip-Close) points.
For more information, see Level 3 Scan.