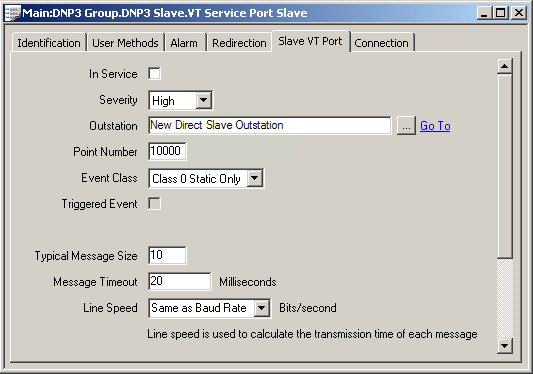
Use the fields on the Slave VT Port tab to define these properties of the service port:

- In Service—Use to specify whether the virtual port is active or inactive (see Placing an Item In Service in the ClearSCADA Guide to Core Configuration).
- Severity—Use the combo box to define the priority of any alarms or events that are associated with the port (see Defining Severities in the ClearSCADA Guide to Core Configuration).
- Area of Interest—If the Area of Interest feature is enabled on your system, an Area of Interest field is displayed on the tab. Use the field to specify the Area of Interest with which any VT Service Port Slave alarms and events are associated (see Assign a Different Area of Interest to an Item’s Alarms and Events in the ClearSCADA Guide to Core Configuration).
- For more information on the Area of Interest feature, see Restrict Alarm and Event Access to Specific Areas of Interest in the ClearSCADA Guide to Core Configuration.
- Outstation—Specify the Slave outstation on which the port is located. Use the browse button to display a Reference browse window and select the required outstation from the window.
- Point Number—Enter the number that uniquely identifies the port through which data is to be routed. Where the master for the outstation is a ClearSCADA server, this number has to match the Virtual Terminal Number configured on a Virtual Terminal (see Configure a DNP3 Virtual Terminal).
- Event Class—On DNP3 outstations, events such as state changes can be assigned into different classes (1, 2, or 3), depending, for instance, on their priority. Static data (present values and states) are assigned as Class 0. Enter the class of data that is transmitted using this port. The class has to be supported by the Slave outstation. Where the master for the outstation is a ClearSCADA server, you need to choose a class that is scanned by the master (see Specify When ClearSCADA Performs Class Polls).
- Triggered Event—Use this check box to specify whether the outstation can report changes to its master without waiting for a request for data.
Select the check box if the Slave outstation is to send changes to its master without waiting for a request for data.
Clear the check box if the Slave outstation is only to report changes during the next request for data by its master.
Whether the outstation supports triggered events, or unsolicited message generation, is defined on the DNP3 tab of the Slave Outstation Form (see Configure the General DNP3 Properties).
- Typical Message Size—Specify the typical size, in bytes, of a virtual terminal message. Once the service port receives this many bytes, it sends the message to the DNP3 master.
If the number of bytes received on the service port does not reach this value, the message is sent after the Message Timeout (see below).
If a message larger than the specified size is received, the service port splits the message into separate data packets. Each data packet is of the size specified in this Typical Message Size field, with the exception of the last data packet, which may be smaller. The service port sends those data packets that are of the specified Typical Message Size to the DNP3 master immediately. If the final data packet is smaller than the specified Typical Message Size and no further data is waiting to be sent that would bring it up to the Typical Message Size, the final data packet is delayed by the time specified in the Message Timeout field (see below).
A packet is split into smaller data packets if it exceeds 255 bytes—the maximum message size imposed by DNP3.
- Message Timeout—Specify the time, in milliseconds, that the service port has to wait before sending a message that is smaller than the Typical Message Size (see above).
Example:
A VT Service Port Slave has this configuration:
Typical Message Size: 10
Message Timeout: 20A message 10 bytes in size is received and passed on immediately to the master.
A message of 8 bytes is received. The service port waits for 20ms before passing the message onto the master.
A message of 12 bytes is received. The service port splits the messages into two packets. The first 10-byte packet is immediately passed on to the master. The size of this packet is determined by the ‘Typical Message Size’ of 10 bytes. The service port then waits 20ms before passing the remainder of the message on to the master in the next data packet.
A message of 34 bytes is received. This is split into four data packets. The service port immediately sends the three 10-byte packets to the master. After 20ms, it sends the remaining 4-byte packet to the master. (Should the VT Service Port Slave have received a further 6-byte message within the 20-second timeout period, it would have sent the remaining 4-bytes of data, along with the new 6-byte message, in a single 10-byte data packet, as soon as it had accumulated that 10 bytes-worth of data.)
- Line Speed—Use to specify the speed of the slowest part of the connection between the Slave and its master.
If the entire connection uses the same speed (the baud rate), you can set the Line Speed to Same as Baud Rate. (The baud rate is specified on the VT Service Port’s Connection tab.)
If part of the connection uses a slower speed, specify that speed in the Line Speed combo box.
For more information on Line Speed, see Defining Scan Parameter Settings for a Channel in the ClearSCADA Guide to Advanced Drivers.