Associated with: DNP3 master outstations
Security permission required to access this pick action: Retrieve Data
Use the Upload File pick action to upload any file from a Slave outstation to its master. You can use the pick action whenever the master is in communication with the Slave.
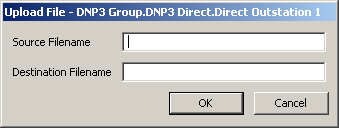
Select the Upload File pick action to display the Upload File window. The content of the window varies, depending on the File Transfer Variation supported by the outstation (see Specify Which File Transfer Routines an Outstation Supports).
Where an outstation supports the Revised g70 Variations of File Transfer routines, the Upload File window includes these fields:

- Source Filename—Use to specify the full path and name of the file that ClearSCADA is to upload from the outstation.
- Destination Filename—Use to specify the file to which ClearSCADA is to write on either the current main ClearSCADA server, or a remote server.
If the file is on the main server, include the full path on that server, for example:
C:\<directory>\file1.txtIf the file is on a remote server, you need to:
- Specify the UNC path to the file—for example,
\\<server name>\<share name>\<directory>\file1.txt - Provide ClearSCADA with the necessary Create/Write access permissions for the file on the remote server.
- Specify the UNC path to the file—for example,
Where an outstation supports the Legacy g70v1 File Transfer variation, the Upload File window includes a single Filename field. Use the field to enter the name of the file that you want to upload, and then select the OK button to perform the upload.

The location to which the file is uploaded is specified as part of the ClearSCADA Server Configuration (see Define the DNP3 Master File Transfer Parameters). The file will be uploaded to that location on whichever ClearSCADA server is currently the main server.
The DNP3 outstation may impose file name restrictions on the files that it holds. See the outstation documentation regarding such restrictions.
Example:
The directory on the main server into which files are uploaded from DNP3 outstations is set to C:\ClearSCADADB.
An operator selects the Upload File pick action on a particular DNP3 outstation, and specifies the file name thisfile.txt.
On execution of the pick action, ClearSCADA uploads the file thisfile.txt from the DNP3 outstation, to the server location C:\ClearSCADADB.