Associated with: DNP3 SCADAPack Security Configuration items
Security permission required to access this pick action: Configure
In order for ClearSCADA to be able to download a security configuration file to a SCADAPack E outstation, the file that contains that security configuration has to exist in the ClearSCADA database.
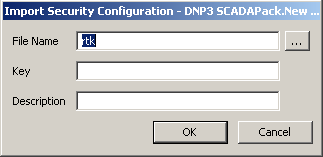
Use the Import Security Configuration pick action to import the security configuration file into the ClearSCADA database and ensure that the file resides in the same location on each of the servers on your system. The location at which each security configuration file is stored in ClearSCADA is specified using the Data Files field, within the Location section of the ClearSCADA Server Configuration Tool (see Locations of the Database Folders in the ClearSCADA Guide to Server Administration).
To import a security configuration file into ClearSCADA:
- Select the Import Security Configuration pick action to display the Import Security Configuration window.

- Select the browse button next to the File Name field.
A File Name window is displayed. The layout of the window varies, depending on the operating system that you are running. - Use the window to locate and select the SCADAPack E .rtk file that you want to import into your database. (For more information, see Import and Download SCADAPack Security Configuration Files.)
- Select the Open button on the File Name window.
The File Name window is closed and the name of the selected file is displayed in the Import Security Configuration window’s File Name field. - In order to communicate successfully using DNP3 Secure Authentication, both the DNP3 master (ClearSCADA) and DNP3 outstation have to be provided with a pre-shared private Update Key. ClearSCADA supports one Update Key per outstation (for the ‘Default User’).
An encrypted Update Key is included in each security configuration file generated by Schneider Electric’s Security Administrator application. The Update Key is encrypted in the file in such a way that it cannot be read by the DNP3 master (such as ClearSCADA).
Use the Key field to enter the private Update Key that is included in the security configuration file that you specified in step 2. The key has to be a 128-bit key comprising 32 hexadecimal digits (for example, 0123456789ABCDEF0123456789ABCDEF). The key is case insensitive.
It is imperative that the Key is kept secret and is not stored or transmitted in any way that could permit unauthorized access to the key.
ClearSCADA will reject any attempt to import a security configuration file into ClearSCADA using this Import Security Configuration pick action should an invalid Update Key be specified in this Key field. (An invalid Update Key is a key that contains non-hexadecimal digits or is of the wrong length.)
- In the Description field, enter a brief description about the security configuration file. Use the description to differentiate between the various security configuration files that might be imported into the ClearSCADA database.
Users can ascertain both the file name and description at any time by viewing the DNP3 SCADAPack Security Configuration item’s Status display (see DNP3 SCADAPack Security Configuration Status Attributes).
- Select the OK button to confirm the details and import the selected file.
The file is imported into the location that is specified using the ClearSCADA Server Configuration Tool’s Data Files field.
You need to associate the security configuration file with the relevant DNP3 SCADAPack E outstation(s) (see Configure the Security Configuration Properties), before you can use the Download Security Configuration pick action to download the file to those outstation(s).
You can use a single DNP3 SCADAPack Security Configuration item to import as many security configuration updates as required over time. If you do this, be aware that ClearSCADA only retains the last file to be imported by each DNP3 SCADAPack Security Configuration item and discards any previously imported files as soon as a new file has been imported successfully.
NOTE: If using this pick action with the Automation Interface (see DNP3 SCADAPack E Automation Interface Methods), you need to specify the method name ImportSecurityFile.