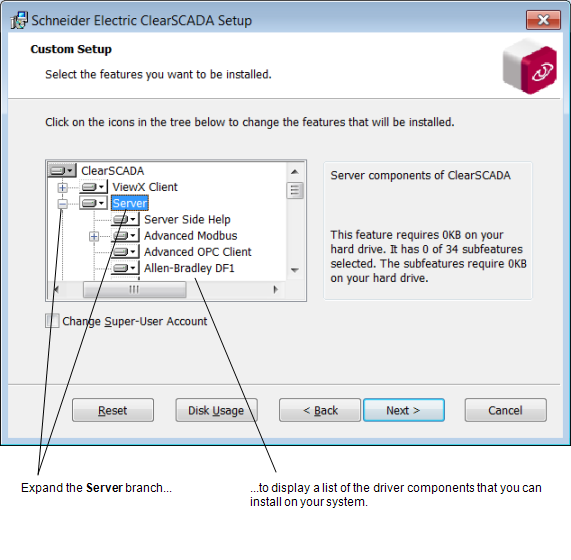
On each of the servers on your system (including permanent standby servers), you need to install the driver-specific Server component(s). You use the ClearSCADA Installation Wizard to specify the driver component(s) that you want to install.
On a Hot-Standby system, you should install the new driver on the standby server(s) first, followed by the server that is running as the main server. This enables the system to be ‘live’ for as much time as possible during the installation process. (A standby server can have more drivers installed than the main server and still be able to synchronize with the main. However, a main server that has more drivers installed than the standby server(s) will not be able to synchronize with those server(s) and as such, the system would need to be down for longer.)
To install the relevant driver components on each server using the ClearSCADA Installation Wizard:
- Shut down the server (see Stop the ClearSCADA Server in the ClearSCADA Guide to Server Administration).
- Run the ClearSCADA Installation Wizard.
- Expand the Server branch of the tree that is displayed in the Setup window.

- Within the Server branch, either:
- Choose to install the component that represents the driver that you want to install.
(For instance, install the DNP3 server component, if your servers are to run the DNP3 driver.)
Or:
- To install an Extension Driver, expand the entry that represents the extension driver’s ‘parent’ driver, then choose to install both the extension driver component and the ‘parent’ driver component.
As with any ClearSCADA component that you want to install, you click on the icon that represents that component, to display a set of options. You then choose to either install just that component, or the entire feature (the component and any ‘child’ components).

Any icon that displays a red cross indicates a component that will not be installed.
- Choose to install the component that represents the driver that you want to install.
- With a few drivers, you need to install other component(s) in addition to the above component(s). Where such components are required, the driver-specific documentation summarizes such requirements.
- Repeat steps 4 and 5 for any other drivers that you want to install.
- Restart the server (see Start the ClearSCADA Server in the ClearSCADA Guide to Server Administration).
- Repeat the above steps on the other servers on your system. (On a Hot-Standby system, once you have installed the new driver(s) on a standby server, bring that server back online and synchronize it with the main server. Repeat the above steps with any other standby servers, then perform a manual changeover to upgrade one of the standby servers to main. Following this, install the driver(s) on the machine that was previously main, then bring that server back online.)
Further Information
System Architectures in the ClearSCADA Guide to Server Administration.
Synchronization Process for Multi-Server Architectures in the ClearSCADA Guide to Server Administration.
Perform a Manual Changeover on a Multi-Server System in the ClearSCADA Guide to Server Administration.