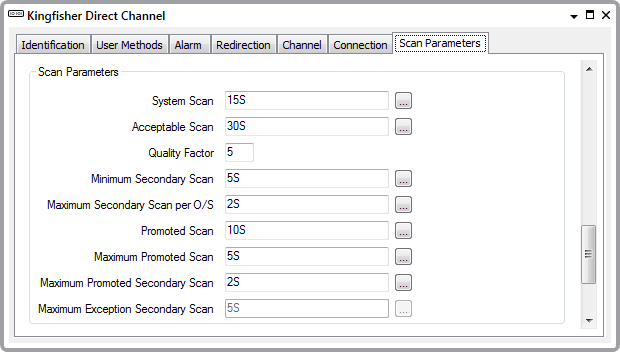
Use the second Scan Parameters section on a Kingfisher Direct Channel Form’s Scan Parameters tab to define the permitted scan durations for the direct channel.
The ClearSCADA server uses the scan times to determine whether the outstations that communicate via the selected channel are scanned within a suitable time. If not, the server generates alarms relating to the scan status.
Before you attempt to define the scan durations, you need to have an appreciation of the scanning procedure, and the different types of scans (see Scanning Direct Outstations on the Kingfisher Driver).
Use these fields to specify the Quality Factor and permitted scan durations for a channel. You can enter the durations directly in each scan field, or use the Interval Window (accessed via each field’s browse button) to specify the required durations.

- System Scan—Specify the expected duration of the primary and secondary scans combined. Enter the time in the OPC Time Format, for example, 15S for 15 seconds.
For further details, see Recommended Settings for Scan Durations, and see System Scan Interval.
- Acceptable Scan—Specify the total amount of extra time allowed to complete a system scan.
If the system scan is complete within the Acceptable scan time, the quality of the scan is not affected—the system scan took longer than expected, but was able to run to completion.
If the System Scan is incomplete at the end of the Acceptable Scan time, the scan has been unsuccessful and the Quality Factor decreases by 1.
Enter the time in the OPC Time Format, for example, 30S for 30 seconds.
For further details, see Recommended Settings for Scan Durations, and see Acceptable Scan Interval.
- Quality Factor—Enter the required Quality Factor number. This is the start number of the Quality Factor accumulator—it will decrease by 1 each time there is a Bad quality scan via the selected channel. If it reaches 0, ClearSCADA detects that the channel has failed.
We recommend that you use the Quality Factor default of 5.
For further details, see Quality Factor.
- Minimum Secondary Scan—Specify the least amount of time that the ClearSCADA server can spend scanning the outstations (that communicate via the selected channel) for secondary data.
The system scan cannot complete until the ClearSCADA server has performed the primary scan, and has performed a secondary scan for the amount of time you define in this field.
Enter the time in the OPC Time Format, for example, 5S for five seconds.
For further details, see Recommended Settings for Scan Durations, and see Minimum Secondary Scan Interval.
- Maximum Secondary Scan per O/S—Specify the maximum amount of time that the ClearSCADA server can spend performing a secondary scan on a single outstation (via the selected channel).
This setting helps to prevent the server from using too much of the secondary phase scan time for communicating with one outstation.
Enter the time in the OPC Time Format, for example, 2S for two seconds.
For further details, see Recommended Settings for Scan Durations, and see Maximum Secondary Phase Time.
- Promoted Scan—Specify the amount of time between each promotion window.
This defines how often the ClearSCADA server performs a promoted scan on those outstations that communicate via the selected channel and have been promoted (operators can promote an outstation by using the Promote Scanning action).
Enter the time in the OPC Time Format. We recommend that you use the default of 10S (10 seconds).
For further details, see Outstation Promotion.
If a particular outstation needs scanning at a different promotion interval to that of other outstations on the channel, you can specify such an interval using the outstation’s Promoted Polling Interval property (see Specify the Polling Intervals and Offset). When an outstation has such an interval configured, the driver uses the outstation’s Promoted Polling Interval rather than the channel’s Promoted Scan interval to determine how often it needs to perform a promoted scan on that particular outstation.
- Maximum Promoted Scan—Specify the maximum duration of each promotion window (opened for the selected channel).
If a Promoted scan is incomplete when the Maximum Promoted Scan time is reached, the Promotion window is closed. The Promoted scan will continue from the point at which it was interrupted when the next Promotion window occurs.
Enter the time in the OPC Time Format. We recommend that you use the default of 5S (five seconds).
For further details, see Promotion Window.
- Maximum Promoted Secondary Scan—Specify the maximum amount of time that the ClearSCADA server can spend retrieving secondary data during a Promotion window (via the selected channel).
Enter the time in the OPC Time Format. We recommend that you use the default of 2S (two seconds).
For further details, see Maximum Secondary Promoted Time.
NOTE: The Kingfisher driver does not use the Maximum Exception Secondary Scan. Leave the default setting of 5S in place for this field.