You can alter a filter that has been applied to a List so that different filter criteria are applied. To change the filter on a List such as an Events List, Alarm Summary, Queries List, or Historic List, you can either:
- Use the Quick Filter feature to apply a quick filter in addition to the existing filter(s) (see Quick Filter a List other than an Alarms List).
Or:
- Edit an existing filter:
- Display the Filter Columns Window (see Filter a List).
- Select the filter that you want to change.
- Select the Edit button.
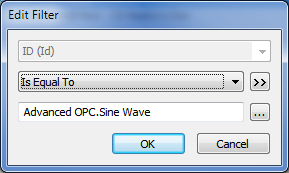
The Edit Filter window is displayed.
- Use the Edit Filter window to adjust the filter settings as required. The filter settings work in exactly the same way as the Add Filter window except that you cannot change the field to which the filter criteria applies (see Add a Filter to a List).
If required, you can alter the filter by directly modifying the SQL query, to change the WHERE clause (see Use SQL to Create a Filter for a List other than an Alarms List).
- Select the OK button to confirm the changes and close the Edit Filter window.
- Repeat the above steps for any other filters that you want to change.
- Select the OK button to confirm your selection and close the Filter Columns window.
The revised filter(s) are applied to the List.
Or:
- Remove an existing filter:
- Display the Filter Columns Window (see Filter a List).
- Select the filter that you want to remove.
- Select the Remove button.
The filter is removed from the filter list. - Repeat the above steps for any other filters that you want to remove.
- Select the OK button to confirm the deletion(s) and close the Filter Columns window.
The remaining filter(s) are applied to the List.
You can also: