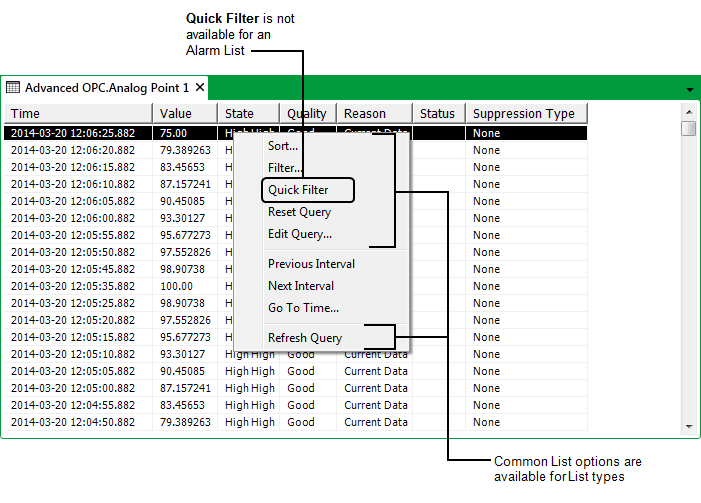
ClearSCADA provides you with a set of common List options that allow you to change how the information on a List is displayed. When you display a List, you can right-click on an entry in order to display a context-sensitive menu. You then select the menu option that you require:
NOTE: With Lists that are embedded on Mimics you select (rather than double-click) on an entry in the List to display that entry's context-sensitive menu.

- Use the Sort option to Sort a List.
- Use the Filter option to Filter a List.
- Use the Quick Filter option to filter the List according to any of the values shown on the List (see Quick Filter a List other than an Alarms List).
- Use the Reset Query option to reset any filtering or sorting back to the default (see Reset the Filters and Sort Order on a List other than an Alarms List).
- Use the Edit Query option to Ascertain which SQL Query is Presently used by a List.
- Use the Previous Interval and Next Interval options to display the historic values for the previous or next time intervals respectively, (see Displaying the Previous or Next Time Interval).
Only those historic values that were logged within a specific time period are initially included on a Historic List. This time period is specified in the Trend/List section on the point or accumulator’s Historic tab. (For information on configuring this time period for a point, see Defining Historic Details for a Point in the ClearSCADA Guide to Core Point Configuration. For information on configuring this time period for an accumulator, see Tabs on Accumulator Forms in the ClearSCADA Guide to Core Configuration.)
- Use the Go To Time option to display the historic values for a specific time interval. (see Display a Particular Time Interval).
- Use the Refresh Query option to refresh the data in the List (see Refresh the Data on a List other than an Alarms List).
Further Information