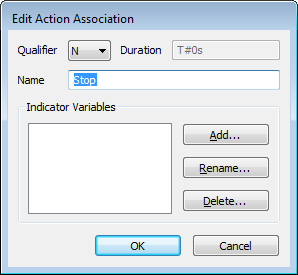
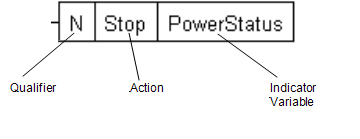
When you have added an action to your SFC, you need to configure an action association. The settings in the action configuration define when the action takes place, and whether it is repeated, works as a pulse, or so on.
The action association configuration also allows you to create indicator variables for your actions. These are indicators that can displayed on the SFC to show operators which variables are affected by an action.
To configure an action association:
- Display the Sequential Function Chart,
- Either:
- Double-click on the action on the SFC.
The Edit Action Association window is displayed.
Or:
- Right-click on the action that you want to configure.
A context sensitive menu is displayed.
NOTE: You have to right-click on the action on the SFC—if you right-click on the action in the Actions tab, a different context sensitive menu is displayed.
- Select the Edit option.
The Edit Action Association window is displayed.

- Double-click on the action on the SFC.
- Use the Qualifier combo-box to define when the action is to be performed. The available options include:
- N—The action is executed repeatedly while the step is active. This means that the action will occur again and again until the program proceeds to the next step in the sequence.
- R—The action resets another instance of the same action. This is used in conjunction with actions that use an S qualifier.
Actions that use an S qualifier are executed repeatedly until they are reset. They are reset when another instance of the same action is executed (the other instance of the action has to have an R qualifier).
- S—Actions that use an S qualifier are executed repeatedly until they are reset. They are reset by an action with an R qualifier (see above).
- P—The action is a pulse action. It is executed once when the step is first activated and then once again when the step is deactivated.
- P0—The action is a pulse action. It is executed once when the step is deactivated.
- P1—The action is a pulse action. It is executed once when the step is first activated.
- L—The action is time limited. It executes repeatedly for a defined time period.
- D—The action is time delayed. It is executed after a defined time period has passed.
- SD—The action is stored and time delayed. The action is executed repeatedly after a defined time period has expired. The action is executed even if the associated step is deactivated before the start of the time period.
- DS—The action is time delayed and stored. The action is executed repeatedly after a defined time period has expired. The action is not executed if the associated step is deactivated before the start of the time period.
- SL—The action is time limited and stored. The action is executed repeatedly for defined time period.
- Use the Duration field to define the time period for time delayed and time limited qualifiers. You have to enter the time period in the OPC time format, for example, T#30s for 30 seconds.
- Use the Name field to define a name for the action association. The name has to be exactly the same as the name of the action that the action association affects. For example, if an action named PowerOff is used to write a value to a point that controls the power supply, the action association for that action also has to be named PowerOff.
- Use the Indicator Variables section to define any indicators. The indicator variables are optional and are used to provide information about the completion of an action.
You can use an indicator variable to display the name(s) of the direct or internal variables that are affected by an action. This is useful as it allows operators to see which variables are affected by each action. For example, if a Stop action affects the state of a 'PowerStatus' variable, an indicator variable could be used to show 'PowerStatus' next to the Stop action on the SFC.

To create an indicator variable:
- Select the Add button on the Edit Action Association window to display the Add Variable window.
- In the Add Variable window, enter the name of a variable that is affected by the action with which the indicator variable will be associated. The name has to be identical to the name of the selected variable. For example, if a Start action affects a RunState direct variable, the indicator variable for the Start action also has to be named RunState.
- Select the OK button or press the Enter key to confirm the name.
If an action affects more than one variable, you can add more indicator variables by repeating steps i-iii inclusive. The additional indicator variables will be listed after the first indicator variable in comma separated format.
You can rename an indicator variable, by selecting an indicator variable in the list, then selecting the Rename button. You can then enter a new name for the indicator variable.
You can also remove an indicator variable by selecting an indicator variable in the list, then selecting the Delete button.
- Select the OK button to confirm your selections.
The Edit Action Association window is closed and the action association is configured according to your selections.