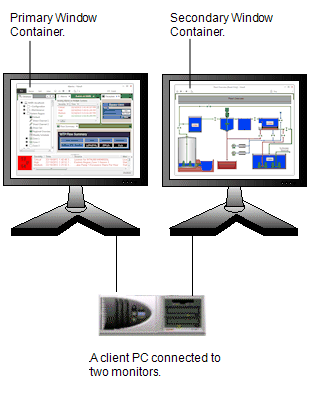
You can configure a Mimic so that it has hyperlinks that, when selected, cause a display to be shown on another monitor. This type of hyperlink can be useful on a Multi-Monitor setup (where a client PC has been configured to use more than one monitor), as you can select a hyperlink on a Mimic shown on one monitor and the target display is shown in a specified Window Container on a different monitor.

You can use a hyperlink to display various ViewX displays in a Window Container on another monitor, including:
- Mimics
- Forms
- Lists
- Alarms Lists
- Trends
- X-Y Plots
- X-Y-Z Plots
- Dynagraphs
- Logic Programs
- Schedules
- Reports
- Time Profiles
- Script Libraries
- Calendars
- Value Maps
- Alarm Action Rosters
- Alarm Action Calendars
- Data Grids
- Data Tables
- Crystal Reports.
NOTE: Some drivers also have driver-specific ‘documents’ that can be used as ‘target’ displays for hyperlinks.
To create a hyperlink that causes a display to be shown on another monitor, you need to configure a Script pick action that uses Execute Code Fragment mode. As part of the configuration for the pick action, you will need to define code that instructs ViewX to display a specified display in a specified Window Container. The following procedure explains how to create such a hyperlink:
- Log on to ViewX via a User account that has the Configure permission for the Mimic that is to contain the hyperlink. We will refer to this Mimic as the ‘Source’ Mimic.
NOTE: You can use a single monitor client to create a hyperlink to a display on another monitor, but to test your hyperlink works as expected, you will need to use a Multi-Monitor setup.
- Display the Mimic in Design Mode (see Displaying a Mimic)
- Either add a new Mimic object and select it or select an existing Mimic object. The object you select will contain the hyperlink (when you select it in Run Mode, it will cause the ‘target’ display to appear in another Window Container.).
- Right-click on the selected Mimic object, then select the Pick Action Wizard option to display the Pick Action Wizard.
- On the first page of the Pick Action Wizard, select Script, then select Next.
- On the second page of the Pick Action Wizard, set the Mode to Execute Code Fragment, then enter the following code in the Code field:
- App.OpenWindowOnHead n,"<Absolute reference to target display>"
Where:
- n is the head number assigned to the Window Container in which you want the target display to be shown (see Assign a Head Number to a Window Container in the ClearSCADA Guide to Client Administration).
- <Absolute reference to target display> is an absolute reference to the ViewX ‘document’ that is to be the ‘target’ display. The absolute reference has to include the system name and should not include the angle brackets < >.
For more information on finding out the absolute reference for a display, Locating the Absolute Address of a Display.
- Use the Permission setting to define the security permission required to select the pick action that you are configuring.
- Select the Next button.
- Enter a Pick Action Comment if required
- Select the Next button, then select the Finish button.
The Pick Action Wizard is closed.
When you display the Mimic in Run Mode, you will be able to select the Mimic object to trigger the pick action. If configured correctly, this will cause the target display to appear in the specified Window Container on another monitor.
Example:
A ViewX client is setup up to run on two monitors. Each monitor hosts a Window Container, one named "Primary", the other named "Secondary". For this example, we will assume Primary is the left-hand side monitor.
The Primary Window Container is assigned the head number "1" in the Startup Configuration File, the Secondary Window Container is assigned the head number "2".
A user logs on and displays a Mimic named ‘ControlA1’ in the Primary Window Container on the left monitor. The user configures the ‘ControlA1’ Mimic so that is has a hyperlink that, when selected in Run Mode, will cause a Mimic named ‘Sector8C’ to be displayed in the Secondary Window Container. The ‘Sector8C’ Mimic is stored on a system called ‘MAIN’ and in a Group named ‘Power Switches’.
To configure the hyperlink, the user selects a suitable object on the ‘ControlA1’ Mimic and displays the Pick Action Wizard for that object. They then configure a Script pick action that is set to Execute Partial Code. They define the code as:
- App.OpenWindowOnHead 2,"SCX:///MAIN/CMimic/Power Switches.Sector8C"
The App.OpenWindowOnHead 2 part of the code instructs ClearSCADA to display the defined target display in a new document window in the Secondary Window Container.
The comma separates the function command from the definition of the target display. The code enclosed in double quotes " " defines the target display and is an absolute reference that includes the system name and database class (in this case MAIN and CMimic respectively).
The user completes the pick action configuration and then displays the ‘ControlA1’ Mimic in Run Mode. They select the object with the pick action, which causes the ‘Sector8C’ Mimic to be displayed in the Secondary Window Container on the right-hand side monitor.