The General tab for embedded lists contains several settings that are common to General tabs, including Name, Visible, Animations, Pick Action, ToolTip, and the Dynamic Position settings. For more information on these common settings, see General Tab.
The General tab for embedded Lists also contains settings that are specific to embedded Lists. You can use these specific embedded List settings to:
- Define the appearance of an embedded List
- Choose whether the embedded List is to be updated
- Specify the database that will be queried for the embedded List.
The settings that are specific to embedded Lists on Mimics are:
- System—Use the System combo box to specify the database (system) to which the SQL query in the embedded List is applied. This allows embedded Lists on one system to display information taken from the database of another system.
Example:
A company has a ClearSCADA system that contains two databases. One database is called 'North' and the other is called 'South'. The 'North' database contains a Mimic that has an embedded List. The embedded List is set up to display the points on a system. By default, the embedded List displays the points on the 'North' system as this is the system that contains the Mimic. However, by using the System setting for the embedded List, an engineer can set the embedded List to display the points that are in the 'South' database. To do this, the engineer accesses the Properties window for the embedded List and changes the System setting from North to South.
Similarly, on the South system, a Mimic can be setup to contain an embedded List that shows the points on the North system. Again, an engineer has to access the Properties window for the embedded List and change the System setting, only this time the setting has to be changed from South to North.
- Register for Interest—Use the Register for Interest check box to define whether the embedded List is to be updated when new values are available.
If you select Register for Interest, the embedded List will be updated when the underlying data changes in the database. In ViewX, this is unlikely to cause any performance issues and your embedded List will update as required. However, your system may experience slower performance if you use multiple WebX clients to view the Mimic simultaneously. This is because for a WebX client to update an embedded List, it needs to frequently check all of the list data for updates. When multiple embedded Lists all need to display the same data, this can cause slow performance. With ViewX, this situation is avoided, as ViewX is able to check only for updates.
If you clear Register for Interest, the embedded List will not update on the Mimic. This is useful when you have no need for the embedded List to update, for example, if you want the embedded List to show a static list of system users. Clearing the Register for Interest check box will mean that performance is not affected by the embedded List, no matter how many ViewX or WebX clients are viewing the Mimic.
However, in some cases it can be inappropriate to clear Register for Interest. For example, if you need the embedded List to indicate the alarm state of a point, you will need to select Register for Interest (otherwise, the list will only be able to show the alarm state that was in effect at the time the embedded List was displayed).
- Foreground—Use the Foreground color button to set the color of the text in the entries on the list.
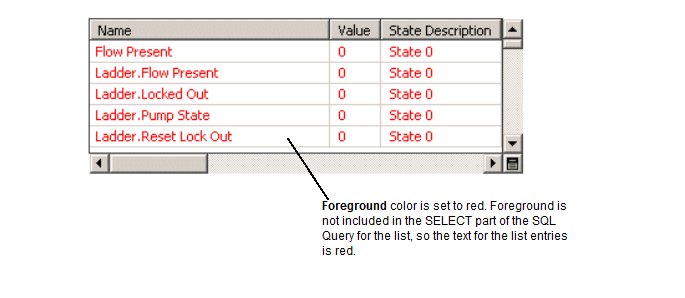
As with other color buttons, you can choose a color from the palette, or use the ... option to create a custom color on the Color window (see Using the Color Window).
NOTE: The Foreground color only takes effect if the Foreground is not included in the SELECT part of the SQL Query for the list.
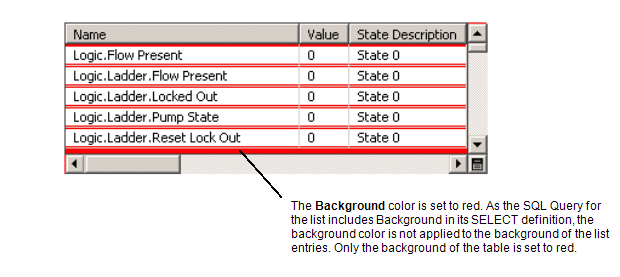
- Background—Use the Background color button to set the color of the background of the list. The background color is shown in each row in the list and also at the extremities of the list.
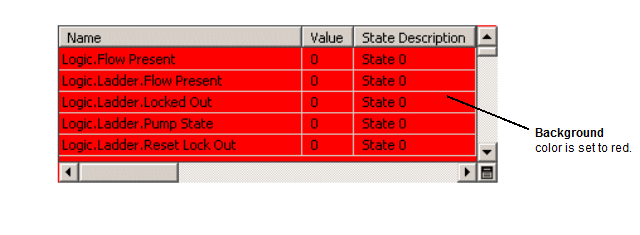
As with other color buttons, you can choose a color from the palette, or use the ... option to create a custom color on the Color window (see Using the Color Window).
NOTE: The background color only affects the background color of the list’s cells if Background is excluded from the SELECT part of the SQL Query for the list. If the Background is included in the SELECT part of the SQL Query, the background color will only affect the background of the table, not the individual cells.
- Header Text—Use the Header Text color button to set the color of the text in the column headings on the list.
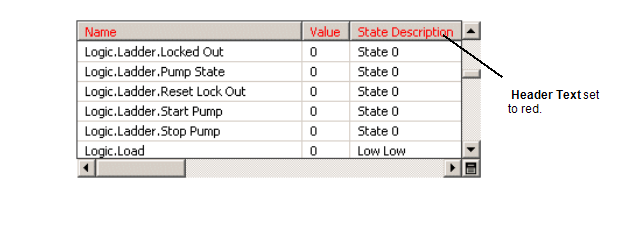
As with other color buttons, you can choose a color from the palette, or use the ... option to create a custom color on the Color window (see Using the Color Window).
- Header Face—Use the Header Face color button to set the color of the column heading cells on the list.
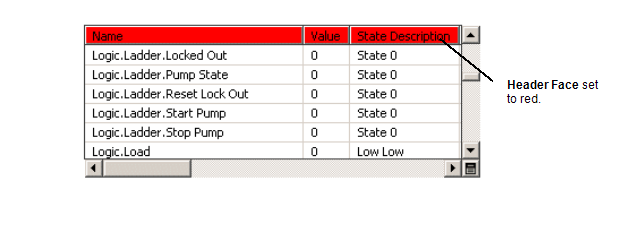
As with other color buttons, you can choose a color from the palette, or use the ... option to create a custom color on the Color window (see Using the Color Window).
- Header Shadow—Use the Header Shadow color button to set the color of the shadow line in the header cells on the list. The shadow line is a thin line that is shown on the bottom and the right-hand edge of each header cell.

As with other color buttons, you can choose a color from the palette, or use the ... option to create a custom color on the Color window (see Using the Color Window).
- Header Highlight—Use the Header Highlight color button to set the color of the highlight line in the header cells on the list. The highlight line is a thin line that is shown on the top and left-hand edges of each header cell.

As with other color buttons, you can choose a color from the palette, or use the ... option to create a custom color on the Color window (see Using the Color Window).
- Header Dark Shadow—Use the Header Dark Shadow color button to set the color of the dark shadow line in the header cells on the list. The dark shadow line is a thin line that is shown around the bottom, left, and right edges of the header cells.

As with other color buttons, you can choose a color from the palette, or use the ... option to create a custom color on the Color window (see Using the Color Window).
- Grid Color—Use the Grid Color color button to set the color of the lines that form the cells.

As with other color buttons, you can choose a color from the palette, or use the ... option to create a custom color on the Color window (see Using the Color Window).
- Grid Size—Use the Grid Size spin-box to define the size of the grid lines that form the cells. You can increase or decrease the size as required.