When you have added objects to a Mimic, you will need to edit them so that they are the appropriate size and color and use suitable fonts, animations, pick actions, and so on.
To alter the color and configuration of a Mimic object, you need to access its Properties settings. To do this, you need to display the object's Properties window. You can also use the Properties window to set up animations and pick actions. For more information, refer to the Editing section that applies to the object you want to configure. For example, if you want to change the color of a pipe, refer to the Editing a Pipe section.
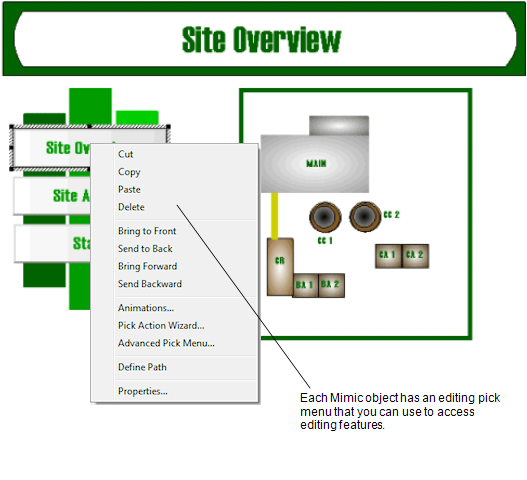
Each Mimic object also has an editing pick menu. You can access the editing pick menu by right-clicking on the required object (in Design mode).

The editing pick menu has the following options which you can use during the design of your Mimic:
- Cut—Use to remove the object from the Mimic and place in the clipboard storage area of your PC.
- Copy—Use to make a duplicate of the selected object. The duplicate is placed in the clipboard storage area of your PC and replaces any data that is in the clipboard.
- Paste—Use to add the contents of your PC's clipboard storage area to the Mimic.
- Paste Special—Use to add the contents of your PC's clipboard storage area to the Mimic. This option differs to the standard Paste option as it allows you to select which format is used for the information being 'pasted' onto a Mimic. The Paste Special option is only available when the clipboard area contains data in multiple formats, for example, if you use the Copy Shortcut feature, this copies a hyperlink to the clipboard area. You can then use the Paste Special option to paste the hyperlink onto a Mimic as an actual hyperlink or as plain text.
- Delete—Use to remove the selected object from the Mimic. The deleted object is not stored on your PC's clipboard area.
- Bring to Front—Use to move a Mimic object to the front (see Changing the Order of Mimic Objects).
- Send to Back—Use to move a Mimic object to the back (see Changing the Order of Mimic Objects).
- Bring Forward—Use to move a Mimic object forwards (see Changing the Order of Mimic Objects).
- Send Backward—Use to move a Mimic object backwards (see Changing the Order of Mimic Objects).
- Flip—Use to flip a Mimic object so that it becomes a mirror image of its original self (see Flipping a Mimic Object).
- Rotate—Use to change the angle of a Mimic object (see Rotating a Mimic Object).
- Animations—Use to access the Animations window for the selected Mimic object (see Using the Animations Window).
- Pick Action Wizard—Use to access the Pick Action Wizard for the selected Mimic object (see Associating Mimic Objects with Pick Actions).
- Advanced Pick Menu—Use to access the Pick Menu window (see Custom Pick Action Menus)
- Define Path—Use to start the path definition process. After selecting this option, you can define the path for a position animation (see Position Animations)
- Edit Points—Use to change the shape of a Mimic object (see Changing the Shape of an Object).
- Convert to Pipe—Use to convert the selected shape or line into a pipe object.
- Convert to Polyline—Use to convert the selected pipe object into a shape or line.
- Simplify—Use to simplify a Mimic object so that it contains fewer lines. This is designed for use with the Import DXF File feature (see Importing a DXF File).
- Properties—Use to access the Properties window for the selected Mimic object. For more information, please refer to the section that describes editing the type of object. For example, if you want to use the Properties window for a pipe object, see Editing a Pipe.
There are also useful Mimic editing features available via the Graphics Tab on the ViewX ribbon.