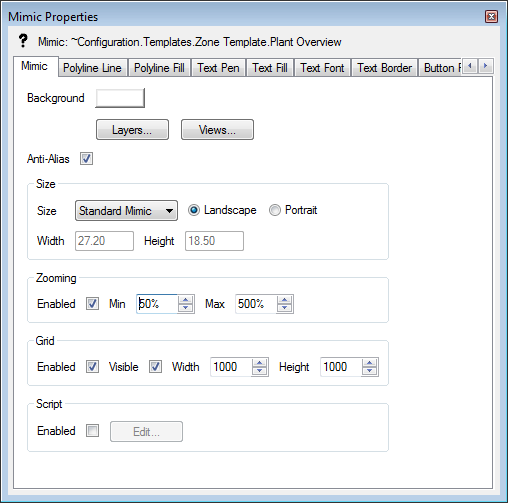
Each Mimic has a Mimic Properties window that you can use to define the default settings for:
- An individual Mimic. The default settings that you put in place for the Mimic are applied whenever the Mimic is displayed, irrespective of which client PC is used.
- New Mimics that are created and edited after defining the default settings. The default settings for new Mimics are client-specific, so they only apply when your client PC is used to configure a new Mimic (rather than edit a Mimic that already existed before the default settings were changed).

The way in which you display the Mimic Properties window determines whether the changes apply to a specific Mimic or every Mimic on your client:
- If you display the Mimic Properties window by selecting the Edit button on the Mimics tab of the Options window, the settings will apply to each new Mimic that you display on your client PC. The settings are client-specific and so will not apply when the same Mimics are displayed on other client PCs. For more information, see Defining the Default Mimic Properties for New Mimics.
- If you display the Mimic Properties window directly from an individual Mimic (rather than via the Options window) th, the settings apply to the selected Mimic only. The settings are applied every time the Mimic is displayed, irrespective of the PC on which it is being displayed. For more information, see Defining the Default Mimic Properties for a Specific Mimic.
The default settings that you define on the Mimic Properties window are used for new objects that you add to a Mimic (regardless of the means by which you access the Mimic Properties window). For example, if you specify Text Font settings on the Mimic Properties window, any text boxes that you add will use those settings by default.
The Mimic Properties window consists of several tabs, each containing a variety of settings. You can use the tabs as follows:
- Mimic—Use the settings on this tab to:
- Define the Background Color for a Mimic
- Add, Edit, Reorder and Remove Layers on a Mimic
- Add, Edit, and Remove Views on a Mimic
- Smooth Mimic Graphics with the Anti-Aliasing Feature
- Set the Size and Orientation of a Mimic
- Define the Magnification Settings for a Mimic
- Define the Grid Settings for a Mimic
- Define the Script Settings for a Mimic.
- Polyline Line—Use the settings on this tab to Define the Polyline Line Settings for a Mimic.
- Polyline Fill—Use the settings on this tab to Define the Polyline Fill Settings for a Mimic
- Text Pen—Use the settings on this tab to Define the Text Pen Settings for a Mimic
- Text Fill—Use the settings on this tab to Define the Text Fill Settings for a Mimic
- Text Font—Use the settings on this tab to Define the Text Font Settings for a Mimic
- Button Pen—Use the settings on this tab to Define the Button Pen Settings for a Mimic
- Button Fill—Use the settings on this tab to Define the Button Fill Settings for a Mimic
- Button Font—Use the settings on this tab to Define the Button Font Settings for a Mimic
- Pipe Fill—Use the settings on this tab to Define the Pipe Fill Settings for a Mimic.
NOTE: Some Mimic options can only be configured on a per-Mimic basis, including the Layers, Views, and Script settings.
The default settings that you specify using the Mimic Properties window are just a starting point - each object that you add to a Mimic also has its own properties window. You can use the individual Mimic object properties windows to configure each Mimic object as required. For details about the properties windows for individual Mimic objects, see Editing Objects on a Mimic.