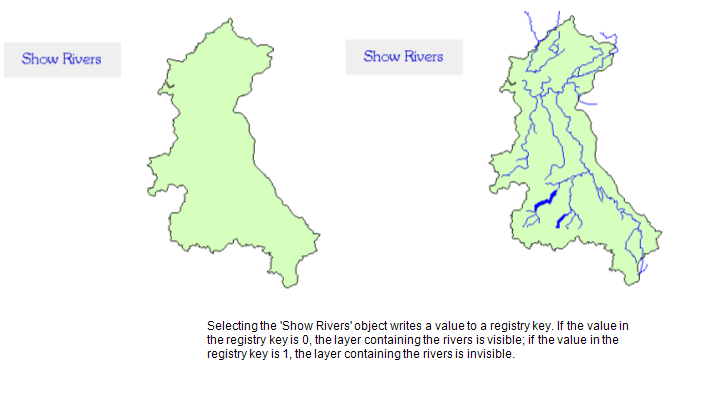
One of the common uses for registry settings is to control the visibility of layers on a Mimic. This is particularly useful on Mimics that contain maps, where each layer has a different level of detail. For example, the top layer could provide a simple overview of an area, whereas lower layers could reveal geographical features such as rivers, roads, sites and so on.
By using a registry pick action, you can create a Mimic that has a selectable button (or another type of object) that toggles a layer's visibility on and off. The toggle is only applied to the local machine, so that other users viewing the same Mimic are not shown the layer changes.

Another use of registry settings is to switch between filter settings for an embedded list, so when the registry setting is true one set of filters is applied, and when the registry setting is false another set of filters are applied (the filters need to be defined in animations for the embedded list, and the animations also need to use an IF statement to reference the registry settings).
Usually, the format for the registry expression is:
REGISTRY ('<registry setting name>', 0) = 1
Where <registry setting name> is the name you allocate to the registry setting (do not enter the angle brackets < >). This means that the registry setting is true when it has a value of 0 and false when it has a value of 1. You can reference the registry setting name in your expressions, for example, you can set a layer to be visible when the registry setting is 0 and invisible when the registry setting is 1.
To set up a local variable that allows a layer's visibility to be toggled on and off at the click of a button:
- Display the Layer Properties window (see Edit the Layer Settings) for the layer that you want to set up to use the local variable.
- In the Expression field, enter the expression that defines the behavior that you require. The expression should take the format:
REGISTRY ('<registry key name>', 0) = 1
For example:
REGISTRY ('ShowLayer', 0) = 1
- Select the OK button to confirm the layer configuration.
Now that you have defined the registry setting, you need to create a selectable object that, when selected, will change the registry setting (and therefore will toggle the layer's visibility).
- Add a Mimic object that will act as a display button. When selected, the object will toggle the layer's visibility on and off. You can use any type of shape, line, or button for the object. The object you create needs to be visible on each of the layers—we recommend that you create a separate layer for the object and set that layer to be the top layer.
- Edit the object so that it has a suitable appearance. For more information, see the section on editing the object, for example, see Editing a Button.
- On the General tab of the object's Properties window, select the Animations button.
The Animations window is displayed.
If you are using a latched button to set the registry value, proceed to step 17.
If you are using an unlatched button or another type of object such as a line or shape to set the registry value, proceed to step 7.
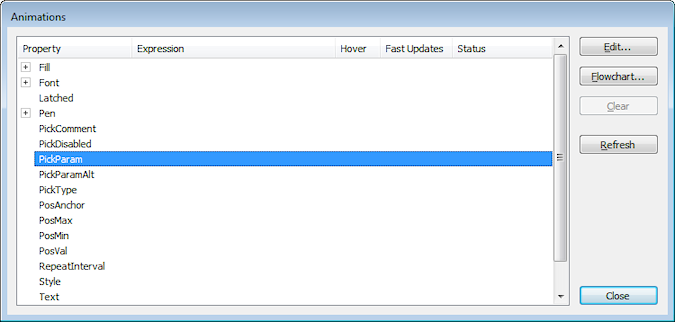
- Double-click on the PickParam property to display the Expression window. The Pick Param property associates an animation with the pick action feature of an object.
- Enter the following expression:
'<registry key name>( ' + IIF( REGISTRY( '<registry key name', 0 ) = 0, '1', '0' ) + ')'
Where <registry key name> is the name of the registry to which a value is written when the button or object is selected. The registry key name has to be identical to the name of the registry key that you specified in the configuration for the layer. Do not enter the angle brackets < >.
For example:
'ShowLayer( ' + IIF( REGISTRY( 'ShowLayer', 0 ) = 0, '1', '0' ) + ')'
The expression instructs the system to write a 0 value to the registry when the existing registry setting is 1, and to write a 1 value to the registry when the existing setting is 0. This means that the button or object will toggle the layer visibility on and off when selected.
- Select the OK button to confirm the expression.
- On the Animations window, double-click on the PickType property to display its Expression window.
- Enter the number 8 as the expression. This informs the system that the object's pick action feature is to be used as a registry pick action (8 represents the registry type of pick action. For more information, see Pick Action Animations for Mimic Objects).
- Select the OK button to confirm the expression. Proceed to step 29.
NOTE: As an alternative to steps 10 to 12 inclusive, you can select the Pick Action button on the General tab of the object's Properties window. This displays the Pick Action Configuration Wizard—you will need to select the Registry option on the Pick Action Configuration Wizard then proceed through the various stages of the pick action configuration. You only need to set the object to have a Registry pick action as the other settings are provided as part of the expression for the PickParam animation.
- Double-click on the Latched property to display the Expression window. The Latched property represents the button when it is pressed down.
- Enter the following expression:
REGISTRY ('<registry key name>', 0) = 1
Where <registry key name> is the name you are using for the registry to which a value will be written. Do not enter the angle brackets. This expression is identical to the expression that you used for the layer.
- Select the OK button to confirm the expression.
- Close the Animations window.
- Access the Button Properties window for the latched button (see Editing a Button).
- On the General tab, select the Pick Action button to display the Pick Action Wizard.
- Select the Registry option button to set the button to write a value to the registry when selected.
- Select the Next button to proceed to the next step (Registry Configuration Button Down).
- In the top field, enter the name of the registry key to which a value is written when the button is pressed down. The registry key name has to match the name of the registry key that you defined in the expressions for the layer and the Latched animation property.
- Set the Key Type combo box to Number if the value that is written is a number, or set it to String if the value contains letters.
- In the Value field, enter the value that is written to the registry when the button is pressed down.
- Select the Next button to proceed to the next step (Registry Configuration Button Up.
- Repeat steps 21-23 inclusive, only this time the settings that you define will apply to the button when it is up, that is, not pressed down.
- Select the Next button to proceed to the next step.
- Enter a Pick Action Comment if required, then select the Next button.
- Select the Finish button to end the pick action configuration.
- View the Mimic in Run Mode and select the Mimic object (button, line, shape and so on) to switch the relevant layer's visibility on and off. If the layer does not toggle between being visible and invisible, trace your steps through this section and check that you have followed each step correctly.