You can use the Pick Action Wizard to create a hyperlink. The Pick Action Wizard provides step-by-step instructions for creating a hyperlink.
To use the Pick Action Wizard to create a hyperlink:
- Display the Mimic that is to contain the new hyperlink. You need to display the Mimic in Design mode (see Displaying a Mimic).
- Right-click on the Mimic object that is to act as the 'trigger' for the hyperlink. If the Mimic does not yet contain the object that you want to use as the 'trigger', you will need to create the object (see Adding Objects to a Mimic) and then right-click on it.
A context sensitive menu is displayed. -
Select the Pick Action Wizard option to run the Pick Action Wizard.
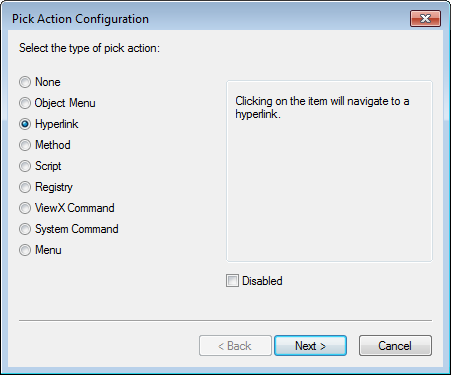
- On the first 'page' of the Wizard, select the Hyperlink option, then select the Next button to proceed to the second 'page'.
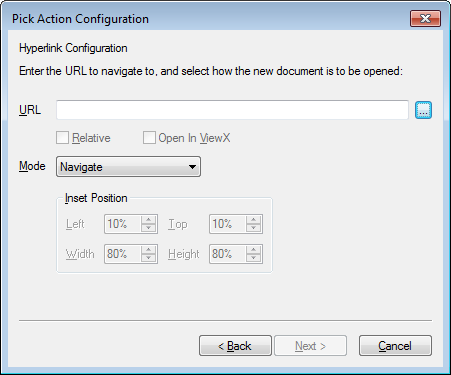
- On the second 'page' use the URL field to specify the 'target' display (the display that will be shown when the 'trigger' Mimic object is selected in Run mode.
To link to a web page:
- Enter the address of the web page manually in the URL field. You need to enter the full address, including http://
- Use the Open in ViewX check box to define whether the web page is shown in an external web browser or is shown in ViewX.
- Select the check box to display the web page in ViewX
- Clear the check box if you want the web page to be displayed in an external web browser.
To link to a ViewX display such as a Mimic, Trend or Form, either:
- Enter the address of the ‘target’ item in the URL field manually
Or:
- Select the URL field’s browse button and choose Link to Object. Next, use the browse window to select the ‘target’ item. The address of the item is added to the URL field automatically.
If you select a database item that has a graphical display, the hyperlink will display the graphical interface; if you select a database item that does not have a graphical display, the hyperlink will display the Form for the item.
To link to the Form of an item that has a graphical display, choose the item and then adjust its URL entry. You will need to remove the class component of the URL entry. For example, a hyperlink to the graphical display of a Mimic named ‘Change Password’ could be:
SCX:////CMimic/..Change Password
To change the hyperlink so that the Mimic's Form is the target, you need to remove the CMimic part of the entry:
SCX://///..Change Password
The class name is usually C<type of database item>, for example, CGraph, CMimic, CXYPlot. If required, you can use the Database Schema to determine the class of a database item (see Working with the Database Schema in the ClearSCADA Guide to the Database).
If you select the Link to Object option, the Relative check box becomes available. Proceed to step 6.
To link to an external file such as a Microsoft Word document, either:
- Enter the address of the ‘target’ file in the URL field manually.
Or:
- Select the URL field’s browse button and choose Link to File. Next, use the browse window to locate the ‘target’ file and then select Open. to confirm your choice. The address of the file is added to the URL field automatically. Proceed to step 7.
- Use the Relative check box to define whether the hyperlink uses a relative or absolute reference. If you select the check box, the hyperlink uses a relative reference. This means that as long as the hierarchy between the Mimic that contains the 'trigger' object and the 'target' database item remains the same, the hyperlink will work. This means that the Mimic and the 'target' database item can be moved—as long as the hierarchy between the Mimic and the 'target' database item remain the same, the hyperlink will work.
If you clear the Relative check box, the hyperlink will use an absolute reference. This means that the hyperlink will only work if the Mimic that contains the 'trigger' object and the 'target' database item remain in exactly the same location. If the Mimic is moved or the 'target' database item is moved, the hyperlink will be broken.
NOTE: The Relative option is only applicable to links to items in the ClearSCADA database.
- Use the Mode combo box and Inset Position settings to define the type, size and location of the 'target' display:
- Mode—Choose the required mode of navigation:
- Navigate—The 'target' display will be shown in place of the 'source' Mimic (the Mimic that contains the 'trigger' object). The display window will remain at its current size. Proceed to step 8.
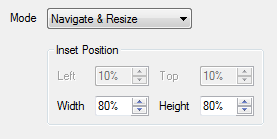
- Navigate & Resize—The 'target' display will be shown in place of the 'source' Mimic (the Mimic that contains the 'trigger' object). The display window will be resized according to the dimensions you specify in the width and height spin-boxes.
Use the Height spin-box to define the vertical dimensions of the resized display window, and then use the Width spin-box to define the horizontal dimensions. When you have defined the dimensions, proceed to step 8.
- Open in New Window—The 'target' display will be shown in a new window that overlays the window that contains the 'source' Mimic. The new window is sized automatically by the operating system. Proceed to step 8.
- Open as Inset—The 'target' display will be shown in a new window that overlays the window that contains the 'source' Mimic. You can specify the size and location of the window.
Use the Left and Top spin-boxes to define the position of the new window. 0% is the top left-hand corner of the 'source' Mimic window. So, when you increase the percentages, the new window will be positioned further down/right accordingly. Use the Width and Height spin-boxes to change the horizontal and vertical dimensions of the window accordingly. Proceed to step 8.
- Open as Inset (Relative)—The 'target' display is shown in a new window. The position of the window is relative to the position of the cursor when the 'trigger' object was selected.
The Open as Inset (Relative) option works in the same way as the Open as Inset option except that the cursor position defines 0% instead of the top left-hand corner of the 'source' Mimic. For example, if you set the inset window to be 50% of the 'source' Mimic's width and height and to have Left and Top settings of 10%, the 'target' Mimic will be displayed at 10% across and 10% down from the cursor position at the time the hyperlink was selected.
Proceed to step 8.
NOTE: Setting the Width or Height to 0% instructs the inset window to use the maintain the aspect ratio of the 'source' Mimic. For example, if you set the Height to 0% and the Width to 50%, the 'target' Mimic will retain the proportions of the 'source' Mimic (the 'target' Mimic will be half as wide and the height will be calculated so that the 'target' Mimic maintains the same proportions as the 'source' Mimic).
- Select the Next button to proceed to the third 'page' of the Pick Action Configuration Wizard.
- In the Pick Action Comment field, enter the text that will be displayed in the comment for the 'trigger' object. When a user positions the cursor over the 'trigger' object, a comment will be displayed in the status bar showing the text that you enter. For this reason, we recommend that you enter a brief description of the 'target' display or some indication as to which display the hyperlink targets.
NOTE: You can leave the description field blank if you wish. If you do not enter a description, a default description will be used instead.
- Select the Next button to proceed to the final 'page' of the Pick Action Configuration Wizard.
- If you are satisfied with the hyperlink configuration settings you have defined, select the Finish button to close the Pick Action Wizard and put the hyperlink configuration into effect.
The Hyperlink configuration is complete.
When the Mimic is displayed in Run mode, users will be able to select the 'trigger' object on the Mimic—when it is selected, the relevant 'target' display will be shown.