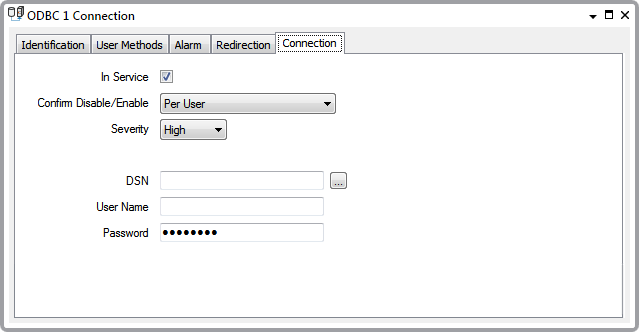
Use the fields on the Connection tab to define the access properties of the connection to the other application’s database.

- In Service—Use to specify whether the ODBC connection is active or inactive (see Placing an Item In Service in the ClearSCADA Guide to Core Configuration).
NOTE: If you later take the connection out of service, associated Queries and their dependants (points) also become out of service. This does not affect the configuration of these items.
- Confirm Disable/Enable—Users with the required permission can disable a connection that is in In Service, or enable a connection that is not In Service.
Use the Confirm Disable/Enable combo box to specify whether a confirmation dialog box is displayed whenever an operator requests that this connection is disabled or enabled (see Requesting Confirmation of Action Requests in the ClearSCADA Guide to Core Configuration).
- Severity—Use to define the severity of any alarms or events that are associated with the ODBC connection (see Defining Severities in the ClearSCADA Guide to Core Configuration).
- Area of Interest—This field is only displayed if the Area of Interest feature is enabled on your system. Use the field to specify the Area of Interest with which any non-state related point alarms or events are to be associated (see Assign a Different Area of Interest to an Item's Alarms and Events in the ClearSCADA Guide to Core Configuration).
NOTE: Use the Area of Interest field to specify the area with which any ODBC Connection alarms or events are to be associated (see Assign a Different Area of Interest to an Item’s Alarms and Events in the ClearSCADA Guide to Core Configuration).
- DSN—Specify the Data Source Name (DSN) for the database from which ClearSCADA is to retrieve data. Use the browse button to select a Reference browse window and select the required DSN from the window. The DSN has to be a System DSN. To assist in selecting the right type of DSN, the entries in the Reference browse window are limited to System DSNs.
- User Name—If access to the other application’s database is password protected, specify the user name that, used in conjunction with the Password given below, gives the required access.
- Password—If access to the other application’s database is password protected, specify the password that, used in conjunction with the above User Name, gives the required access.
NOTE: If you have a requirement for inserting or replacing data values in the other application’s database, you need to specify a user name and password that has Read and Write privileges (for the other application’s database).