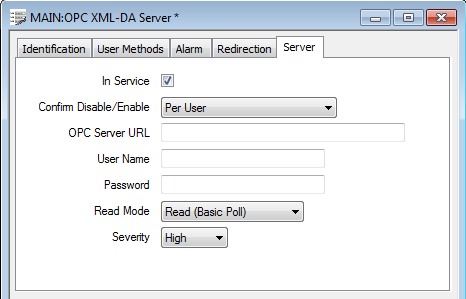
Use the fields on the Server tab to configure an OPC XML-DA server’s connection properties:

- In Service—Use to specify whether the OPC XML-DA server is active or inactive (see Placing an Item In Service in the ClearSCADA Guide to Core Configuration).
NOTE: If you take the server out of service, its scanners and their dependent items (such as points) also become out of service. This does not affect the configuration of the dependent items.
- OPC Server URL—Enter the URL of the OPC XML-DA server that is to be interrogated.
Example:
http://XMLDASERVER/xmlda/
To poll the local ClearSCADA server, enter the URL: http://localhost/webservices/opc
- User Name—Reserved for future use. Leave blank.
- Password—Reserved for future use. Leave blank.
- Read Mode—Use this combo box to define how ClearSCADA is to interrogate the XML-DA server for data. Choose from:
- Read (Basic Poll)—The driver periodically reads the points in a block.
- Subscription (Basic Poll)—Only supported by some servers. The server is made aware of the tags that need to be polled. The driver periodically requests the server to transmit any data changes for those tags.
When supported by a server, Subscription (Basic Poll) mode is more bandwidth efficient than Read (Basic Poll) mode.
- Severity—Use to define the severity of any alarms or events that are associated with the OPC XML-DA server (see Defining Severities in the ClearSCADA Guide to Core Configuration).
- Area of Interest—If the Area of Interest feature is enabled on your system, an additional Area of Interest field is displayed on the Server tab. Use the field to specify the area with which any of the server’s alarms or events are to be associated (see Assign a Different Area of Interest to an Item’s Alarms and Events in the ClearSCADA Guide to Core Configuration).
For further information on the Area of Interest feature, see Restrict Alarm and Event Access to Specific Areas of Interest in the ClearSCADA Guide to Core Configuration.