Perform this procedure after you Configure a Test SCADAPack 50 Digital Point.
In ClearSCADA, a SCADAPack 50 Outstation represents the properties of a SCADAPack 50 device.
Follow the procedure below to:
- Configure the SCADAPack 50 Test.Outstation properties. This includes allocating the outstation to an Outstation Set, which is a group of outstations that share channels
- Place the SCADAPack 50 Test.Outstation Set in service.
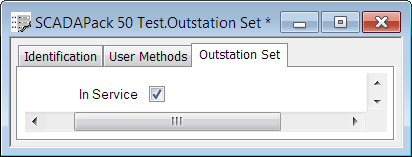
- In the Database Bar, select the SCADAPack 50 Test.Outstation Set database item.
The SCADAPack 50 Test.Outstation Set Form is displayed.
- Select the In Service check box.

- Save the property settings (see Saving Configuration Changes in the ClearSCADA Guide to Core Configuration) and close the SCADAPack 50 Test.Outstation Set window.
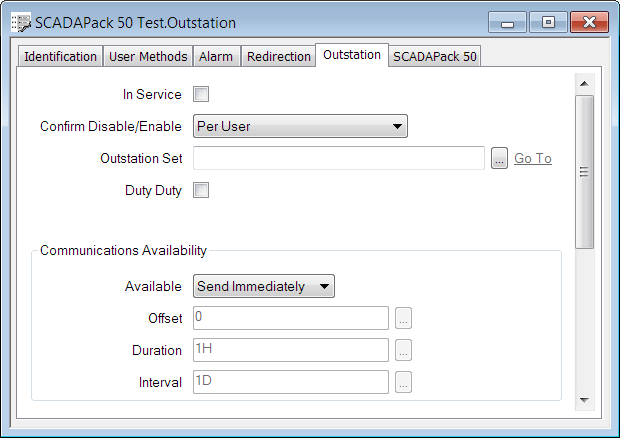
- In the Database Bar, select the SCADAPack 50 Test.Outstation database item.
The SCADAPack 50 Test.Outstation Form is displayed.
- Select the Outstation tab.

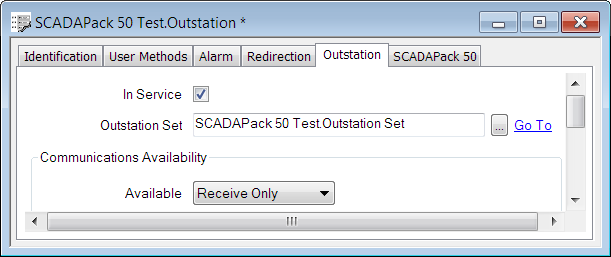
Set the following properties (leave the other properties at their default settings):
- In Service—Select the check box to activate the outstation.
- Outstation Set—Allocate the outstation to an Outstation Set. Use the browse button to display a Reference browse window, then select the SCADAPack 50.Test Outstation Set entry from the window.
- Available—Select the Receive Only combo box option.

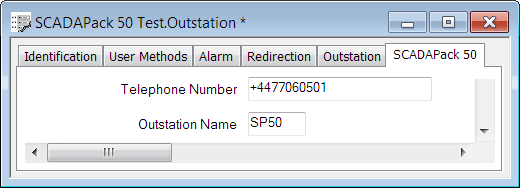
- Select the SCADAPack 50 tab.
- Set the following properties (leave the other properties at their default settings):
- Telephone Number—Enter the telephone number of the device modem. Use the required format (for more information, see the modem documentation). For example, +4477060501.
ClearSCADA can potentially receive messages from many devices. The Telephone Number and Outstation Name together uniquely identify a device and enable ClearSCADA to route the messages received from a device.
- Outstation Name—Enter
SP50. This should be the same name that you entered for the device in the Device Identifier field on the Kervisu Global Parameters screen. This is the name of the device that the SCADAPack 50.Test Outstation database item represents.

- Line 1 Location—Select the Local combo box option.
- Line 1 Channel—Use the browse button to display a Channel Reference browse window. Select the SCADAPack 50.Test Channel entry from the window.

- Telephone Number—Enter the telephone number of the device modem. Use the required format (for more information, see the modem documentation). For example, +4477060501.
- Save the property settings (see Saving Configuration Changes in the ClearSCADA Guide to Core Configuration) and close the SCADAPack 50 Test.Outstation window.
ClearSCADA displays the following message:
"DialIn Channel Id: Notice: Possible loss of device Operation: Downloading this change could affect the operation of the device and require a site visit to restore operation of the device. Please consult the documentation before proceeding".
When you complete the next step, this message will no longer apply and ClearSCADA will no longer display the message.
-
Select the Preset Configuration action for the outstation (see Preset Configuration).
NOTE: ClearSCADA supports a wide variety of operator-driven or automated actions and controls. These actions can be triggered automatically by ClearSCADA or can be activated manually by a user (typically by selecting an action from a context-sensitive menu (see Object Menu in the ClearSCADA Guide to ViewX and WebX Clients)).
The next stage is to view the status of the outstation.
Proceed to View the Outstation Status.
Further Information
For information about how terminology varies between ClearSCADA and Kervisu, Differences between Kervisu and ClearSCADA Terminology.