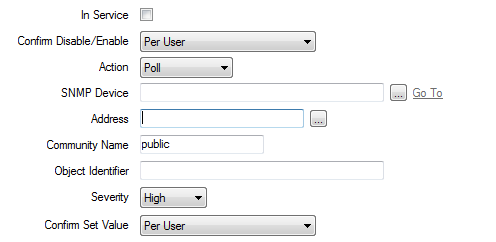
Use the fields at the top of the <Point Type> tab on the appropriate SNMP Point Form to configure these common point properties:

- In Service—Use to specify whether the point is active or inactive (see Placing an Item In Service in the ClearSCADA Guide to Core Configuration).
- Confirm Disable/Enable—Users with the required permissions can disable a point that is In Service, or enable a point that is not In Service. Such actions are carried out using the Disable Point and Enable Point pick actions.
Use the Confirm Disable/Enable combo box to specify whether a confirmation dialog box is displayed whenever an operator requests that this point is disabled or enabled (see Requesting Confirmation of Action Requests in the ClearSCADA Guide to Core Configuration).
- Action—Use to specify the type of data retrieval that is associated with the point.
- Poll—The point is used to retrieve current point values. If this option is selected, the driver updates the value in the ClearSCADA database whenever that point value changes. It does not update the point value in the database while the value remains unchanged.
If this option is selected, use the Device and Object Identifier fields (see below) to specify the value that this point is to monitor. You also need to Configure the Poll and Link Status Properties.
- Link Status—Applies only to 1-bit Digital points. The point is used to determine whether a device is currently accessible via a particular link.
If this option is selected, use the Device field (see below) to specify the link that this point is to monitor. You also need to Configure the Poll and Link Status Properties.
You need to configure the point states such that State 0 indicates that the device is healthy and being polled for data, and State 1 indicates that the link has failed (either the device, or the network between the device and ClearSCADA, has failed).
- Trap Generic—The point is used to retrieve alarm or significant event data using the generic SNMP trap (see Understanding TRAPS and INFORM Requests).
If this option is selected, each trap returns generic code in the data, which specifies which event has occurred.
- Trap Specific—The point is used to retrieve alarm or significant event data using a trap that is technology-, product- or user-specific.
If this option is selected, you also need to supply the trap’s Object Identifier (see below) and Configure the Trap Specific Properties.
- Poll—The point is used to retrieve current point values. If this option is selected, the driver updates the value in the ClearSCADA database whenever that point value changes. It does not update the point value in the database while the value remains unchanged.
- SNMP Device—Use to specify the name of the remote SNMP Device with which the point is associated. Use the browse button to display a Reference browse window and select the required device from the window (see Create an SNMP Device).
When you connect an SNMP point to an SNMP device the Address and Community Name fields are grayed out as these values are passed from the device.
- Address— Use this to specify the IP address of the network device.
Example:
10.3.2.54
Use the browse button to display a Reference browse window and select the required entry from the window.
- Community Name—Use to specify the access community for the point. The community name is, in effect, a password that is used to restrict access to the data within an SNMP agent. It is a name that is shared by the SNMP management work stations and hosts. You should be able to obtain the name from your network administrator.
- Object Identifier—Not applicable for Trap Generic or Link Status actions. Use to specify the identifier that links this point to the appropriate value in the SNMP agent. The identifier is a string of numbers that is derived from a global naming tree, and is used to identify the object.
Example:
.1.3.6.1.2.1.1.1.0
NOTE: We recommend the use of a free tool called Getif for discovering the correct object identifiers (OIDs) for SNMP agents. You can download the tool from http://www.wtcs.org/snmp4tpc/getif.htm.
- Severity—Use this combo box to define the severity of any events that are logged, or alarms that are raised for the point. For example, ClearSCADA raises an alarm if the point has invalid Device configuration or the Object Identifier is incorrect.
For more information on severities, see Defining Severities in the ClearSCADA Guide to Core Configuration.
- Area of Interest—If the Area of Interest feature is enabled on your system, an Area of Interest field is displayed. Use the field to specify the Area of Interest with which the point’s alarms and events are associated (see Assign a Different Area of Interest to an Item’s Alarms and Events in the ClearSCADA Guide to Core Configuration).
- Confirm Set Value—This field only applies if the point is used to retrieve current point data and has its Action set to Poll. Use this combo box to specify whether a confirmation dialog box is displayed whenever an operator attempts to set the point’ s value (see Requesting Confirmation of Action Requests in the ClearSCADA Guide to Core Configuration).
To specify whether a point value can be set or written in the device, use the Set Value Enabled check box within the Poll/Link Status section of the tab (see Configure the Poll and Link Status Properties).
Further Information
For fields specific to Cardinal points see Configuring Cardinal Points
For fields specific to Digital points see Configuring Digital Points
For fields specific to Integer points see Configuring Integer Points
For fields specific to String points see Configuring String Points.