Create a Super User account
When the installer program runs, you will need to select the type of installation and choose which parts of the software you want to install. When you have done this, you will be prompted to Create a Super User Account. You need to configure a Super user account for your system to enable you to access the system for the first time and configure the security of the system.
Change the password for a Super User
You can use the Server Configuration Tool to change the settings for the Super user account. To re-configure the Super user account:
-
Display the Server Configuration Tool and log on if required (see Accessing the ClearSCADA Server Configuration Tool in the ClearSCADA Guide to Server Administration).
- Expand the required system and node.
- Expand the System Configuration branch.
- Select the Security section.
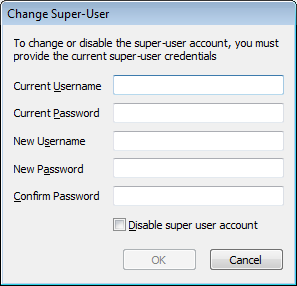
- Select the Change button in the Super-User section to display the Change Super-User window.

- Use the Change Super-User window to alter the Super User settings:

- Current Username—Enter the Username for the Super User. This is the Username that is already in place (either the Username that was entered during the installation process or the Username that was previously defined for the Super User via the Change Super-User window).
- Current Password—Enter the password for the Super User. This is the password that is already in place (either the password that was entered during the installation process or the password that was previously defined for the Super User via the Change Super-User window).
- New Username—Enter the new Username for the Super User. This will replace the current Username.
- New Password—Enter the new password for the Super User. This will replace the current password.
- Confirm Password—Re-enter the new password to confirm it as the new password. You have to enter the same password as you entered in the New Password field.
- Disable Super User Account—Use this check box to disable the Super User feature if required. We recommend that you enable a Super user account. Select this check box to disable the Super User feature or leave it clear to enable the Super User feature.
NOTE: If the Super user account is disabled on your system, you can re-enable it by running the installer program again on the server system. The installer program is included on the ClearSCADA CD/DVD/Download and is named
Setup.exe(see Installing ClearSCADA) .
- Select the OK button to confirm your entries and close the Change Super User window.
- Apply the changes to the server.
ATTENTION: Schneider Electric is not responsible for the physical security of your system PCs. Physical security is the responsibility of the customer. You should take action to protect your system PCs from unauthorized access, as any user with sufficient permissions to run the ClearSCADA installer on the server system will be able to enable the Super User account. By using the Super User account, they will have full access to your system.
SECURITY THREAT
Further Information