You can use the Server Configuration Tool to define the default level of system security. Users access the system via user accounts and the level that you choose enforces several security settings, including minimum password length, password retries, and so on, for user accounts that are managed directly in ClearSCADA.
NOTE: With user accounts that are associated with Windows User Profiles, password management is performed via the relevant Windows domain.
To define the default security level and user account settings for your system:
- Display the Server Configuration Tool and log on if required (see Accessing the ClearSCADA Server Configuration Tool in the ClearSCADA Guide to Server Administration).
- Expand the required system node.
- Expand the System Configuration branch.
- Select the Security branch.
- Use the Security Level combo box to choose the security level:

- None—Disables the security feature (not recommended).
ATTENTION: If you disable the security feature by choosing a security level of None, there are no user accounts and every user can access the features for every item.
- Weak—Enables the security feature and enforces low level security measures. You can see the low level security settings in the grayed out fields on the Security section of the Server Configuration Tool.
 Weak Security Level
Example:
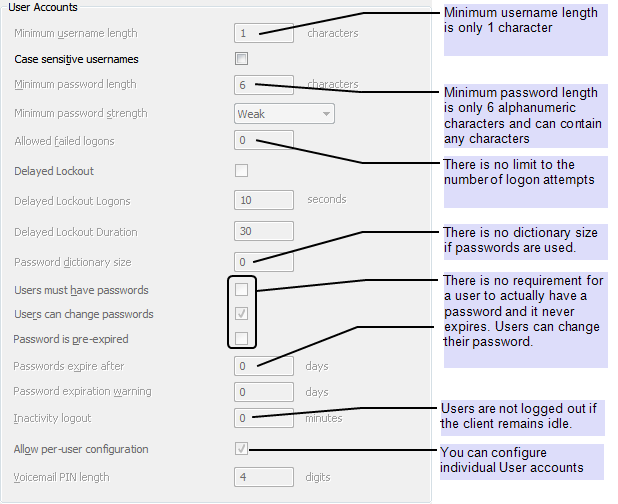
- Case Sensitive Usernames—Use the check box to define whether user names are case-sensitive (see Case Sensitive Usernames).
- Delayed Lockout—Select this check box to enable ClearSCADA to disable user accounts temporarily for a duration defined in Delayed Lockout Duration, if a user does not enter the correct Username and Password within the number of attempts defined in Delayed Lockout Logons. By default this feature is disabled.
- Delayed Lockout Logons—Define the number of log on attempts that are permitted if the Delayed Lockout feature is enabled. If a user does not enter the correct Username and Password within the defined number of attempts, the system will disable the relevant user account for a duration defined in Delayed Lockout Duration. This value should be smaller than the value of the Allowed Failed Logons.
- Delayed Lockout Duration—Define the duration of time that a user account is disabled if the Delayed Lockout feature is enabled.
- Medium—Enables the security feature and enforces medium level security measures. You can see the medium level security settings in the grayed out fields on the Security section of the Server Configuration Tool.
 Medium Security Level
Example:
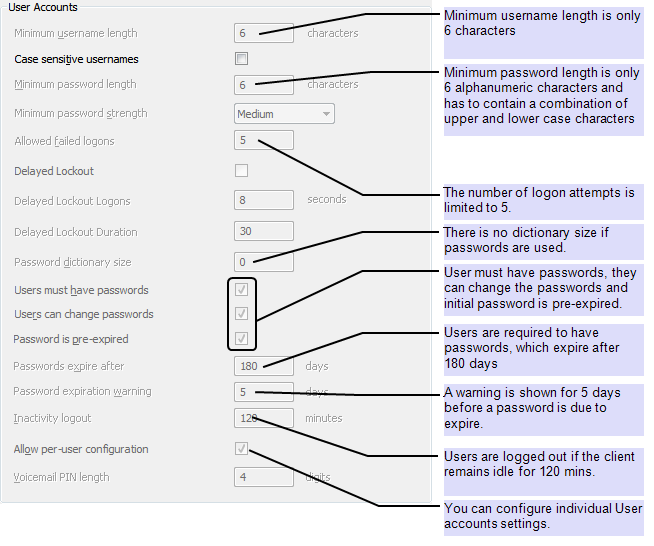
- Case Sensitive Usernames—Use the check box to define whether user names are case-sensitive (see Case Sensitive Usernames).
- Delayed Lockout—Select this check box to enable ClearSCADA to disable user accounts temporarily for a duration defined in Delayed Lockout Duration, if a user does not enter the correct Username and Password within the number of attempts defined in Delayed Lockout Logons. By default this feature is disabled.
- Delayed Lockout Logons—Define the number of log on attempts that are permitted if the Delayed Lockout feature is enabled. If a user does not enter the correct Username and Password within the defined number of attempts, the system will disable the relevant user account for a duration defined in Delayed Lockout Duration. This value should be smaller than the value of the Allowed Failed Logons.
- Delayed Lockout Duration—Define the duration of time that a user account is disabled if the Delayed Lockout feature is enabled.
- Strong—Enables the security feature and enforces high level (strong) security measures. You can see the high level security settings in the grayed out fields on the Security section of the Server Configuration Tool.
This is the default security setting when ClearSCADA is installed.
 Strong Security Level
Example:
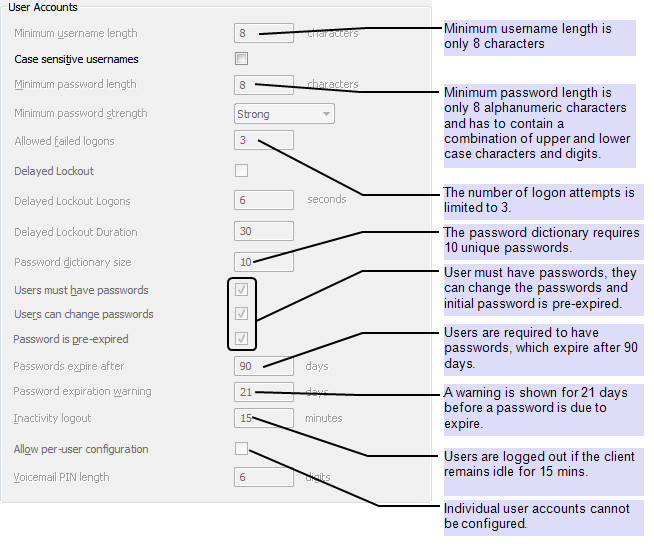
- Case Sensitive Usernames—Use the check box to define whether user names are case-sensitive (see Case Sensitive Usernames).
- Delayed Lockout—Select this check box to enable ClearSCADA to disable user accounts temporarily for a duration defined in Delayed Lockout Duration, if a user does not enter the correct Username and Password within the number of attempts defined in Delayed Lockout Logons. By default this feature is disabled.
- Delayed Lockout Logons—Define the number of log on attempts that are permitted if the Delayed Lockout feature is enabled. If a user does not enter the correct Username and Password within the defined number of attempts, the system will disable the relevant user account for a duration defined in Delayed Lockout Duration. This value should be smaller than the value of the Allowed Failed Logons.
- Delayed Lockout Duration—Define the duration of time that a user account is disabled if the Delayed Lockout feature is enabled.
NOTE: The preset security levels allow you to select the Case sensitive usernames option.
If you change the Security Level of an operational system, then the passwords for users accounts that have passwords are automatically expired and users will need to enter new passwords the next time that they a log on.
- Custom—If you have set the Security Level to Custom, you can use the Server Configuration Tool to define the default security settings for new user accounts. This means you can specify how often users have to change their passwords, how much time can expire before an inactive user is logged off automatically, and so on.
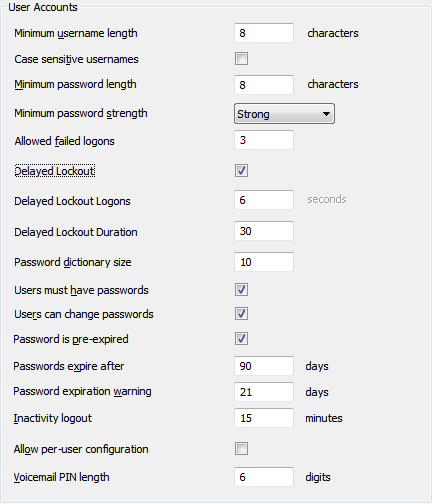
Define the default user account settings:
- Minimum Username Length—Enter the least number of characters permitted in a user account name. We recommend a minimum password length of at least 6 characters for greater security.
- Case Sensitive Usernames—Use the check box to define whether user names are case-sensitive (see Case Sensitive Usernames).
ATTENTION: Before disabling Case Sensitive Usernames, you should check that your system does not have user accounts with the same name (but using different case). If you disable Case Sensitive Usernames on a system that has users with the same name, those users will become invalid.
- Minimum Password Length—Enter the least number of characters permitted in a user account password. We recommend a minimum password length of at least 6 characters for greater security.
NOTE: The Minimum Password Length setting only applies to new accounts; it does not affect existing passwords.
- Minimum Password Strength—Choose the strength for passwords. The strength determines what kinds of characters are required in a password. Choose from:
- Weak—The password can contain any characters.
- Medium—The password has to contain a combination of upper and lower case characters.
- Strong—The password has to contain a combination of upper and lower case characters and digits.
- Very Strong—The password has to contain a combination of upper and lower case characters, digits, and punctuation characters such as commas.
NOTE: The Minimum Password Strength setting only applies to new accounts; it does not affect existing passwords.
- Allowed Failed Logons—Define the number of log on attempts that are permitted. If a user does not enter the correct Username and Password within the defined number of attempts, the system will disable the relevant user account. The user will be unable to log on via that account until a system administrator has re-enabled the user account by enabling the Security feature on the User Form (see Creating a User Account).
- Delayed Lockout—Select this check box to enable ClearSCADA to disable user accounts temporarily for a duration defined in Delayed Lockout Duration, if a user does not enter the correct Username and Password within the number of attempts defined in Delayed Lockout Logons.
- Delayed Lockout Logons—Define the number of log on attempts that are permitted if the Delayed Lockout feature is enabled. If a user does not enter the correct Username and Password within the defined number of attempts, the system will disable the relevant user account for a duration defined in Delayed Lockout Duration. This value should be smaller than the value of the Allowed Failed Logons.
- Delayed Lockout Duration—Define the duration of time that a user account is disabled if the Delayed Lockout feature is enabled.
- Password Dictionary Size—Enter the number of passwords that are stored in the password dictionary for each user account by default.
When a user creates a password, it is stored in the password dictionary. When the password expiry time has elapsed, the account user needs to enter a new password. The new password cannot be the same as any of the passwords in the password dictionary.
For more information on the Password Dictionary, please refer to Creating a User Account.
- Users Must Have Passwords—Select this check box to enforce passwords; every user account will require a password. If you clear this check box, passwords are not required and users will only need a user name in order to log on.
- Users Can Change Passwords—Select this check box to allow users to change the passwords for their user accounts; clear it to stop users from being able to change their passwords.
- Password is Pre-expired—Select this check box to set ClearSCADA to prompt each new user to change their user account password the first time they log on; clear it to make each user log on using the password defined in their user account configuration (they are not prompted to change their password). For more information on the Pre-expired feature, see Define the Password for a User.
- Passwords Expire After n Days—Enter the default number of days that can elapse before a new password needs to be created for each user account. By setting a password expiry time, you increase system security as passwords are regularly changed so there is less chance of an unauthorized user accessing the system.
Example:
If you set tPassword Expire After n Days to 10 days and a Password Dictionary Size of 3.
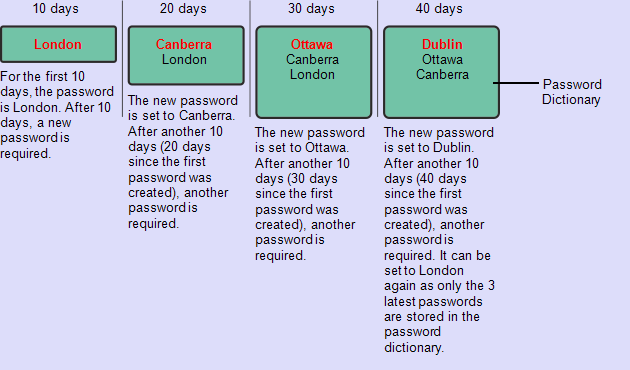
- Password Expiration Warning—Enter the default number of days from which a user is informed in advance that their password is due to expire. Once this limit is reached, ClearSCADA generates a diagnostic message whenever the user logs on, informing the user of the number of days that remain until their password expires. The diagnostic message appears in the Messages Window. The user is prompted to change their password before the expiration date occurs.
- Inactivity Logout—Enter the number of minutes that can elapse before an inactive user is logged off. This default setting is designed to help protect your system from unauthorized users that may attempt to gain access via unmanned workstations. If a user is inactive for the Inactivity Logout time, their user account will be logged off automatically. So, if a user leaves their workstation unmanned for the Inactivity Logout time, any users that attempt to use the workstation will need to log on.
- Allow Per-User Configuration—Use this check box to define whether individual user accounts can have different settings to the default settings you are applying via the Server Configuration Tool. If you select this check box, each user account will have the Security tab available—the Security tab settings allow the user account to have security settings that are different to the default settings you are defining via the Server Configuration Tool, (see Define the Security Settings for a User). If you clear the check box, every user account will use the default settings (so will have the same number of characters per password, same failed log in attempt limits and so on.)
The default settings that you specify on the Server Configuration Tool are put into effect automatically for every new user account. You can then use the User Form to adjust the settings for the individual user accounts as required (see Configure User Accounts Appropriately).
- Voicemail PIN Length—If ClearSCADA is connected to a third-party telephony system with voicemail, this allows you to enter the number of characters required for PIN numbers. PIN numbers for voicemail are required to have the defined number of characters. For example, if you enter 7, voicemail PIN numbers require exactly 7 digits.
- None—Disables the security feature (not recommended).
- Apply the changes to the server.
- Repeat steps 2 to 6 inclusive for each system as required.
When you have set the default password and timeout settings, we suggest you proceed to:
Further Information