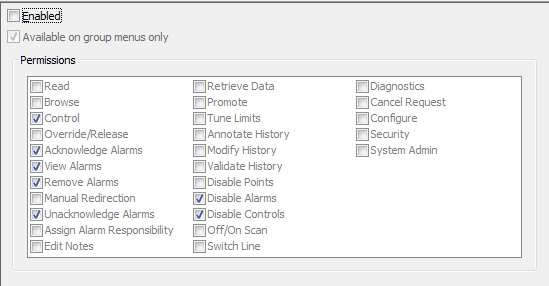
You can only make use of the exclusive control feature after it has been enabled and configured to meet your requirements. You can use the Server Configuration Tool to enable (and disable) the exclusive control feature and choose the permissions to which it applies.
To enable and configure the exclusive control feature:
- Access the Server Configuration Tool (see Accessing the ClearSCADA Server Configuration Tool in the ClearSCADA Guide to Server Administration).
- Expand the required system and node.
- Expand the System Configuration branch.
- Select Exclusive Control.
The Exclusive Control section is displayed.
- Select the Enabled check box to activate the exclusive control feature.
- Use the Available on Group Menus Only check box to define whether the exclusive control options (Take Exclusive Control, Release Exclusive Control etc.) are available on every item or only on Group items. If you select the check box, users will only be able to use the exclusive control options on entire groups of items; if you clear the check box, users will be able to use the exclusive control options on individual items.
- Select the check boxes for those features that you want to stop other users being able to use on an item that is under exclusive control. For example, if you select the Disable Alarms check box, when a point is under the exclusive control of a user, other users cannot disable the alarms for that point.
The features that relate to the check boxes you leave cleared will be available to those users that have sufficient permissions, even for items that are under exclusive control. For example, if the Override/Release check box is cleared and a point is under the exclusive control of a user, every other user will still be able to use the Override and Release Override actions for that point.
- Repeat steps 2 to 7 inclusive for each node in the system.
- When you have made the changes to the server configuration, close the Server Configuration Tool and select the Yes button at the save changes prompt.