If ClearSCADA's built-in algorithms are unsuitable for your needs, you can add custom algorithms (see Historic Algorithms (Custom)).
To add a historic algorithm:
- Access the ClearSCADA Server Configuration Tool, (see Accessing the ClearSCADA Server Configuration Tool).
- Expand the Database Configuration branch.
- Select Historic Algorithms.
- Right-click in the list of historic algorithms.
A context-sensitive menu is displayed. - Select the type of algorithm that you want to create:
- Add Accumulative Algorithm—The algorithm only uses the values in the current sample to calculate the historic value (see Accumulative Algorithms).
- Add Moving Algorithm—The algorithm uses the values in the current sample and the samples for a defined amount of time prior to the current sample to calculate the historic value (see Moving Algorithms)
Adding an Accumulative Algorithm
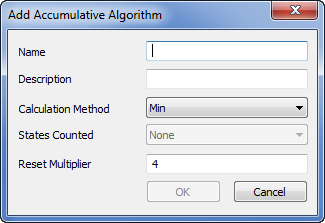
- Use the Add Accumulative Algorithm window to define the settings for the algorithm:

- Name—Type in a suitable name for the algorithm. The name should indicate the purpose of the algorithm.
- Description—Type in a short description of the algorithm. The description will allow other users to easily understand the purpose of the algorithm.
- Calculation Method—Select the type of calculation that is provided by the algorithm. Choose from:
- Min—Calculates the minimum value during the sample.
- Max—Calculates the maximum value during the sample.
- Mean—Calculates the mean average value during the sample.
- Integrator—Calculates the total value during the sample.
- Rate of Change—Calculates the rate at which values are changing during the sample.
- Runtime—Calculates the amount of time that an item remains in the same state.
- Counter—Calculates accumulative values during the sample.
- States Counted—This setting is only available when the Calculation Method is set to Runtime or Counter. None, True, False, True And False.
- Reset Multiplier—This setting defines the reset time for the sample. It is a multiplication of the interval, for example if the Reset Multiplier is set to 2 and the interval for the historic data is 1 hour, the end of the sample is set to 2 hours. After every 2 hours, the sample will be reset—the values in the previous sample will not be used in the calculation for the next historic value.
- Select the OK button to confirm the settings.
Adding a Moving Algorithm
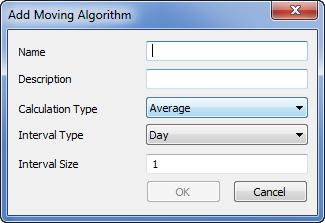
- Use the Add Moving Algorithm window to define the settings for the new algorithm:

- Name—The name for the algorithm. You should enter a name that is indicative of the type of algorithm, so that users can easily understand the purpose of the algorithm when using a historic Trend.
- Description—Enter a short description of the algorithm. Again, this is to help users understand the purpose of the algorithm.
- Calculation Type—Choose the type of calculation for the algorithm. This can be:
- Average—A mean average calculation.
- Sum—A total calculation.
- Interval Type—Define the time units for the amount of time over which the algorithm will be applied. For example, if you want the algorithm to be used to calculate the average values for 6 days prior to the resample interval on a Trend, you need to set the Algorithm Type to Average, and the Algorithm Interval Type to Days. You would also need to set the Algorithm Interval Size to 6.
- Interval Size—Defines the start time of the period for which the algorithm is applied. For example, if you enter 4 and the Algorithm Interval Type is set to Days, the start time of the period is 4 days prior to the current resample interval on a Trend. The algorithm value is calculated based on the historic values reported between the current resample interval and 4 days prior to the current resample interval.
- Select the OK button to confirm the settings and close the window.
Example:
A new algorithm named 6Day is created. It has a description setting of '6 Day Average', its Algorithm Type is Average, and it has an Algorithm Interval Type of Days and an Algorithm Interval Size of 6.
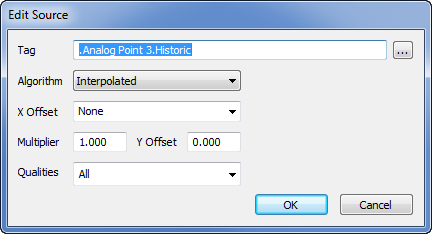
An engineer configures a historic Trend. It shows a trace that represents the historic values of a point. When the engineer edits the Advanced Source Configuration for the trace, a list of algorithms is available—the list includes the 6Days algorithm (algorithm).

The engineer sets the trace to use the 6Day algorithm. This means that the trace represents the average value for the point, with the average calculation using the values from 6 days prior to the current re-sample interval. This means that each time a new average value is plotted for the trace, the values that are used to calculate the average value are those historic values that were reported between the time the value is plotted (the re-sample) and 6 days prior to the re-sample. So if the average value is plotted at 12:00 on April 12th 2014, the calculation for the average value is based on the values reported between 12:00 on April 6th 2014 and 12:00 on April 12th 2014.