You can configure ClearSCADA to backup your database automatically. This is highly recommended as it means you do not have to rely on user interaction to create regular backups.
The recommended way to have ClearSCADA backup your database automatically is to associate a Backup item with a Schedule. The Schedule should be configured to trigger the Backup item's Backup method on a regular basis, for example, Daily.
NOTE: When you change configuration that is stored in the ClearSCADA database, ClearSCADA will not commit these changes to disk immediately. ClearSCADA will first of all store the changes in temporary memory and then periodically save (flush) them to the Main server’s disk. The interval at which ClearSCADA performs this save process is set in the Server Configuration Tool (see Database Save Interval). The default save interval is 1 minute, but this may vary. Therefore, ClearSCADA may not include recent configuration changes in the backup. This is because ClearSCADA may not yet have saved the changes to disk. However, once ClearSCADA has saved these changes, it will include them in any subsequent backups.
To configure a Schedule to trigger a database backup on a regular basis:
- Log on to ViewX via a User Account that has the Configure Database permission and the System Admin permission.(Configure Database allows you to configure the Schedule and System Admin allows you to access the Backup method of a Backup database item).
-
If your database does not already contain a suitable Backup item, create a new Backup item and configure it (see Configure a Backup Database Item). If you already have a suitable Backup item, skip this step.
NOTE: If you want to backup to a location on a network or to a mapped drive, appropriate Backup settings must be in place in the Server Configuration Tool (see Backing up a Database Over a Network)
-
If your database does not already contain a suitable Schedule item, create a new Schedule. To do this, right-click on the Root Group or a Group folder and select Create New > Other > Schedule. Enter a suitable name for the new Schedule item.
If you already have a suitable Schedule item, skip this step.
- Display the Form for the Schedule (seeDisplay a Form in the ClearSCADA Guide to Core Configuration).
- Configure the Schedule so that it is In Service and uses settings appropriate to your requirements (seeDefine the Basic Schedule Properties in the ClearSCADA Guide to Core Configuration).
- Save the configuration changes.
-
Right-click on the Schedule item and select the Edit Schedule option from the context-sensitive menu.
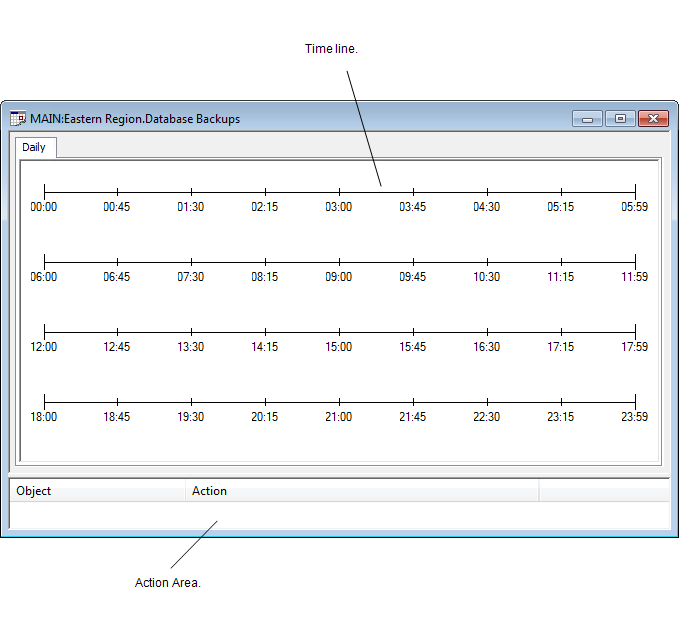
The Schedule Editor is displayed.
-
Drag the appropriate Backup item from the Database Bar into the Action Area at the bottom of the Schedule Editor.
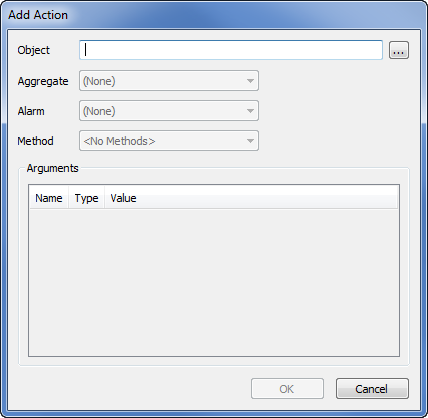
When you release the mouse button, the Add Action window is displayed.
- Leave the Alarm combo box set to (None). This is because the method you want the Schedule to trigger is associated with the Backup item, not an alarm aggregate for the Backup item.
-
Set the Method combo box to Backup (as this is the method that you want to be triggered).
NOTE: If you want the scheduled backup to use different settings to those defined in the Backup item's configuration, you can use the Arguments section to edit the expression. (For more information, see Method Expressions in the ClearSCADA Guide to Expressions).
- Select the OK button to confirm the settings and close the Add Action window.
- If you have configured the Schedule to be a Daily, Weekly, Monthly, or Yearly Schedule, you need to define when the Backup method will be triggered. To do this:
- On the time line in the Schedule Editor, double-click on the times at which you want the Backup method to be triggered.
A marker is added for each 'event' that you add to the Schedule.
If you have configured the Schedule to be a Simple Schedule, the Backup method will be triggered according to the Offset and Interval (that you defined on the Schedule Form).
- On the time line in the Schedule Editor, double-click on the times at which you want the Backup method to be triggered.
- Save the Schedule.
ClearSCADA will trigger the Backup method automatically at the specified times.
During the backup process, data cannot be written to the database. This means that any changes that need to be written to the database, such as configuration changes, are stored locally and are not flushed. The stored changes are only flushed to disk on the server when the backup is complete.
When a backup is in progress, you can cancel it (if required) by using the Abort Backup method. Aborting a backup does not result in an alarm being raised, as the backup was canceled intentionally.
If the backup process is unable to complete successfully, ClearSCADA will deem the backup to have failed and will raise an alarm. The alarm will be shown in the various alarm displays, including the Alarm Banner and Alarms List.
NOTE: If a backup is in progress on a multi-server system, and there is a Main-Standby changeover, ClearSCADA stops the backup automatically. The backup is deemed to have failed and an alarm is raised.
Schedules are just one way of backing up the database automatically - Logic programs, external applications, method calls, and alarm redirections can all be configured to trigger a Backup method too.
Further Information
Logic: see Calling a Method in the ClearSCADA Guide to Logic.
Alarm Redirections: see Select the Action to be Taken in the ClearSCADA Guide to Alarm Redirection.
Method Calls: see Configure the Method Call's Properties in the ClearSCADA Guide to Core Configuration.