For a Hot-Standby Pair connection to work correctly, you need to configure the Main server to recognize the Standby server. Similarly, you need to configure the Standby server to connect to the Main server. This is achieved by using the Partners settings on the Server Configuration Tool.
The successful configuration of a Hot-Standby Pair is also dependent on certain settings being in place on both the Main server and the Standby server. If you follow the instructions in this section, you will learn how to check which Main server settings need to be duplicated on the Standby server.
To configure a Hot-Standby Pair:
- Install ClearSCADA and the relevant drivers on the server that is to begin as the Main server.
- Restart the server (ClearSCADA runs as a service and will start when your server’s system starts up).
- When the server has been restarted, you will see a ClearSCADA server icon in the Windows taskbar. The ClearSCADA server icon is magenta if there is no database or blue if there is an existing database. If the icon is magenta, you will need to set up the client connections (see Welcome to the Client Administration Guide in the ClearSCADA Guide to Client Administration). If the icon is blue, you can right-click on the ClearSCADA server icon to display a context sensitive menu, and then select the Configuration option to display the Server Configuration Tool.
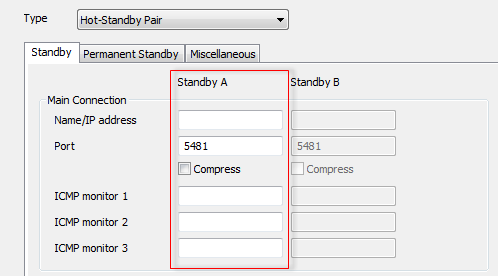
- Log on to the server that starts as Main and configure it to be part of a Hot-Standby Pair (see Configure the Partners Settings of a Server). You should set the Type to Hot-Standby Pair and use the Standby A column of fields to define the connection settings of the Standby server. For example, in the diagram below, you would set the Name/IP Address, Port, compression settings (Compress), and ICMP Monitors for the Main Connection between the Main server and the Standby server by using the fields in the Standby A column.

- Use the Server Configuration Tool to define the other server configuration settings for the Main server as required (see Understanding the ClearSCADA Server Configuration Tool).
- Restart the server to apply the configuration settings (see Start and Stop the System Server).
- Create a Blank Database.
- Set up the client connections (see Welcome to the Client Administration Guide in the ClearSCADA Guide to Client Administration).
- Set up User Groups and User accounts (see Welcome to the Security Guide in the ClearSCADA Guide to Security).
- Define the security settings for your database (see Allocating Security Permissions in the ClearSCADA Guide to Security).
- Set up the Archiving facility.
- Set up your system to Monitor the Available Disk Space.
- Install ClearSCADA on the server that starts as the Standby server.
ATTENTION: You should install the same drivers on the Standby server as those installed on the Main server. If the Main server has drivers that are not installed on the Standby, the Standby server will not be able to establish a connection with the Main server.
- Log on to the server that starts as Standby and configure it to be part of a Hot-Standby Pair (see Configure the Partners Settings of a Server). You should set the Type to Hot-Standby Pair and use the Standby A column of fields to define the connection settings of the Main server.
- Define the same server configuration settings as those that are in place on the Main server. To do this, you can either:
- Export the settings from the Main server to the Standby server (contact Schneider Electric for more information).
- Apply the configuration settings to the Standby server manually by using the Server Configuration Tool (see Understanding the ClearSCADA Server Configuration Tool). This is the recommended method for implementing changes to the server configuration (i.e. making adjustments to existing server configuration settings).
The main advantage of using this method is that you can make small adjustments on each server, rather than having to make the changes on one server then export the settings. However, this method of server configuration can mean that:
- Server configuration could take a longer amount of time, especially if the servers are being setup for the first time.
- Server settings could be different on the servers due to system administrator making a mistake, for example, entering an incorrect value.
- Server settings could be different due to a system administrator not having a record of the settings on the other server(s). This is especially applicable when the servers are at different geographical locations. For this reason, we recommend that you make notes of each setting that you change.
- Restart the Standby server to apply the configuration settings (see Start and Stop the System Server).
- Set up the client connections (see Welcome to the Client Administration Guide in the ClearSCADA Guide to Client Administration).
- Perform a manual changeover to check that both servers can switch to Main (see Perform a Manual Changeover on a Multi-Server System). You should also take this opportunity to test the performance of the architecture (see Test the Servers in a Multi-Server Architecture).
When you have configured the server architecture, we recommend that you configure a Logic program to map the server status values to digital points so that alarms can be raised should a server become unavailable. For more information, see How Can I Detect that a Server has Failed?.