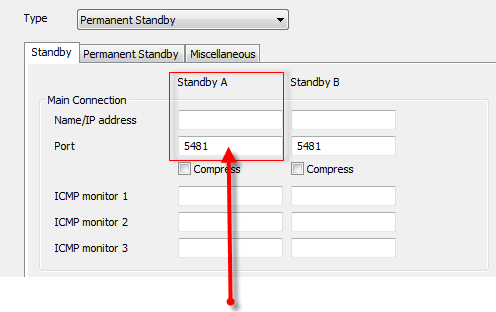
The Permanent Standby server has to be able to connect to the Main server so that the Main server can update the Permanent Standby server’s database. To make this possible, you need to configure the Permanent Standby server so that it can recognize the connection to the Main server.
To configure a Permanent Standby server:
- On the Permanent Standby server, access the Server Configuration Tool and log on via a User account with the System Admin permission (if log on is required).
- Access the System Configuration>Partners settings and set the Type to Permanent Standby.
- In the Main Connection section on the Standby tab, use the Standby A fields to define the settings for the primary connection between the Permanent Standby server and the server that starts as the Main server in the architecture.
- For more information on the Name/IP Address, Port, Compress, and ICMP Monitor settings, see Configure the Main and Backup Connections.
-

- In the Backup Connection section, use the Standby A settings to define the secondary connection between the Permanent Standby server and the Main server (this only applies if dual ethernet connections are being used; leave the fields empty if there is only one connection between the Permanent Standby server and the Main server):
- In the IP Address field, enter the IP address of the Permanent Standby server’s network card (the card that is used for the secondary connection with the Main server).
- Use the Compress check box to enable or disable compression on the secondary connection between the Permanent Standby server?and the Main server. For more information, see Define the Server Compression Settings.
- Use the Standby A column’s Monitor settings to define the monitor connect and request timeouts for the connection between the Permanent Standby server and the server that starts as Main (see Define the Monitor Timeout Settings for a Server).
- Use the Standby A column’s Transfer settings to define the transfer update, connect and request timeouts for the connection between the Permanent Standby server and the server that starts as Main (see Define the Transfer Interval and Transfer Timeouts).
- Use the Duty Mode check box to enable or disable Duty Mode for the connection between the Permanent Standby server and the Main server (see Enable or Disable Duty Mode).
- Configure the settings for the connection(s) between the Permanent Standby server and the Standby server by repeating steps 3-7 inclusive, only this time using the Standby B column of fields instead of the Standby A column. The Standby B column of settings work in exactly the same way as the Standby A settings except that they apply to the server that starts as Standby.
-
NOTE: If you are adding a Permanent Standby server to a Triple Standby architecture, you can only configure it to connect to the Main server and one of the two Standby servers. The Permanent Standby server will only connect to the server that starts as Main and the specific Standby server you define—it will not connect to the other Standby server.
- Use the Miscellaneous tab to define the Heartbeat Timeout as required (see Multi-Server Connection Poll Requests).
- Restart the Permanent Standby Server to apply the changes (see Restart the ClearSCADA Server).
Use the Standby A column to define the settings for the primary connection between the Permanent Standby server and the Main server.
When you have configured the Permanent Standby Server, it will be able to recognize the server that starts as Main and the server that starts as Standby (in the case of Triple Standby architectures, it will be able to recognize one of the two servers that start as Standby).
But for the Permanent Standby server to be fully incorporated into your system architecture, you should also: