ClearSCADA includes several default Historic Views that can be used to provide applications with access to historic data. However, you may need to create new Historic Views that provide either or both of the following:
- A different type of calculated historic value.
- A historic value that has been calculated over a different period of time.
For example, you may need to create a Historic View that provides monthly average values.
To create a Historic View:
- Run the Server Configuration Tool (see Accessing the ClearSCADA Server Configuration Tool).
- Expand the SQL Query Configuration branch of the tree-structure.
- Select Historic Views.
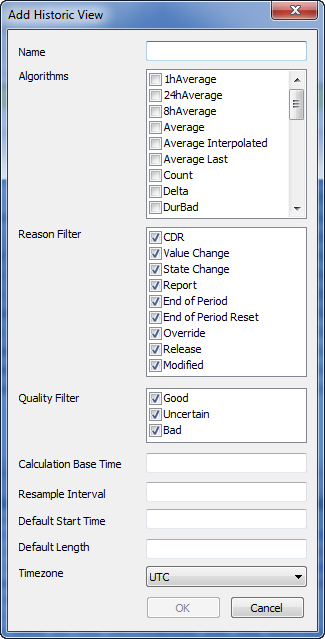
- Right-click on the background of the historic views list, and then select the Add option to display the Add Historic View window.
-

- Enter the name of the Historic View in the Name field. We recommend that the name indicates the time span and type of calculation, for example, HisDailyAverage.
-
NOTE: The Name can only consist of alphanumeric characters as this will be the name of a table in the database.
- Use the Algorithm combo box to select the type of calculation that is to be performed on the values in the historic result set (see Algorithms for Historic Views).
- Select the check boxes for those reasons that are to be included in the calculation.
- Each raw value that is logged has a reason for logging. The reason can be:
- CDR—The value was reported during current data retrieval (CDR).
- Value Change—The value was reported as it has changed from its previous value.
- State Change—The value was reported as there has been a change of state.
- Report—The value was reported as a report has been generated.
- End of Period—The value was reported for the end of period (see End of Period in the ClearSCADA Guide to Core Point Configuration).
- End of Period Reset—The value was reported for the end of period. It indicates that the period has been reset so the next value is likely to be lower (see End of Period in the ClearSCADA Guide to Core Point Configuration).
- Override—The value was reported as it is an override value.
- Release—The value was reported as an override has been released.
- Modified—The value was reported as it is a modified value (changed manually by a user).
- When you choose to include a reason, those raw values that have that reason are used in the calculation for the historic view. The values that have reasons that you exclude from the view are not included in the calculation.
- Use the Quality Filter setting to specify whether the Historic View uses values with Good, Bad, or Uncertain quality in its calculations. You can choose a single quality, two qualities, or all three depending on your requirements.
- By default, Historic Views use historic values with all three types of quality. This ensures that the Historic View table contains values that are representative of values that were reported by a device.
- You can choose to include or exclude any of the quality types as required. For example, you may want the values in a Historic View to be calculated using only Good quality values.
- If your system uses advanced drivers that have the Log Historic Value on Communication Failure feature, we recommend that you exclude Bad quality from the Quality Filter. This is because there may be ‘extra’ bad quality values relating to loss of communications which can cause undesirable results in the Historic View. For more information, see Quality Filter for Historic Views.
- Enter a suitable time interval in the Calculation Base Time field (see Calculation Base Time for Historic Views). This determines whether the start time of the historic result set is rounded down to a second, minute, hour, day, or week.
- Define how often the algorithm calculation is performed in the Resample Interval field (see Resample Interval for Historic Views).
- Define the start of the historic result set in the Default Start Time field (see Default Start Time and Length for Historic Views).
- Define the duration of the historic result set in the Default Length field (see Default Start Time and Length for Historic Views).
- Use the Timezone combo box to choose the appropriate time settings. You can choose from:
- UTC—Uses Coordinated Universal Time. The times of the values will be the UTC times of the values as they were reported. No time conversion takes place.
- Local Time (No DST)—Uses the local time settings of the client or server that is requesting the historic data. The time of the values as they were reported is converted into the appropriate time for the local machine but Daylight Saving Time is not taken into account.
- This is the appropriate setting for systems that span areas that use the same time settings, such as mainland Europe.
- Local Time (Use DST)— Uses the local time settings of the client or server that is requesting the historic data. The time of the values as they were reported is converted into the appropriate time for the local machine and Daylight Saving Time is taken into account.
- This is the appropriate setting for systems that span areas that use different time settings, for example, this setting would be suitable for a system that had clients in northern, southern, eastern, and western states of the USA.
- For more information on time zone settings, see Time Zone Support in ClearSCADA in the ClearSCADA Guide to Core Configuration.
- Select the OK button.
The Add Historic View window is closed, and the new Historic View is added to the list of Historic Views on the Historic Views section. - Right-click on the system icon in the tree-structure, and select the Apply Changes option to apply the changes.