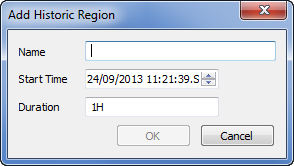
Each Historic Region defines a time period and is allocated a name. The historic data and event messages that were logged during the defined time period are available online and will not be deleted.
When defining a Historic Region, you need to specify:
- Name—A name for the Historic Region. Each Historic Region requires a unique name.
- Start Time—The start of the time period that is represented by the Historic Region. This includes the date and time.
- Duration—The length of the time period represented by the Historic Region. This is a time entry defined in the OPC standard format.
To create a Named historic region:
- Access the ClearSCADA Server Configuration Tool, (see Accessing the ClearSCADA Server Configuration Tool).
- Expand the Database Configuration branch.
- Select Historic Regions.
- Right-click on the background of the list of historic regions.
A context-sensitive menu is displayed.
- Select the Add option to display the Add Historic Region window.

- Complete the following fields:
- Name—enter a unique name for the Historic Region. We recommend that the name is meaningful, as operators will use it to identify the historic region on Trends and Historic/Events Lists.
- Start Time—use the combo box to define the date and time at which the historic region begins. Only data that was logged after the defined start time and date will be included in the Historic Region. For information on specifying a different date or time to that shown, see Specifying the Required Entry in a Date and Time Field in the ClearSCADA Guide to Core Configuration.
- Duration— enter the amount of time to be represented by the Historic Region. Enter the required interval in the OPC Time Format. You can enter the value directly in the field to specify the required value.
The Historic Region will include historic and event data that was logged after the Start Time and before the end of the Duration. For example, if the Start Time is 6/26/02 11:00 and the Duration is 1H, the Historic Region will include historic/event data that was logged between 11:00 and 12:00 on 26th June 2014.
- Select the OK button to close the Add Historic Region window.
The Historic Region is added to the list of Historic Regions on the Historic Regions section.
When the historic region settings are applied, users will be able to use the region to:
- Display the data for a specific Historic Region on a Trend
- Filter Historic Lists
- Filter Events Lists
- Right-click on the system icon in the tree-structure, and select the Apply Changes option to apply the changes.
Now that you have created a historic region, you can either proceed to configure other Historic settings (see Historic Configuration Settings) or you can continue with the server configuration.