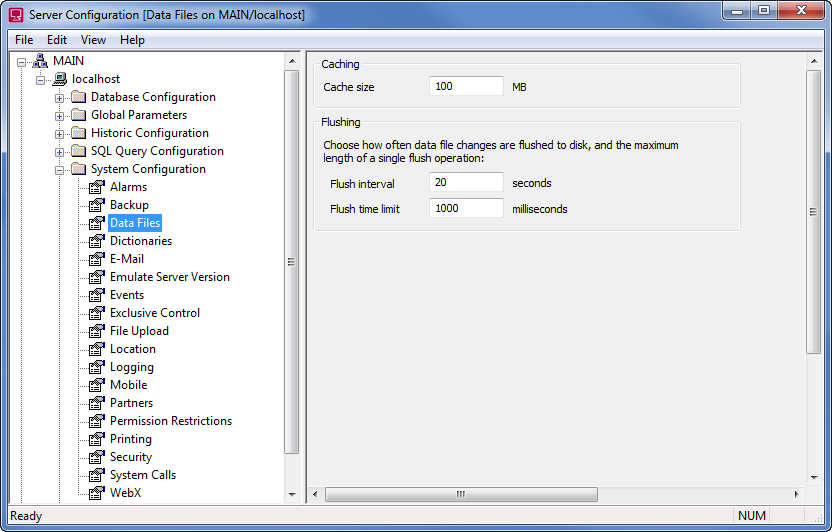
You can use the Server Configuration Tool to define the Caching and Flushing settings for data files.
Data files are special types of file that are used to store the data for a variety of features, including Data Tables. The values within the data files are stored separately from the database.
When a Data Table is displayed, the data that is required for that grid is loaded from the relevant data file into memory. When the Data Table is closed, the data remains in memory until it is purged. If changes have been made to the data while it was in memory, the data is flushed to disk so that the changes are stored in the data files.
The amount of memory that can be allocated for use with data files is called the data file cache. By using the Server Configuration Tool, you can define the amount of memory for the data file cache. The system will use this limit to determine when older data files are to be purged from memory. For example, if the data files cache is set to 1Mb, the system will allow 1Mb worth of data files to be loaded into memory. When the amount of data files requested exceeds the 1Mb limit, the system will start to purge the oldest data files from memory to allow room for the latest requested data files. This means that it is possible to exceed the data cache limit—system performance will be slower if the limit is exceeded.
You can also use the Server Configuration Tool to configure the time limit for data file flushing. Flushing is the term used to describe the process of writing the changes made to the data file values in memory back to the data files on disk.
During flushing, the system checks the data used by the Data Tables for changes. If any changes have been made to the data while it has been stored in memory, the system will flush the changes from memory back to the data files on disk. This helps to keep the data files up to date and accurate. If the system is unable to complete the flushing process within the defined flushing limit, it will remember where the previous flushing process ended and continue from that position at the beginning of the next flush.
Typically, the default Caching and Flushing settings are appropriate. However, you may want to change the settings if:
- Your system is experiencing slow performance as a result of the cache limit being consistently exceeded. You can view the cache status by accessing the status information for the Data File Cache (see Data File Cache in the ClearSCADA Guide to the Server Status Tool).
- There are a high number of files that are waiting to be flushed (as the flush process is too infrequent or too short)
- The flush process is taking a long time to complete.
To define the Data File Caching and Flushing settings:
- Access the ClearSCADA Server Configuration Tool (see Accessing the ClearSCADA Server Configuration Tool).
- Expand the System Configuration branch of the tree-structure.
- Select Data Files
-

- In the Data Files section, use the fields to define the caching and flushing settings as follows:
- Cache Size—Enter the maximum amount of memory to be allocated for use with data files. When the Cache Size limit is reached, ClearSCADA will attempt to start to remove the oldest data file data from memory (the data file data will still be stored in the data files). Typically, the default setting of 100Mb is appropriate, but you may need to increase the amount of memory allocated to the Cache size if your system experiences slow performance due to the limit being consistently exceeded.
- Flush Interval—Enter the amount of time, in seconds, between each flush. The default setting of 20 seconds is usually appropriate, but you may need to decrease this amount if a high number of files are not being flushed. Alternatively, you may need to increase this amount if the flushing causes slow performance (frequent flushing can cause high CPU usage).
- Flush Time Limit—Enter the total amount of time, in seconds, permitted for the flushing process. If a flush is incomplete at the end of the defined time limit, the next flush will continue from the previous position. So, if at the end of the first flush, 75% of the files have been flushed, at the start of the next flush, the server will begin to flush the remaining 25% of the files.
- Right-click on the system icon in the tree-structure and select the Apply Changes option to apply the changes.
Further Information
Location of Data Files: see Locations of the Database Folders.