You can use the ClearSCADA Status Tool to define the log file settings for simple drivers and any advanced drivers that are currently running.
To change the log file settings for an advanced driver that is not currently running, please contact customer support. This is because to change the log file settings for non-running advanced drivers, you will need to adjust the driver registry settings.
ATTENTION: Only change the driver registry settings with expert guidance from Schneider Electric customer support. Making incorrect changes could result in system instability or the driver not being able to run.
To change the logging settings for a simple driver or an advanced driver that is running:
- Run the Server Status Tool (see Run the Server Status Tool in the ClearSCADA Guide to the Server Status Tool).
- Select the Status option to display the ClearSCADA Server Status Tool.
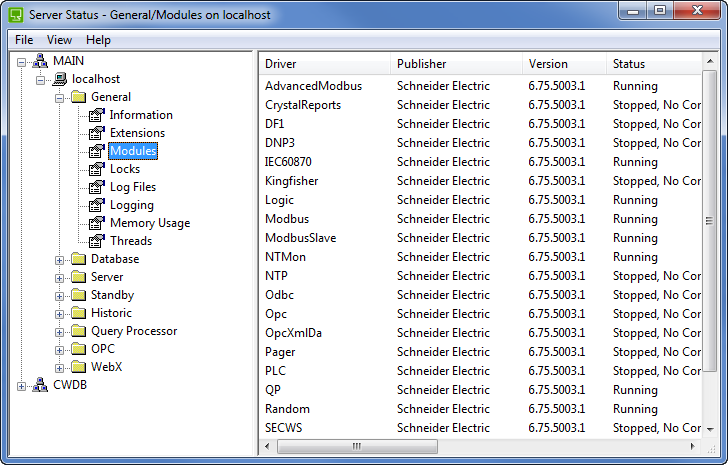
- Expand the General folder then select Modules.
-

- The Modules section lists the ClearSCADA drivers (some of which may not be installed on your system).
- Right-click on the driver for which you want to setup logging.
A context sensitive menu is displayed. - Select the Logging option.
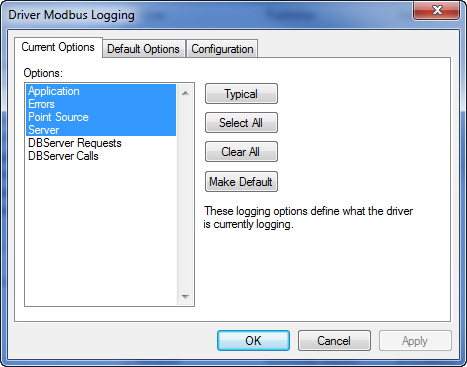
The Logging window for the driver is displayed. -

- Use the Current Options tab to temporarily change the logging options for the driver. The driver will revert back to the default logging settings the next time it starts. You can change the logging options by selecting or deselecting them in the Options list or you can use the buttons as follows:
- Typical—Selects the logging options that are usually required by the driver.
- Select All—Selects the entire range of logging options for the driver. Normally, certain logging options should be disabled as they fill the log files very quickly. If you attempt to enable such a logging option, ClearSCADA will display a message prior to enabling the option.
- Clear All—De-selects all of the logging options for the driver. By selecting the Clear All button, you empty the log file for the driver.
- Make Default—This button sets the currently selected Options as the default options. These options will be used by default when the driver is restarted. If you select this button, the settings on the Current Options tab are copied to the Default Options tab.
- Use the Default Options tab to change the logging options that are used each time the driver starts. These options will become the current options the next time the driver starts.
- As with the Current Options tab, you can select the various logging options manually from the Options list or you can select one of the buttons. The Make Current button works in a similar way to the Make Default button except that it copies the options on the Default Options tab to the Current Options tab.
- Use the Configuration tab to setup the logging for the driver:
- Select/clear the Enabled check box to enable/disable logging for the driver.
- Use the Browse button for the File Base field to set the location of the driver's log files.
- Define the Maximum size of each file to limit the possible size of each log file.
- Define the Maximum number of files to limit the amount of individual driver log files that can be stored simultaneously.
- Define the Number of old files to keep to limit the number of sets of driver log files that can be stored.
- Enter the number for the TCP/IP port in the Telnet Port field.
- If you use a fixed port for the Telnet server, you should enter the number of the port. You should use 'registered ports' in the range 1024 to 49151 inclusive (for more information, see http://www.iana.org/assignments/port-numbers).
- If you set the port number to 0, the operating system will allocate a new port each time the driver is restarted—you will need to determine which port the operating system has allocated each time you need to monitor a driver. You can view the port numbers that have been allocated by the operating system by examining the Telnet Port column in the Modules display of the ClearSCADA Server Status Tool (or Diagnostics web page on the web interface).
- You also need to specify a Telnet Port when a firewall is being used—you need to specify the port so that it can be opened on the firewall.
- For more information on Telnet, see Telnet Monitoring.
- Select the Apply button to apply the changes or select the OK button to apply the changes and close the Logging window.
Further Information