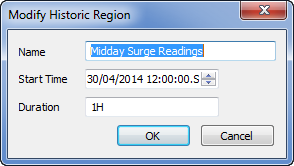
You can change the settings of an existing Historic Region so that it has a different:
- Name
- Start Time
- Duration
This is especially useful when you need to increase or reduce the amount of historic data included in a Historic Region.
To edit an existing named Historic Region:
- Access the ClearSCADA Server Configuration Tool, (see Accessing the ClearSCADA Server Configuration Tool).
- Expand the Database Configuration branch.
- Select Historic Regions.
- Right-click on the background of the list of historic regions.
A context-sensitive menu is displayed. - Select the Modify option to display the Modify Historic Region window.

- Use the Modify Historic Region window to adjust the settings as required. The settings are identical to those on the Add Historic Region window (see Create a Named Historic Region).
- Select the OK button to close the Modify Historic Region window and confirm the changes.
- Right-click on the system icon in the tree-structure, and select the Apply Changes option to apply the changes.
Now that you have modified a historic region, you can either proceed to configure other Historic settings (see Historic Configuration Settings) or you can continue with the server configuration.