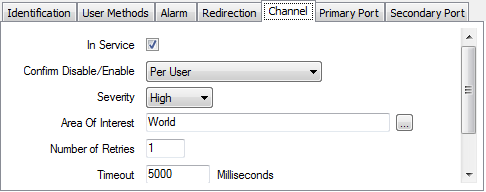
Use the fields on the Channel tab of the appropriate Channel Form to configure the basic communication properties for a channel.
The following fields are displayed for channels on many simple drivers:

- In Service—Use to specify whether the channel is active or inactive (see Placing an Item In Service in the ClearSCADA Guide to Core Configuration).
NOTE: If you later take a channel out of service, its scanners and their dependents (such as points and/or pulse actions) also become out of service. This does not affect the configuration of these items.
- Confirm Disable/Enable—Use to specify whether a confirmation dialog box is displayed whenever a user requests that the channel be disabled (taken Out of Service) or enabled (placed In Service). See Disable Channel and Enable Channel in the ClearSCADA Guide to Drivers.
For further information, see Requesting Confirmation of Action Requests in the ClearSCADA Guide to Core Configuration.
- Severity—Use the combo box to define the priority of any alarms or events that are associated with the channel (see Defining Severities in the ClearSCADA Guide to Core Configuration).
- Area of Interest—If the Area of Interest feature is enabled on your system, an additional Area of Interest field is displayed on the Channel tab. Use the field to specify the area with which any of the Channel’s alarms or events are to be associated (see Assign a Different Area of Interest to an Item’s Alarms and Events in the ClearSCADA Guide to Core Configuration).
For further information on the Area of Interest feature, see Restrict Alarm and Event Access to Specific Areas of Interest in the ClearSCADA Guide to Core Configuration.
- Number of Retries—Enter the number of times that the ClearSCADA server will attempt to request data from each scanner that is using this channel.
If a scanner does not respond to the ClearSCADA server’s initial data request, the server makes a further request (referred to as a ‘retry’). The server can repeat a data request up to the defined number of Retries.
If the scanner does not report its data within the defined number of retries, the ClearSCADA server will regard the scanner as having failed.
Enter the required number of retries.
- Timeout—Enter the number of milliseconds that the server is to wait before attempting a ‘retry’. This delay is used to stop a retry from occurring immediately (as an immediate retry is likely to be unsuccessful for the same reason as the previous attempt).
The default setting of 5000 milliseconds is suitable for most systems.