NOTE: This topic describes how to modify a 'block' of values on a Historic Trend. For information about modifying a single value on a Historic Trend, see Modify a Value on a Historic Trend.
You can change the values of a range of markers on a historic Trend. This is useful when a set of values that has been recorded historically over a period of time is not representative of normal conditions. For example, you may want to modify a range of historic values if the recorded values are inaccurate due to equipment malfunction.
To modify a range of values on a historic Trend:
- Right-click in the main display area on the Trend.
A context-sensitive menu is displayed. - Select the Modify Range of Values option.
The cursor changes shape. - Position the cursor next to the range of values that you want to modify.
- Press and hold down the left-hand mouse button and drag the cursor over the range of values that you want to modify.
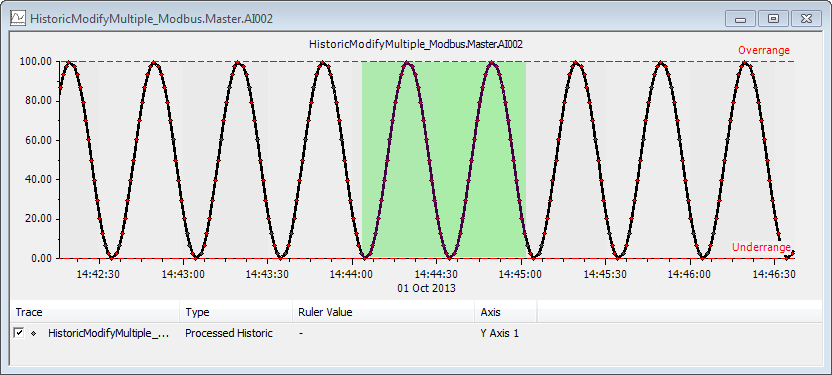
A highlight shows the region of the Trend that you have selected.
- Release the left mouse button to confirm the selection.
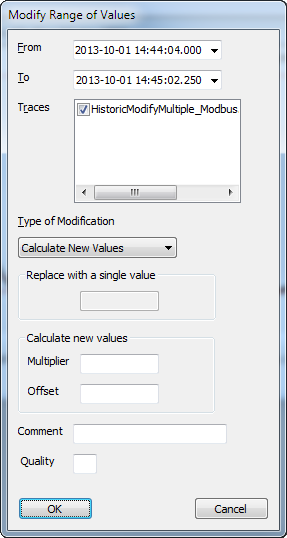
The Modify Range of Values window is displayed.
- The From and To fields indicate the start and end date and time of the range of values that you have selected on the Trend. To alter the selected range, adjust the date and time entries to those that are required. For information on specifying a different date or time to that shown, see Specifying the Required Entry in a Date and Time Field in the ClearSCADA Guide to Core Configuration.
The range that you specify does not need to start or end at the actual time for which a historic value exists. Instead, ClearSCADA applies the modification settings to those values that exist within the range that you specify.
- The Traces field lists the traces that the Trend contains.
If the Trend contains just a single trace, the trace is selected by default.
If the Trend contains multiple traces, select the trace(s) for which you want to modify the values. Check marks indicate the traces that are selected.
Clear the check marks from any traces for which you do not want to modify the values.
- Use the Type of Modification combo box to specify how ClearSCADA is to modify the selected values. Choose from:
- Replace with a Single Value: ClearSCADA is to replace each value in the selected range with the same modification value, regardless of any variation in value that currently exists in the selected range.
- Calculate New Values: ClearSCADA is to replace the values in the selected range with new values that are determined by performing a calculation on the existing values.
- If you specified the Replace with a Single Value option in step 8:
- In the Replace with a Single Value field, enter the value that is to replace the selected range of trace values.
If you specified the Calculate New Values option in step 8:
- Use the Multiplier field to specify the amount by which each of the selected values should be multiplied.
Specify1 if you do not want ClearSCADA to apply a different multiplier.
- Use the Offset field to specify the amount that ClearSCADA should add or subtract from the resulting scaled value to produce the modified value that is to be used in place of the original value.
Specify0 if you do not want to apply an offset.
Example:
The following settings are specified in the Calculate new values section of the Modify Range of Values window:
Multiplier: 2.5
Offset: 20This results in ClearSCADA performing the following calculation on the range of historic values that are selected for modification:
(<Existing Historic Value> x 2.5) + 20
So, for example, ClearSCADA converts the historic value 3.57 to the modified value 28.925 (by performing the calculation (3.57 x 2.5) + 20).
- If required, use the Comment field to enter a brief explanation about why the selected range of recorded values are being modified.
The Comment is included in the message that is logged in the Event Journal when the selected trace values are modified.
ATTENTION: Each entry in the Event Journal includes a 'Message' component that describes the activity that caused ClearSCADA to generate the event (see Understand Events Lists in the ClearSCADA Guide to Lists). The 'Message' component is limited to 256 characters in length. For Event Journal entries that ClearSCADA generates due to historic values being modified, the 'Message' includes any Comment and Quality that are specified as part of the modification criteria. If the length of a Comment results in the 'Message' component exceeding its 256-character limit, ClearSCADA truncates the Comment to accommodate this limit. When truncating a Comment, ClearSCADA takes into account the other elements of the 'Message' component to determine the truncation that is required. This is to allow the other elements, including the Quality, to be included in the Message. With an Event Journal that contains Messages that are in English, this typically means that a Comment might get truncated at around 100 characters.To help avoid Comments from being truncated, keep Comment text meaningful but concise.
- If required, use the Quality field to enter the number that indicates the 'quality' that is to be associated with the modified records. Enter the relevant Quality value in the range 1 to 100.
The Quality is included in the message that is logged in the Event Journal when the selected trace values are modified.
ATTENTION: The Quality number is completely independent of the OPC Quality status attribute that is used elsewhere in ClearSCADA to indicate the reliability of an item's data.
- Select the OK button to confirm the modification settings and replace the selected range of trace values with modified values according to those settings.
ClearSCADA modifies the selected trace values according to the settings that you have specified in the Modify Range of Values window. Additionally, ClearSCADA logs a message in the Event Journal for each historic value that it has modified according to those settings.NOTE: On systems on which a Comment and Quality are mandatory, the OK button remains 'grayed out' and unavailable for use until those fields have been populated.
Further Information
Configure system-wide Comment and Quality requirements: see Specify Whether a Comment and Quality are Mandatory when Modifying Values on a Historic Trend in the ClearSCADA Guide to Core Configuration.