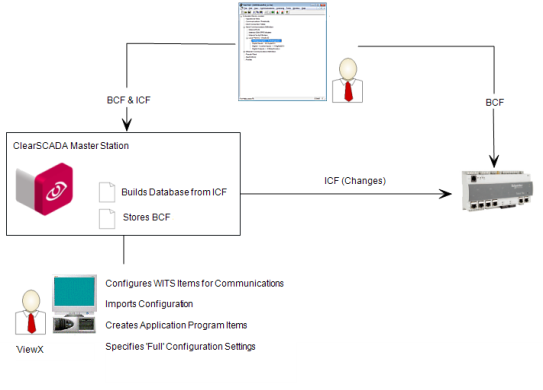
The full configuration of a Field Device can be quite large, in some cases over 100KB. This can make downloading or uploading configuration impractical on a slow or unreliable connection. In many cases, it is the size of the bulk configuration file that causes the full configuration to be large. (The size of the bulk configuration file is determined by the Field Device manufacturer and may be affected by certain settings being used).
To avoid downloading the bulk configuration file, you can load it into the Field Device and then import it into ClearSCADA. This will mean that only the incremental configuration changes made in ClearSCADA need to be downloaded to the Field Device.
You can then use ClearSCADA to apply the rest of the configuration settings, and download them in an incremental configuration file. The incremental configuration produced by ClearSCADA only contains the changes to the configuration.
NOTE: The same process can also be applied to application programs, (if your Field Device allows you to load application programs locally).
The strategy is also a possible option if your Field Device does not support configuration upload.
In the diagram below, BCF is the bulk configuration file and ICF is the incremental configuration file.

NOTE: This strategy describes using a 'regular' bulk configuration file that is used by one Field Device. If your Field Device supports template bulk configuration files and you want to use ClearSCADA's Group Templates feature, see Using Group Templates with WITS Field Devices.
-
Using the Field Device's Configuration Application, enter the minimum configuration (define the points for the Field Device and configure the vendor-specific settings). Load the configuration into the Field Device.
- Log on to ViewX via a user account that has the Configure permission, and create and configure the Pre-Requisite Configuration for WITS Field Devices (WITS Device Profile, DNP3 Channel(s), DNP3 Outstation Set, WITS Outstation).
- Transport the bulk configuration and matching incremental configuration file to a location that is available to a ViewX client.
- In ViewX, import the configuration files into the ClearSCADA database. (Right-click on the Outstation item that represents the Field Device, and then select the Import Configuration action).
When the dialog box appears, browse to the Bulk Configuration File and its matching Incremental Configuration File (created by the Field Device Configuration Application) and import them. For more information, see Import Configuration.
-
In ViewX, use the configuration Forms for the various WITS database items to apply the settings you require for your Field Device.
For more information, please refer to the documentation for the various WITS items (listed at the bottom of this topic).
- Create Time Profiles for any profiles used by your Field Device (see Configuring Time Profiles in the ClearSCADA Guide to Core Configuration).
-
Create and configure WITS Application Program items for each application program used by the Field Device. (Select Create New and then select DNP3 and then select WITS and then select WITS Application Program). For each Application Program, use the Import Program action to import the appropriate application program file.
For more details, see Configuring a WITS Application Program.
- Download the configuration to the Field Device by using the Outstation item's Download Configuration (WITS Outstation) action.
Further Information
WITS Outstations: see Configuring a WITS Outstation
Configuring a WITS Application Program
Configuring a WITS Analog Point
Configuring a WITS Binary Point
Configuring a WITS Counter Point
Configuring a WITS Firmware Image
Configuring a WITS Integrator Point
Configuring a WITS Maximum Point
Configuring a WITS Minimum Point
Configuring a WITS No Change Point
Configure a WITS Pulse (NULL) Action
Configure a WITS Pulse (Trip-Close) Action
Configuring a WITS Rate of Change Point